Mach E mirror cap removal?

Deleted member 4170

Guest
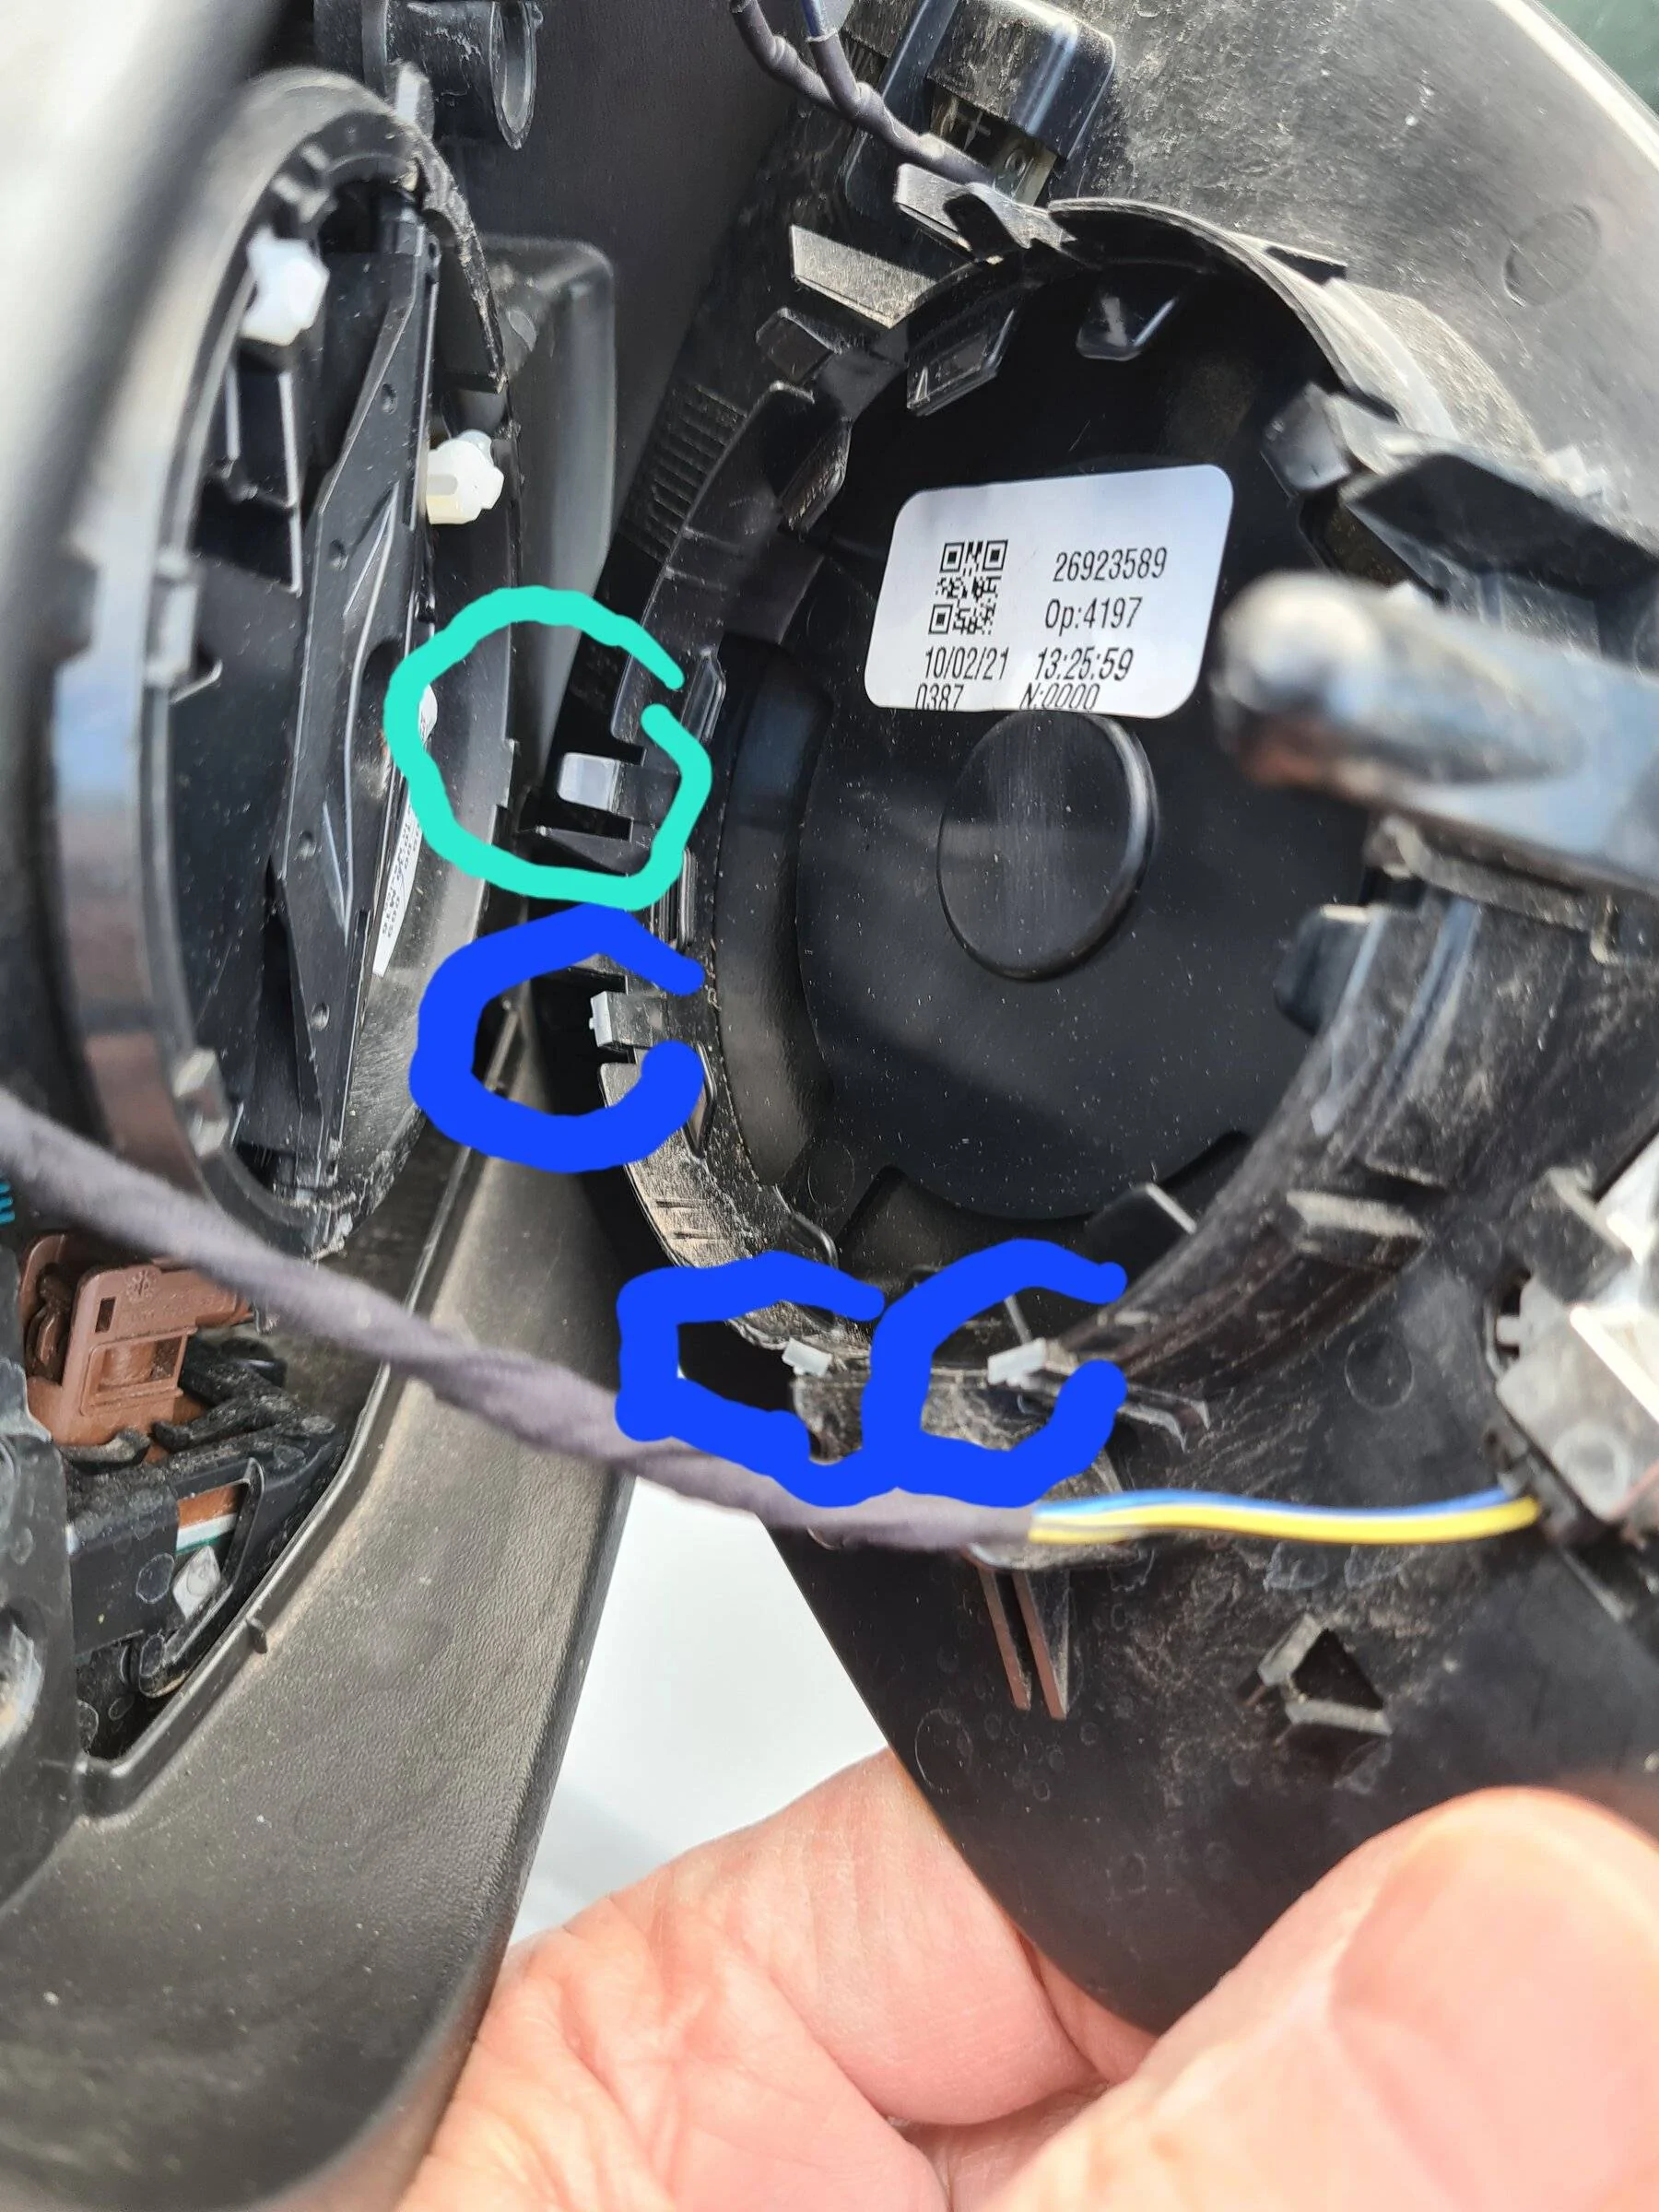
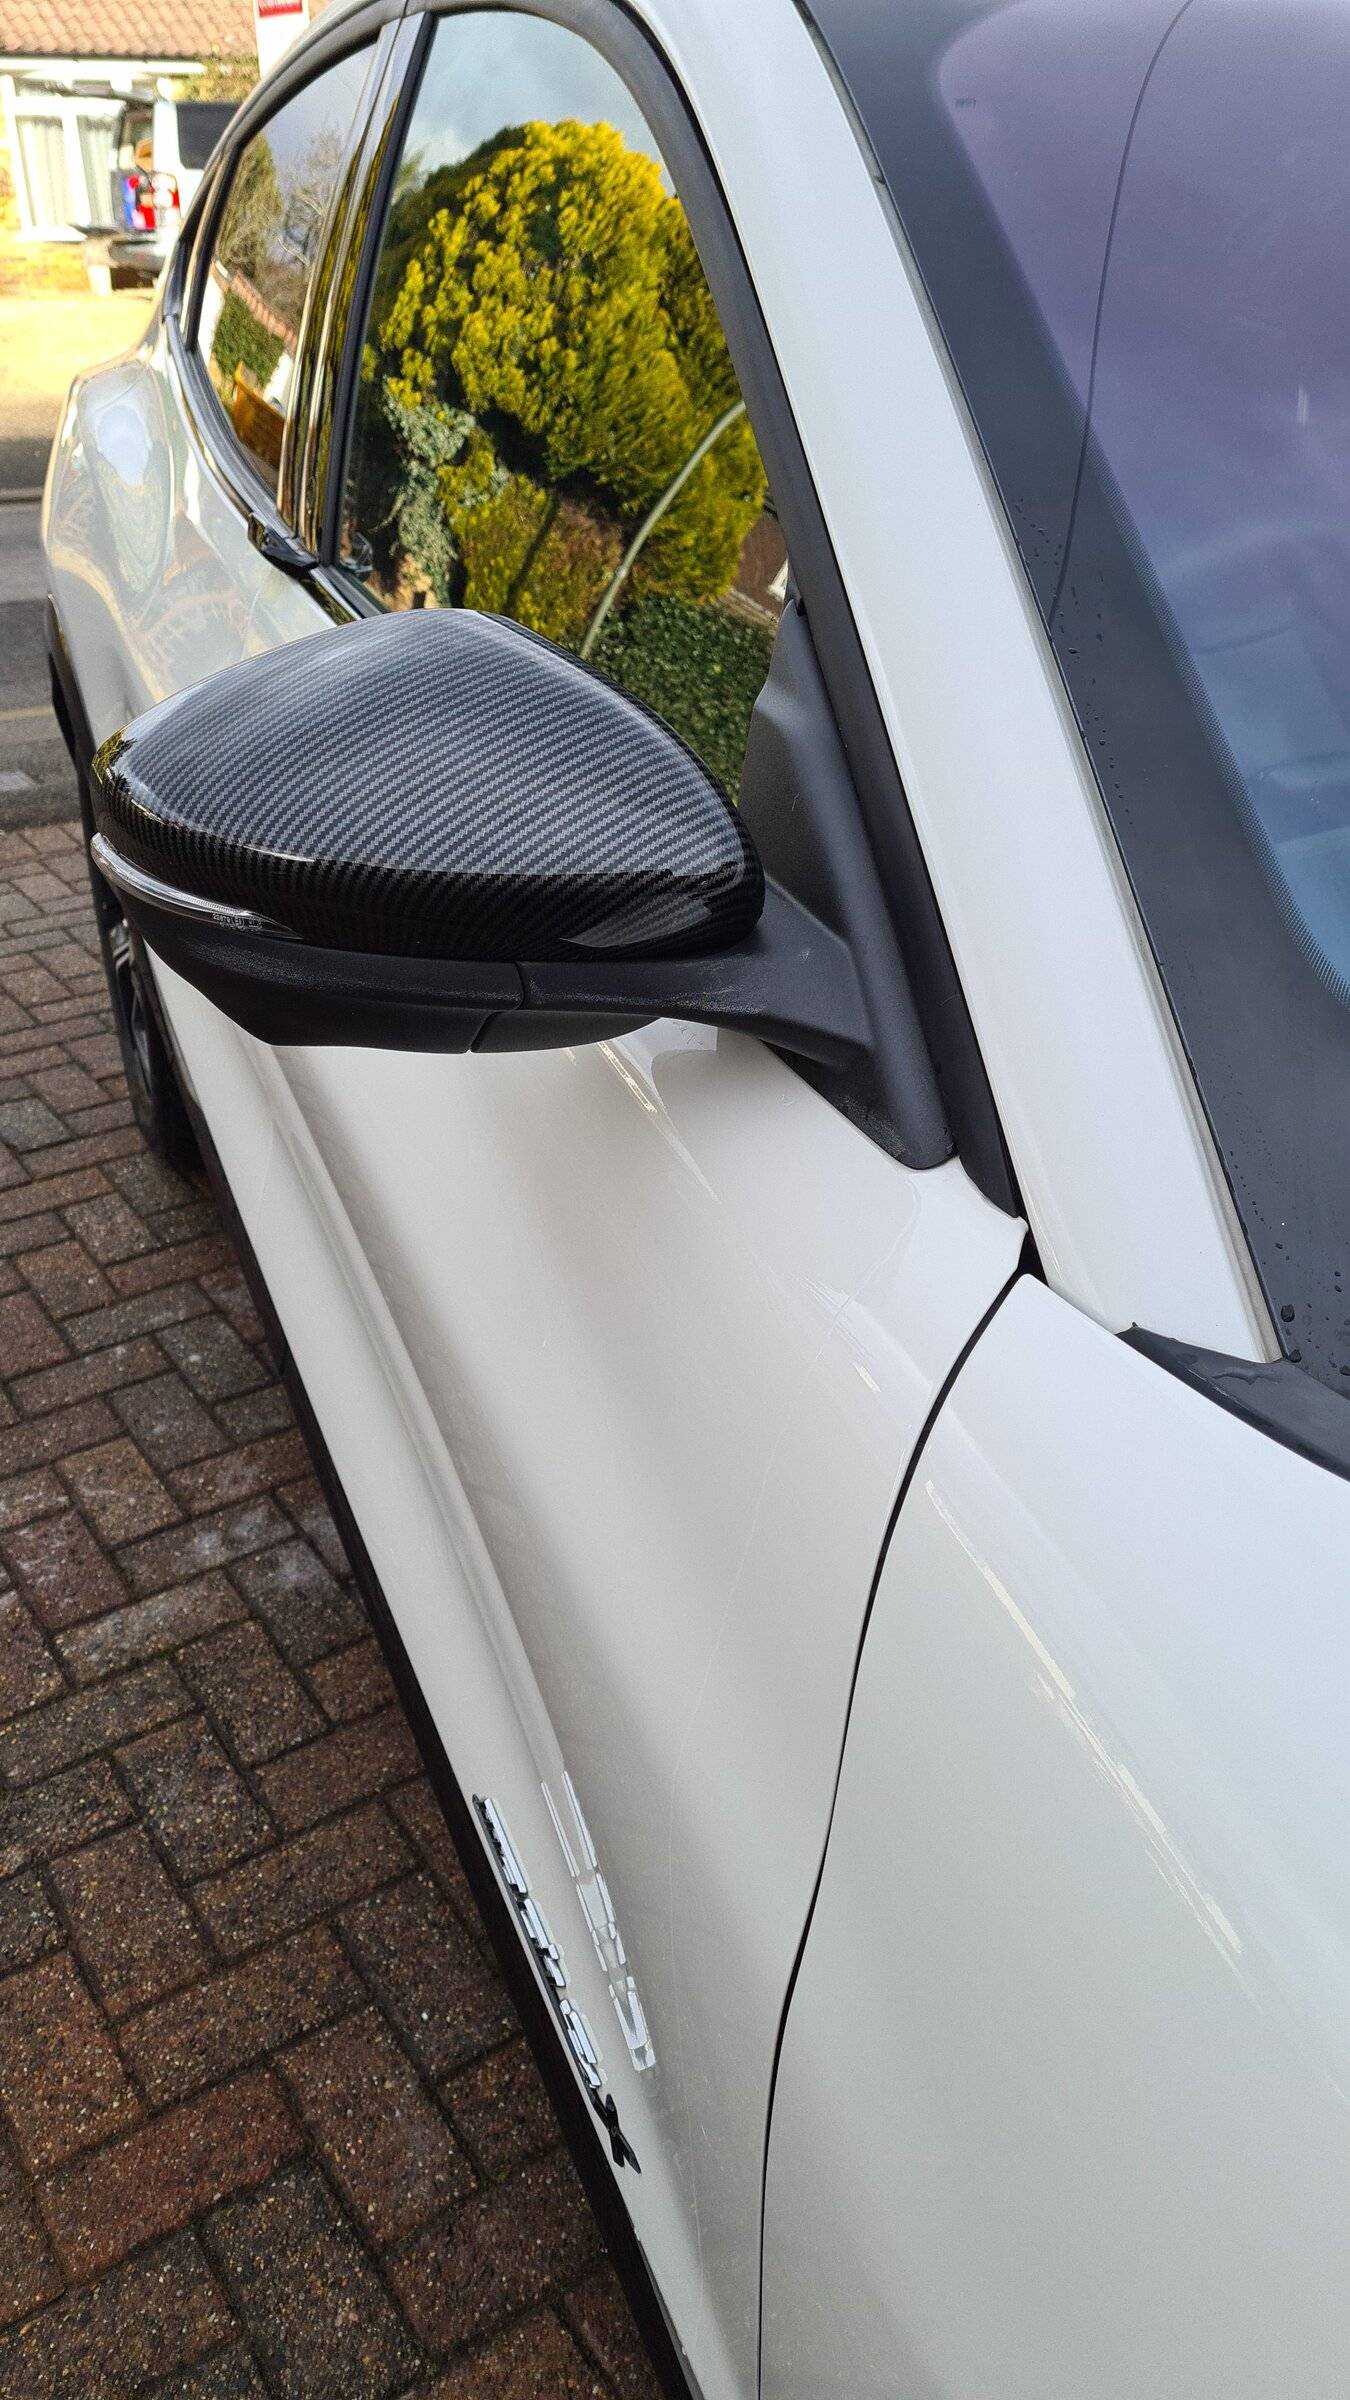
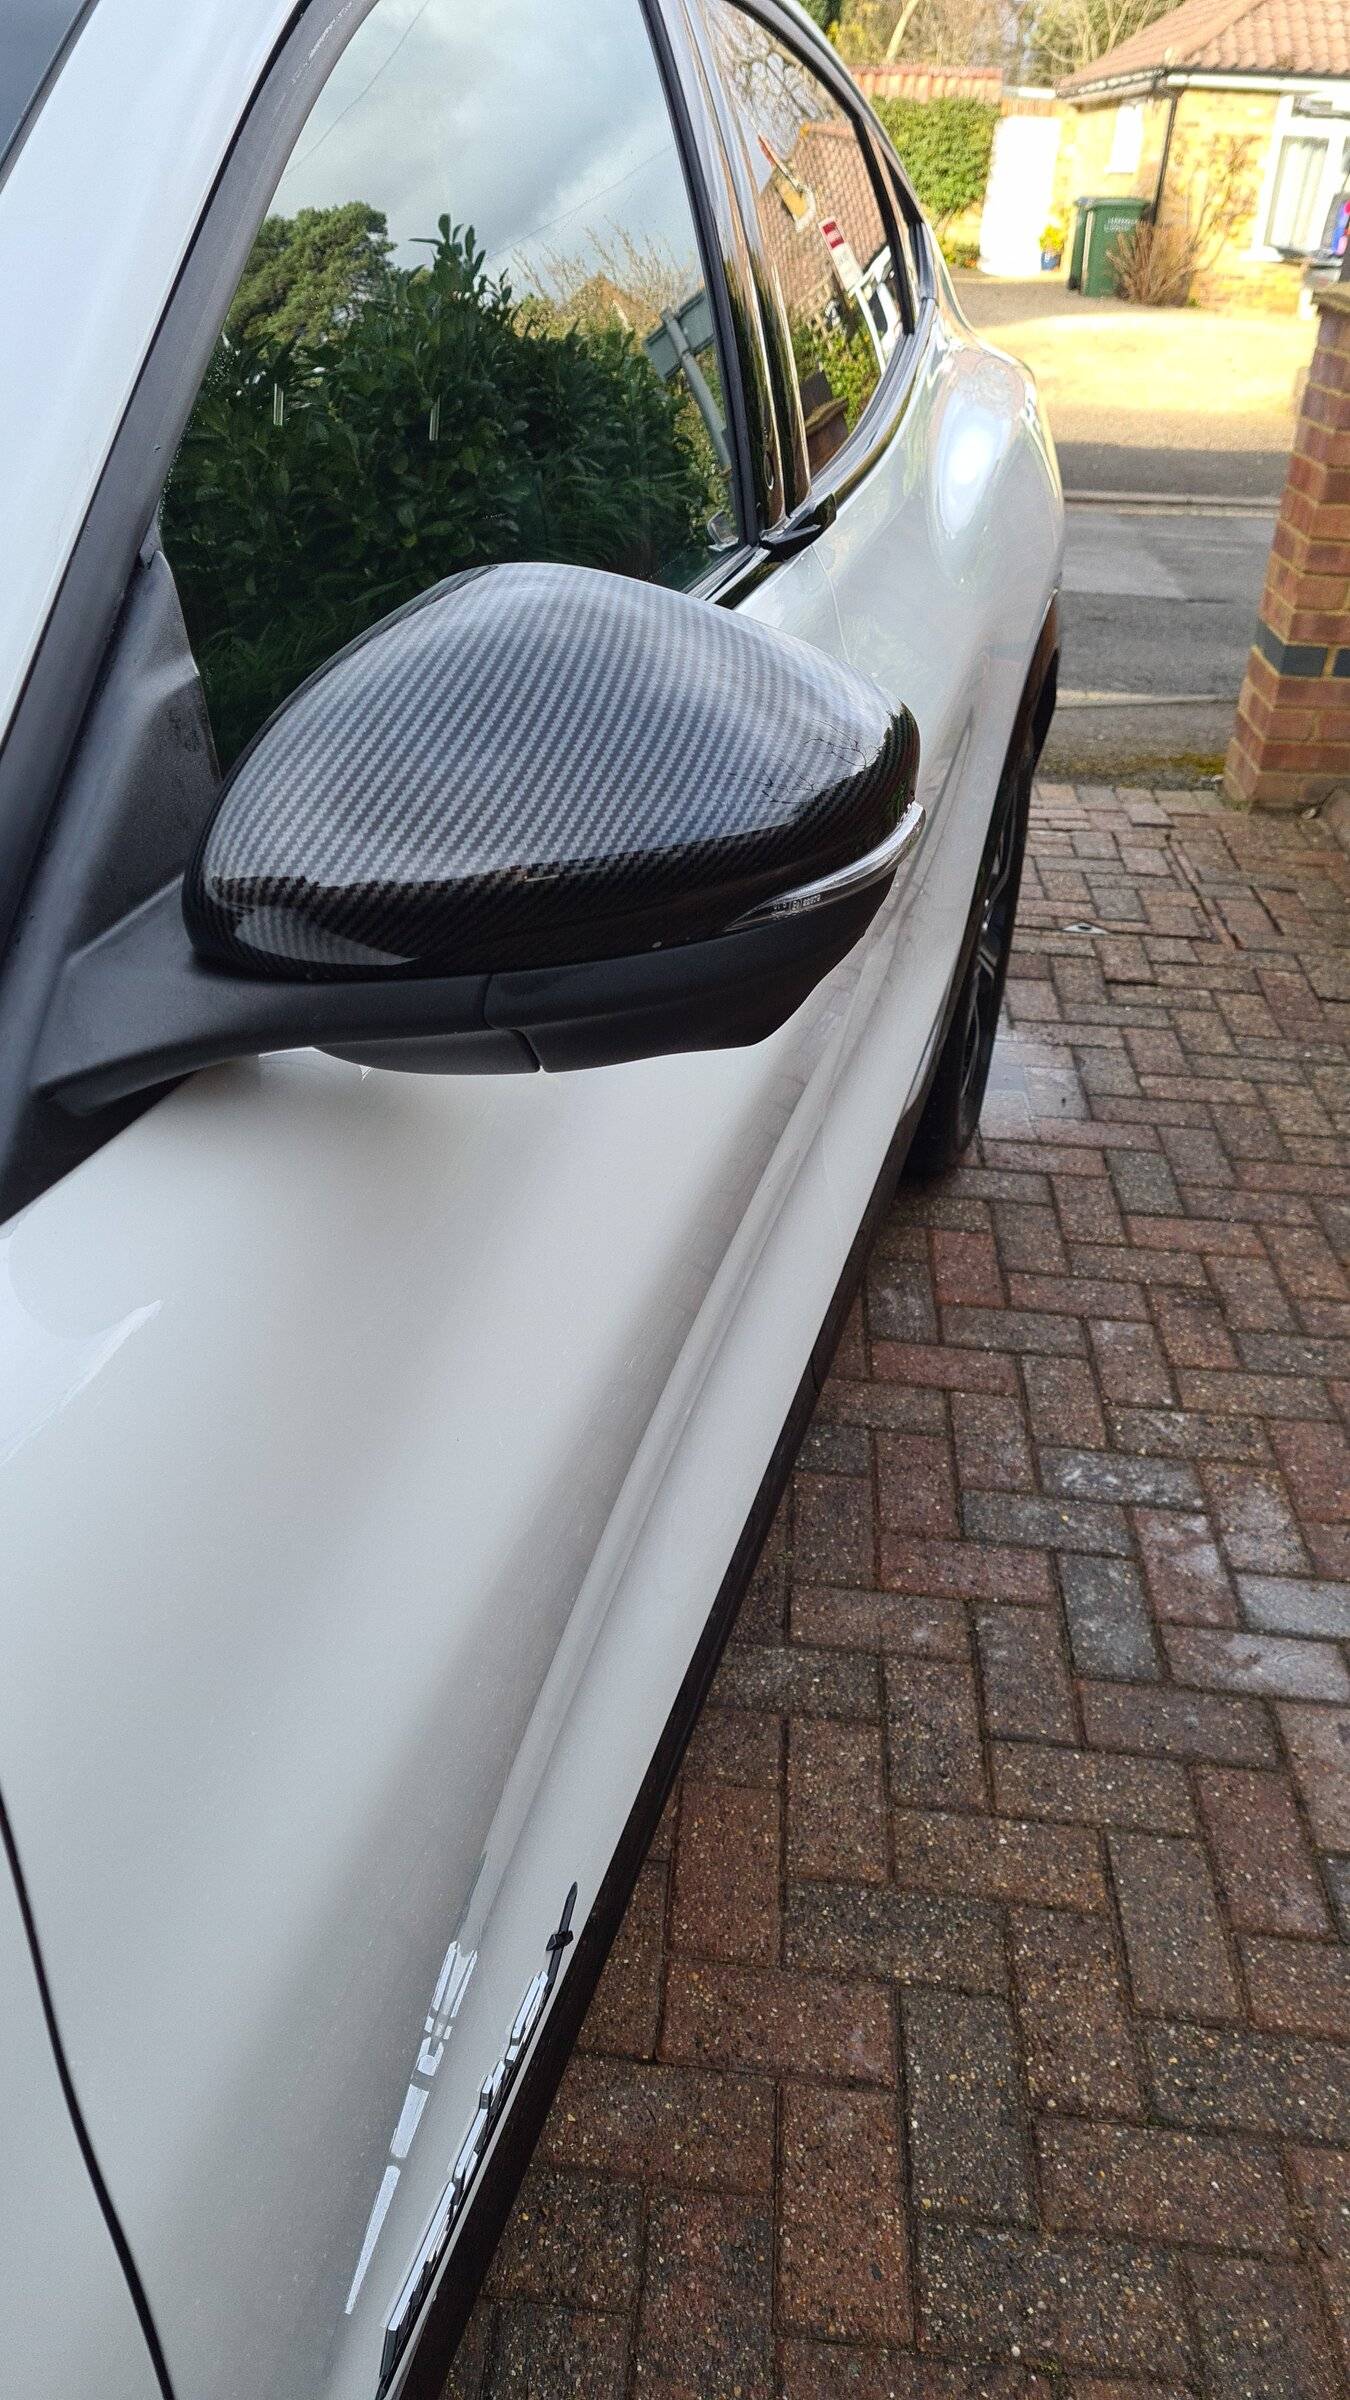
Does anyone know or has video of how to remove the mirror caps?
There don't appear to be any screws behind the mirror glass but do appear to be a couple of small plastic clips which I wonder if they are holding the cap on?
Would appreciate any images etc of how the caps are secured?
On a previous car I had you pulled the mirror out to access plastic clips but don't know how Ford fix these and don't want to break the mirror trying that.
Cheers
Sponsored


TRP

Well-Known Member
First Name
Tim
Joined
Jun 23, 2021
Threads
77
Messages
1,264
Reaction score
1,456
Location
37841
Vehicles
Mach E P4x, Ford F150
Country flag
I too need to know this. I have a driver side mirror turn signal with a rock chip in that I need to replace.......whenever the replacement shows up :rolleyes:
 
OP
OP

Deleted member 4170

Guest
Thanks for that detail, must say more than I thought to do. As this detail is to remove everything, do you know if you have to do all of those to just remove the mirror cap? It looks like you may be able to access the tabs once the glass is off and not remove the motor etc.
If anyone does this can they post a video or photos please?


TRP

Well-Known Member
First Name
Tim
Joined
Jun 23, 2021
Threads
77
Messages
1,264
Reaction score
1,456
Location
37841
Vehicles
Mach E P4x, Ford F150
Country flag
Thanks for that detail, must say more than I thought to do. As this detail is to remove everything, do you know if you have to do all of those to just remove the mirror cap? It looks like you may be able to access the tabs once the glass is off and not remove the motor etc.
If anyone does this can they post a video or photos please?
If my turn signal ever shows up I'll report back. Not going in there without the part after reading the instructions. Once and done for me
 

MachTee

Well-Known Member
First Name
Andy
Joined
Jun 9, 2021
Threads
5
Messages
368
Reaction score
574
Location
USA
Vehicles
MME Premium Infinite Blue SR AWD
Country flag
This is great. Did you get this from a repair manual? If so, where can we get one?
Yes, but I'm not sure the person I got it from would want me to post it. I'm going to assume no.
 

MyLittlePony2022

Well-Known Member
First Name
William
Joined
Jul 17, 2021
Threads
37
Messages
798
Reaction score
808
Location
SF Bay Area, California
Vehicles
2022 "Mach-E Auto" GTPE, Cyber Orange
Country flag
Yes, but I'm not sure the person I got it from would want me to post it. I'm going to assume no.
Bummer. I was hoping that it could be purchased from Ford. The aftermarket (i.e. Chilton) companies usually do not have them available for a few years after the car was made. I will start a new thread to see if anyone can point me to manual that can be purchased.
 

miata

Well-Known Member
First Name
Bill
Joined
Nov 20, 2021
Threads
0
Messages
82
Reaction score
42
Location
california
Vehicles
miata, towncar, highlander
Occupation
engineer
Country flag
Yes, but I'm not sure the person I got it from would want me to post it. I'm going to assume no.
Any update on when one might be "legally" available?
 

method93

Well-Known Member
Joined
Nov 24, 2021
Threads
2
Messages
70
Reaction score
82
Location
Philadelphia
Vehicles
2022 Premium Standard Range Rapid Red
Country flag
Anyone can purchase a subscription to Fords Collision Repair site:

https://www.motorcraftservice.com/

From there you can get all kinds of repair procedures including mirror removal. $22 for 72hrs of access should give you plenty of time for hunting for goodies (caliper removal, bumper removal etc…)

Good luck!
 
OP
OP

Deleted member 4170

Guest
Bummer. I was hoping that it could be purchased from Ford. The aftermarket (i.e. Chilton) companies usually do not have them available for a few years after the car was made. I will start a new thread to see if anyone can point me to manual that can be purchased.
Just removed my mirror caps and had them carbon fiber finished. Warning - it seems it is impossible to pry out the mirror glass as the instructions without some of the retaining tangs snapping off! No matter how carefully I eased the mirror out I lost some on each side. Maybe warmer weather would be better? Blue circles broken, green one as it should be.
However if just removing the cap it may be possible with a slim pair of mouse nose pliers to ease the cap clips out with mirror tilted down instead. Start with the clip nearest vehicle.
Good luck, very pleased with carbon fiber finish :cool:

Ford Mustang Mach-E Mach E mirror cap removal? 20220209_184931


Ford Mustang Mach-E Mach E mirror cap removal? IMG-20220209-WA0004


Ford Mustang Mach-E Mach E mirror cap removal? IMG-20220209-WA0002
 

cbcasas

Well-Known Member
First Name
Christopher
Joined
Jun 8, 2022
Threads
10
Messages
321
Reaction score
157
Location
Southern California
Vehicles
2024 Premium
Country flag
Opened up my mirror to investigate a 360 camera issue with these instructions and reseated all the cables. Put the mirror together and it’s now throwing PDM code C1B15-15 which is for the memory recall. Something must be up with the wiring in my mirror :(
 

Penguin

New Member
First Name
John
Joined
Jan 7, 2023
Threads
0
Messages
1
Reaction score
1
Location
Alhambra, CA
Vehicles
2022 Mustange Mach-E Premium w Extended Battery
Country flag
Thanks for posting this about the mirror and the fragile tabs! I think you saved me from breaking the tabs on my mirror...

I recently removed the skull cap on my passenger side mirror to replace the turn signal light in the mirror. With respect to making sure the tabs on the mirror don't break, there are four pairs of them around the mirror. I printed some hooks to insert under the tabs before using a screwdriver on the center part to disengage the tabs. What they don't tell you in the manual is that you need to reposition the mirror to access the other tabs.

I was able to remove my mirror and keep all the tabs intact. I started with the bottom tabs and had to reposition my mirror in order to be able to access the tabs. There are 4 pairs of tabs around the mirror: 1 pair on the top inside, 1 pair on the top outside, 1 pair on the bottom inside, and 1 pair on the bottom outside.

The manual says to position the mirror to the top inside. This gets you access to the bottom outside tabs. I didn't find this to be the best set of tabs to pop first. What I did follows.

What you'll need:
2 flathead screwdrivers
2 right angle spudgers or hooks for prying (I 3d printed some right angle hooks...2 right angle screwdrivers should also work)

I printed some hooks to be able to insert under the tab before using a screwdriver to pop the tabs open. You can also use right angle screwdrivers to lift the tabs away from what they're clipped to before inserting a flathead screwdriver.

I started with the bottom inside (closest to the car) set of tabs so instead of having the mirror positioned as in the manual, I had the mirror looking all the way out and up. That gave me access to the bottom inside set of tabs.

Put the hooks or right angle screwdrivers in under the tabs and lift them up slightly. Once you have the tabs slightly pulled up, there is a wedge point built-in between the tabs to insert a flathead screwdriver. Insert the flathead screwdriver into that point and twist - it will wedge the tabs away from the fastening point and the tabs will pop off.

Note: They will re-clip when you remove the screwdriver so don't remove it. Let it dangle so the wedge point pinches the screwdriver tip and holds it in place.

Now, adjust the mirror to the inside just enough so that you are able to access the bottom outside set of tabs. Turn the mirror just enough so that the dangling screwdriver stays wedged in the mirror and doesn't get knocked off by the mirror rim of the mirror case. Leave the screwdriver wedged in between the bottom inside tabs. Use a second flathead screwdriver to wedge out the bottom outside tabs.

Repeat the process for hooking and wedging the tabs for the bottom outside tabs holding the mirror.

When you get the outside bottom tabs separated, the other bottom tabs will also disengage and the bottom of the mirror will be loose. This also releases the tension from the top tabs so you'll be able to unhook the top tabs without having to wedge a screwdriver into them.

Now the mirror will be off and you can remove the wiring and torx screws as shown in the manual pictures earlier in this post. The skullcap fasteners are really easy to reach once the mirror is off.

Note: when I removed my mirror, I found that only 3 of the 4 torx screws were there. The factory had left the top inner screw out.

It took maybe 20 minutes to figure out how to hook everything, and then about 10 minutes to get everything unfastened once I'd figured it out.

Hope that helps anyone trying to get the mirror glass removed!

Ford Mustang Mach-E Mach E mirror cap removal? Screen Shot 2023-01-13 at 5.04.46 PM


Ford Mustang Mach-E Mach E mirror cap removal? Screen Shot 2023-01-13 at 5.13.09 PM
 

EV_Vida

Well-Known Member
First Name
Simon
Joined
Sep 25, 2022
Threads
1
Messages
60
Reaction score
53
Location
San Diego
Vehicles
Mach E CR1
Country flag
Thanks for posting this about the mirror and the fragile tabs! I think you saved me from breaking the tabs on my mirror...

I recently removed the skull cap on my passenger side mirror to replace the turn signal light in the mirror. With respect to making sure the tabs on the mirror don't break, there are four pairs of them around the mirror. I printed some hooks to insert under the tabs before using a screwdriver on the center part to disengage the tabs. What they don't tell you in the manual is that you need to reposition the mirror to access the other tabs.

I was able to remove my mirror and keep all the tabs intact. I started with the bottom tabs and had to reposition my mirror in order to be able to access the tabs. There are 4 pairs of tabs around the mirror: 1 pair on the top inside, 1 pair on the top outside, 1 pair on the bottom inside, and 1 pair on the bottom outside.

The manual says to position the mirror to the top inside. This gets you access to the bottom outside tabs. I didn't find this to be the best set of tabs to pop first. What I did follows.

What you'll need:
2 flathead screwdrivers
2 right angle spudgers or hooks for prying (I 3d printed some right angle hooks...2 right angle screwdrivers should also work)

I printed some hooks to be able to insert under the tab before using a screwdriver to pop the tabs open. You can also use right angle screwdrivers to lift the tabs away from what they're clipped to before inserting a flathead screwdriver.

I started with the bottom inside (closest to the car) set of tabs so instead of having the mirror positioned as in the manual, I had the mirror looking all the way out and up. That gave me access to the bottom inside set of tabs.

Put the hooks or right angle screwdrivers in under the tabs and lift them up slightly. Once you have the tabs slightly pulled up, there is a wedge point built-in between the tabs to insert a flathead screwdriver. Insert the flathead screwdriver into that point and twist - it will wedge the tabs away from the fastening point and the tabs will pop off.

Note: They will re-clip when you remove the screwdriver so don't remove it. Let it dangle so the wedge point pinches the screwdriver tip and holds it in place.

Now, adjust the mirror to the inside just enough so that you are able to access the bottom outside set of tabs. Turn the mirror just enough so that the dangling screwdriver stays wedged in the mirror and doesn't get knocked off by the mirror rim of the mirror case. Leave the screwdriver wedged in between the bottom inside tabs. Use a second flathead screwdriver to wedge out the bottom outside tabs.

Repeat the process for hooking and wedging the tabs for the bottom outside tabs holding the mirror.

When you get the outside bottom tabs separated, the other bottom tabs will also disengage and the bottom of the mirror will be loose. This also releases the tension from the top tabs so you'll be able to unhook the top tabs without having to wedge a screwdriver into them.

Now the mirror will be off and you can remove the wiring and torx screws as shown in the manual pictures earlier in this post. The skullcap fasteners are really easy to reach once the mirror is off.

Note: when I removed my mirror, I found that only 3 of the 4 torx screws were there. The factory had left the top inner screw out.

It took maybe 20 minutes to figure out how to hook everything, and then about 10 minutes to get everything unfastened once I'd figured it out.

Hope that helps anyone trying to get the mirror glass removed!

Screen Shot 2023-01-13 at 5.04.46 PM.png


Screen Shot 2023-01-13 at 5.13.09 PM.png
Do you have the stl for the hooks you can share?
Sponsored


Top