Hammered

Well-Known Member
Joined
Oct 4, 2022
Threads
26
Messages
1,299
Reaction score
1,154
Location
SE US
Vehicles
2022 PB F150, MME GTPE
Country flag
Are you just piggy backing your little JBL amp after the OEM amp? Or are you eliminating the OEM amp and using the PAC. I have not been keeping up on what you are doing. I've been in suspension mode lately, not audio mode. 😊
Right now it's in the F150, full speaker swap, factory sub still in there while working on the box. (D5.1300 going in w/ 2 10TW3s when box is done)

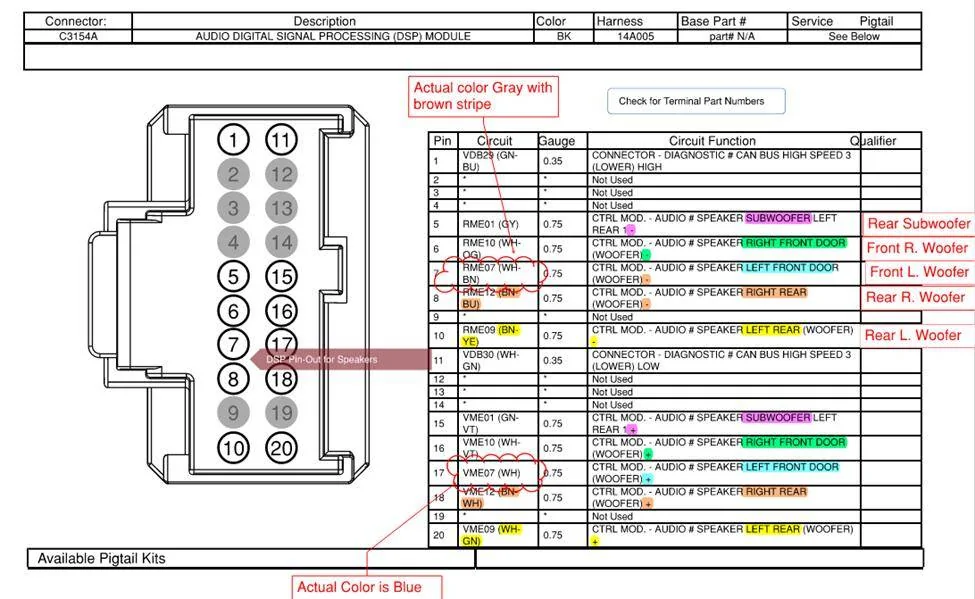
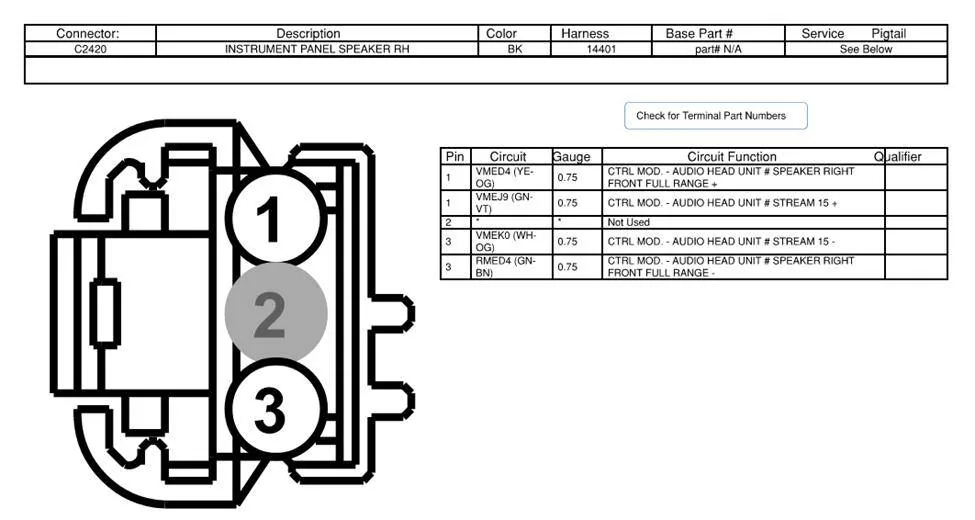
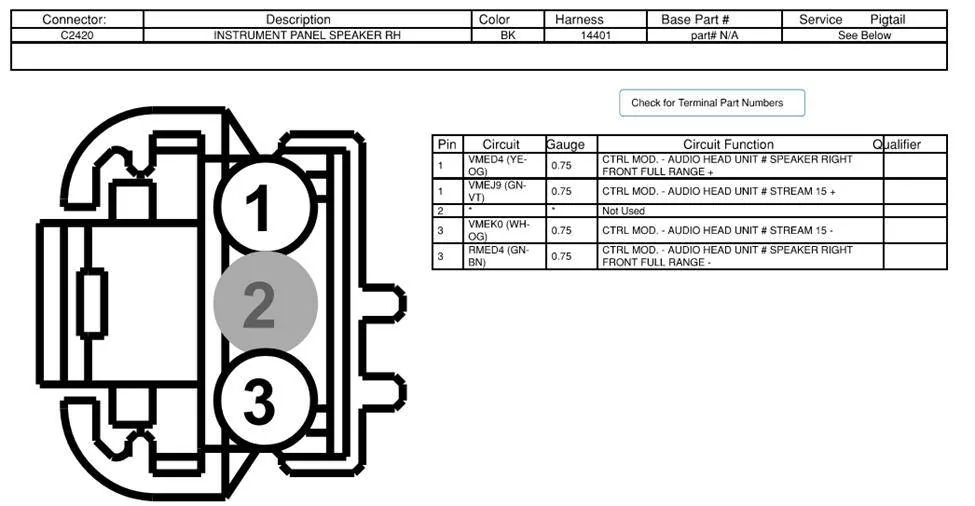
I will then run 3 pairs of wires to the front of the MME to tap into the factory wiring for the tweets and dash (pac has the tap-in harnesses w/ it). I'll then swap in the amp 1:1 and tune it to the MME (as B&O is only 8 amplified channels) -- the PAC goes in place of the factory amp, going to tap its power feed for the amp itself as the factory circuit is enough based on bench power draw results. I believe the factory system isn't driver biased, so there will be a difference based on timing from the DSP. I don't yet have a spectrum analyzer / mic, so I'll tune it to ear w/ various music to see how it is.
Sponsored

 
OP
OP
MyLittlePony2022

MyLittlePony2022

Well-Known Member
First Name
William
Joined
Jul 17, 2021
Threads
34
Messages
753
Reaction score
737
Location
SF Bay Area, California
Vehicles
2022 "Mach-E Auto" GTPE, Cyber Orange
Country flag
@Hammered That sounds great. With a DSP you should be able dial it in and set up the delays for optimum sound for the driver. I believe you said you were going to install a Audio Controls DSP. I was doing the same but with amp with DSP. One less piece of equipment to take up space. The Audio Controls DSP should be able set up several setting so you can set up speaker for the driver, passenger, back seat, etc. I was going to a configuration for me and then a neutral one for both me and my wife. I was thinking of buying the remote to connect which allows me to switch the setting and control the bass setting from the front. Just need to figure out where to put it so it can be easily reached but is not somewhere where it looks like crap. Cannot wait to hear about the final install.
 

ElectrikPony

Well-Known Member
First Name
RANDY
Joined
Jan 23, 2022
Threads
26
Messages
336
Reaction score
235
Location
California
Vehicles
None yet
Country flag
Just currious what you folks are going to replace the center channel speaker with/power it with? It's 3" just for reference.
 

markboris

Well-Known Member
First Name
Mark
Joined
Nov 13, 2019
Threads
26
Messages
2,739
Reaction score
5,769
Location
Sonora, CA
Vehicles
_______ '20 Shelby GT500 FPB '21 Mach-E GTPE IS
Occupation
Retired
Country flag
Just currious what you folks are going to replace the center channel speaker with/power it with? It's 3" just for reference.
The first thing I do is disconnect the center speaker in my cars. It messes up whatever stereo separation and imaging you attempt to get. The only center speaker I ever use is the one in a home theater system.


ElectrikPony

Well-Known Member
First Name
RANDY
Joined
Jan 23, 2022
Threads
26
Messages
336
Reaction score
235
Location
California
Vehicles
None yet
Country flag
Right now I am testing various 10” and 12” subs with various amps in the Mach-e. One thing has been apparent is I can almost completely cut 75hz and below from the Mach-e speakers (all around ) and it makes no difference to the imaging. All the bass is coming from the back of the car and my ears can detect it. Exactly the opposite of what you want. I can see why folks say just adding a sub makes it sound great. If you don’t want any midbass coming from any of the door speakers than yes it sounds good.

Those textile tweeters sound good for how low quality material they use.

it would be an interesting test to see if you just replaced the front doors 6.5” and added more power if that would suffice.

this is all anecdotal, I don’t have my RTA and microphone here right now.

@markboris any literature say how many ohms the 6.5” door speaker is ? How many watts rms it receives? Or should I just assume from the factory specs all channels are equal wattage ?
 
Last edited:

Hammered

Well-Known Member
Joined
Oct 4, 2022
Threads
26
Messages
1,299
Reaction score
1,154
Location
SE US
Vehicles
2022 PB F150, MME GTPE
Country flag
@ElectrikPony I hooked up the PAC unit when I had FDRS running coincidently as I was doing the latest BCM update on the F150. I did the BCM update and once it finished, it said "New lin bus device detected" and then it installed something automatically and the PAC unit was then showing up and configurable in the APIM's audio tab. I then ran the PAC utility and updated to the latest firmware. I'm not sure if the new lin device procedure would have went ahead anyway, but I found it very interesting that FDRS did all of the work on that front.

Anyway I played with the little JBL connected to the new speakers which only retained the stock center and sub. I was able to get the center to add some really nice fill crossed over between 140 and 600hz w/ 18db curves. Then I unhooked it and plugged in a 10TW3 in JL's small box at 2ohms, reconfigured the DSP to drive both subs and man was that thing cranking! No it wasn't able to do what 2 10s w/ a dedicated amp would do but it'd give it a run for the money between the sealed 10 and the ported factory oblong 8" whatever it is being driven at 60w and 40w respectively.

Thoroughly impressed with the little JBL amp after this evenings 3hr tune-n-play session.
 

Hammered

Well-Known Member
Joined
Oct 4, 2022
Threads
26
Messages
1,299
Reaction score
1,154
Location
SE US
Vehicles
2022 PB F150, MME GTPE
Country flag
So I took the truck up to a car audio shop to see if they had a spectrum analyzer to refine the highs a bit, JL C3 1" tweets are bright. At first the owner thought I was screwing with him based on what he was hearing. I had 2 profiles in the amp already, one that'd use the factory center, or with a quick wire swap the JL 10TW3 could be added along w/ the factory sub as changing around the config is as easy as selecting the other profile after swapping the wires around (factory sub remained on channel 8, JL 10 in the little JL box could easily swap into channel 7 as the entire thing is connected via spade terminals). He then went inside and ordered 10 of the amps 🤣
 

markboris

Well-Known Member
First Name
Mark
Joined
Nov 13, 2019
Threads
26
Messages
2,739
Reaction score
5,769
Location
Sonora, CA
Vehicles
_______ '20 Shelby GT500 FPB '21 Mach-E GTPE IS
Occupation
Retired
Country flag
@markboris any literature say how many ohms the 6.5” door speaker is ? How many watts rms it receives? Or should I just assume from the factory specs all channels are equal wattage ?
Sorry Randy, just now saw this. Been a little busy and I don't always look at my alerts.

There is no literature from Ford in the service manual what impedance the speakers are or how much power they will handle. At one point in my Premium I think I measured the speaker to have around 4 ohms but I could be wrong. That was a couple of years ago. I have no idea how much power they can handle but I can tell you the B&O amp is very wimpy. I temporarily fixed that and gave the system a small boost. #366
 
Last edited:

curtisfinney

Well-Known Member
First Name
Curtis
Joined
Dec 16, 2022
Threads
2
Messages
147
Reaction score
94
Location
Minneapolis, MN
Vehicles
Volvo V60, Subaru Forestor, 2023 Mustang Mach E
Occupation
Chemical Engineer
Country flag
I was not completely satisfied with the B&O speakers so decided to replace my speakers. My intent is to document in detail the replacement of the speakers for others to use if they to decide to replace their MME speakers. The subwoofer was replaced within a month of me owning the car. I followed the thread @markboris wrote and that was an easy installation. This helped, but I still wanted to replace the rest of the speakers to get even better sound.

Summary: I replaced the dash (not the center) and door speakers (front and rear) with Infinity Kappa 603CF components. The speakers are a 6.5” mid with a ¾” tweeter so they are “direct” replacements. I was looking Morels in addition to the Infinity brand but chose the Infinities since they fit within my budget. The installation did require some modifications and was not a plug and play scenario. The sound quality of the new speakers is better than the OEM speakers, which is to be expected. The caveat being that the OEM digital signal processor (DSP) is tuned to the OEM speakers, so the sound is not optimally configured. I am going to install a six-channel amplifier with DSP. I would recommend the same or at least a DSP to get the best sound from any new speakers being installed.

Full Write-up: I did the installation over a few weekends. I replaced the passenger front door speakers first. I followed the MME manuals to remove the door panel and it came easily, compared to previous car panel removals. I would highly recommend getting a good set of trim removal tools. I bought some cheap ones for $6 on Amazon and they are thin, and the tips flex. I picked up some quality ones from Mobile Solutions. I ordered both sets as quality investment in tools. I also recommend spending some time learning about speaker installation via the great videos on Car Audio Fabrications. I got some great tips and learned about sound deadening.

The front passenger door speaker swap was the test case and my learning curve for the speaker replacement. In addition to new speakers, I also put sound deadening material from Sound Shield on the plastic door panel. The plastic door panel holds the 6.5-inch speaker, the window wires/pulleys and covers the access opening in the door. I also wanted to put sound deadening on the inside of the door. This requires removal of the plastic door panel. I used Sound Shield slim on the plastic door panel and standard inside of the door. I used up all the standard sound deadening, and I still had half a roll of the slim remaining. Going to put down more in the trunk and under the passenger seats with the left over. To get inside the door the plastic panel has to be removed which means disconnecting from the door window. I recommend caution and taking your time, follow the MME manual. Breaking a door window (tempered glass) would not be a good idea. Disconnecting the window from the panel was not difficult (caution if you are not mechanically inclined) and worth the effort, to get sound deadening within the doors. Besides, I got the opportunity to clean the bottom of the window, below the door. It was dirty.

In my research, I knew the front door speaker (6.5 inch mid) was powered by the rear amp and the dash tweeters were powered by the stereo itself. When I replace the OEM amp, with a six channel, I will power the two front channels separately and the rear speakers together. Actually, if you look at the manuals wiring diagram, this is how Ford also powers the speakers. The rear speakers are a single channel.

With the end in mind, I decided to install non-directional capacitors on the front speakers since I will not be using the Infinity active crossover that comes with the speakers. I reached out to Infinity to get the resonate frequency (FS) of the speakers. They do not publish it in their literature, and it did take some effort for them to provide this to me. The tweeter FS is 1850 Hz, so I want to have a capacitor that is to two times the FS. This provides a factor of safety. The capacitor will restrict the base and mid-level frequencies and the tweeter will only see high frequencies. I chose to use a 17-microfarad capacitor since it got me to ~1.7 times FS and it would only allow frequencies above ~3100 Hz to the tweeters. The mid speaker FS was 82.5 Hz so I used a 330-microfarad capacitor to have the base cut off around 160 Hz. When I install the amp with DSP, I can work on the dB slope to ensure that I have frequency overlap and no holes.

The 6.5-inch speaker is a direct replacement, but the OEM has a larger mounting bracket. The Infinity does come with a mounting ring and the three holes “somewhat” line up to mount the bracket to the plastic door panel. However, you have to extend and enlarge the holes, which is the first modification required. A drill, file or Dremel tool will work. I used a stepper drill. I put foam tape between the bracket and the plastic panel and between the bracket and the speaker. This sealed up the many holes on the bracket, created an acoustic seal and should reduce the introduction of unwanted noise.

Mounting the speaker to the bracket and ultimately the car, was the second modification required. The bracket has four holes to mount the speaker. You cannot use a screw with a fender clip. There is no place to put the clip and screwing into the plastic was also not an option. I used metric bolts and nuts instead. The plastic door panel speaker opening is not just a hole but has flaring. A large nut or a long bolt will hit the plastic and prevent the speaker from sitting flat or on center. I had to use M2 bolts and the put them slightly offset/angled. Even with a small bolt size it was a really tight fit. I recommend pulling the plastic panel off to install the speaker on to the panel, instead of doing on the car. This way you can get to the back side of the speaker and adjust the locations of the nuts. I did not like how the speaker/bracket was sitting. I put in another mounting bolt to get the speaker to sit flat, since it was flaring up on side. The depth from the glass to the top of the plastic panel is 2 9/16 inches or 6.4 cm so my speakers were good. The OEM speaker wire is about 20-gauge. I premade 18-gauge wiring harness with the capacitor and a new XT60 bullet connector. I cut off the end of the OEM speaker connector and soldered the new connector in place.

The dash tweeter install was fairly simple. I lifted up the dash speaker cover. Be careful and make sure your tool us between the dashboard and the plastic chrome strip and NOT between the chrome strip and the speaker grill. I did not remove the cover but lifted it to get to the tweeter. The tweeter OEM connector is not long and can be easily dropped down into the dashboard if not careful. I taped the connector to the dashboard until I was ready to add a new connector. I recommend soldering a wire lead to the tweeter OEM dash wire since it is easier to solder. The Infinity tweeter comes with several mounting brackets. They supply a simple cup that fits nicely into the OEM mount from the backside. I put a bead of superglue on the top of the cup and pushed into the OEM mount. The tweeter does fit into the cup snuggly, but I wanted to have it hold in place, so I put in two bolts on the backside of the cup. The tweeter magnet back is open and magnetic, so it held in place by the magnetic connection between the tweeter and the steel bolts. Put the speaker into the new bracket, thread the wires through and then solder the connector onto the end. The opening in the new cup is not wide enough for the capacitor nor connector to pass.

I chose not to replace the center channel speaker. Prior to replacing the speaker, I listened to the system in stereo and surround sound mode. I personally, which is my opinion, do not like the center channel sound. I did find an Infinity replacement speaker, but they are sold in pairs. The center channel opening is around three inches. If you chose to replace this speaker, make sure the new speaker will fit the opening. Otherwise, you will have to increase the opening size.

I did not get to the driver’s door in the same weekend. I got to drive the car with the Infinity speakers on the passenger side and the OEM on the driver’s side. The OEM speaker’s sound loader than the Infinity speakers. However, the Infinity speakers have a better tonal quality and when tuned correctly, will sound better.

I completed the drivers front door exactly as I did the passenger door. I did write down the widths and lengths of cuts I did for the sound deadening on the passenger door so I could precut the driver’s door material ahead of time. I also premade the speaker wire leads ahead of time. This reduced the time for the installation.

The rear doors were a bit more complicated regarding the tweeters. I did the same thing for the rear as with the front for the 6.5-inch speakers and sound deadening. The 6.5-inch speaker bolts also interfere with the mounting to the plastic door panel, so you have to use M2 bolts. I did not have to install a fourth bolt to mount the bracket to the plastic panel. The depth from the glass to the top of the plastic panel is 2 3/8 inches or 6.1 cm.

I did use the Infinity active cross over for this installation and not the capacitors. I do not want to buy an 8-channel amplifier and power each speaker with a separate channel. I am going to use a six channel and power both the rear door speakers via a single channel. Thus, the use of the passive cross over. I could have used the capacitors and I may go that route later when I put in the new amp. Oh, when I put in the new amp, I am going to replace the OEM speaker wire with 18-gauge wire. It is possible, based on my inspection of the rubber boots connecting the door and the body.

The OEM tweeter has to be removed from the rear and not the front. There are tabs that hold it in place and are located on the back of the door panel. I had to just work my way around to gently push the taps to allow it to drop out. The tweeter is held in place to the speaker grill (bracket) with some mild glue and tabs. I had to break the glue loose and open up the tabs. A bit of prying with a screwdriver and the glue will break loose. The Infinity tweeter with the cup will not fit into the OEM bracket without modification. The cup will not sit flat, and the speaker sits too high to allow the cup to contact the bracket. I chose to use a Dremel tool to increase the opening size to allow the speaker to sit within the bracket. I have never been great at using a Dremel tool, so it does not look pretty. Since the opening needed to be large enough to fit the speaker and was not going to be visible, I did not make a huge aesthetic effort nor to ensure it was that round. The Dremel work allows the cup to sit down and the Infinity tweeter cup to sit flat on the OEM bracket. I put a little bit of black RTV in four spots (tack it) to secure the cup and bracket. I than put a bead of RTV on the top to seal the cup and bracket. I was careful to not put a too much RTV and bleed it into the speaker. This now locks in the speaker to the speaker bracket. With the cup and bracket secured in place, the speaker now can be installed in the door panel.

I used the MME manual to get the speaker polarity associated with the wire color. Note that the rear tweeter speaker wire colors are the same on both sides. The tweeter wire is connected to the 6.5-inch speaker wire later in the harness. Since I was using the active cross over and not the individual capacitors, I did not use the tweeter connection and just secured it to an existing harness. The drivers rear 6.5-inch speaker wire is also the same color wiring as the rear tweeters. See below for the speaker wire colors.


1667323414569.png


1667323422232.png


1667323430169.png


A few tips. I taped up all the OEM and new wiring to prevent rattling and noise. I also taped up any items that would rattle such as OEM wiring connectors and the door panel plastic clips. To prevent the door panel clips from rattling, I put a piece of tape over the clip hole, cut a slot in the tape and inserted the clip. That little bit of tape prevents the clip from rattling. I also put foam speaker rings around the 6.5 inch speakers to help seal the speaker to the door panel. The speaker ring kit comes with a pad that sticks on the door behind the speaker. I chose not to install it since I had sound deadening and the door skin was not really flat so it would have had to be cut to fit. I took pictures of the Infinity Kappa speakers and the front and rear all in a row. The rear speakers are not impressive, and Ford must have skimped on them since “they are in the rear.”
Do you know if there is an easy way to just disconnect my center speaker ?
 

markboris

Well-Known Member
First Name
Mark
Joined
Nov 13, 2019
Threads
26
Messages
2,739
Reaction score
5,769
Location
Sonora, CA
Vehicles
_______ '20 Shelby GT500 FPB '21 Mach-E GTPE IS
Occupation
Retired
Country flag
Do you know if there is an easy way to just disconnect my center speaker ?
Yes. Lift up the grill, unscrew the speaker, lift up and remove the connector.
Sponsored


Top