MyLittlePony2022
Well-Known Member
- First Name
- William
- Joined
- Jul 17, 2021
- Threads
- 37
- Messages
- 798
- Reaction score
- 808
- Location
- SF Bay Area, California
- Vehicles
- 2022 "Mach-E Auto" GTPE, Cyber Orange
- Thread starter
- #1
I wanted to share a write up for the installation of an aftermarket amplifier (amp) in my MME GT PE. This will be long one to provide detail. As another source of installation, I also point people to @Bda who did an over the top-quality installation on his MME.
I installed an aftermarket sub (thanks @markboris) the first month I owned the car. It definitely filled a void in the stereo system. I followed Mark’s write up and installed a JL Audio ACP110LG-TW1
I was still not satisfied with the sound, so I started to plan to replace the speakers and amp. I did the research on the how and the what. The speakers went on sale first, so I swapped out the OEM speakers and added sound deadening on the doors. I did a write up on installing speakers.
The next step was dependent up on Crutchfield putting my amp on sale and last month they dropped the price by ~30%. I order an AudioControl (D-6.1200) and the PAC (AP4-FD31). I planned install the amp and the PAC in the same location as the OEM amp (passenger side cargo area rear panel). The PAC connection to the wiring harness connectors in the rear, so it must go there. You could put the amp somewhere else, but I chose to use the OEM space and bracket for the new amp. This was open space and the amp (I measured prior to ordering) fit, so why not put it there. The OEM is amp is 40% the size of the new amp, so fit is a bit tight under the rear trim panel.
The PAC system is an amplifier integration interface and is needed to convert the digital signal to analog for an aftermarket amp. The front door speakers and the rear door speakers (6.5” and tweeter) are powered by the rear OEM amp. The front tweeter and center channel speakers are powered by the headend unit (i.e., the “stereo receiver”) via an analog signal. To powers the dash speakers, a front amp is required, or you can run speaker wires from your new amp. There is an PAC adapter (LPHFD31) to connect to the factor speaker wire harness for the dash speakers to the new amp. This is sold separately and not included in the PAC AP4-FD31. On a side not, @MrLoganRoss had a Mobridge interface installed instead of the PAC. He posted on his install.
I chose to run speaker wires directly from the rear amp to the front dash tweeters. I did not replace the center channel speaker and did not connect it to the new amp. I ran the wire under the carpet, near the floor door sill. There is room in the rear door sill but there is not room in the front door sills to run power or speaker wire. The cables for the front seats T-off and do not allow for pass-through from the rear to the front. I did not run new speaker wire to the rear door speakers or the front door speakers. The door “power plug” for the rear door is easily accessible and can be removed. There is room to drill this out and add speaker wire. I assume the front is the same and has room. However, the front door power plug is hard to get to and I could not remove it, thus the decision to use the OEM speaker wire and not to replace it with a heavier gauge wire. I sure the 16-gauge speaker wire would have added a bit more fidelity to the system and installing speaker wire may be a future endeavor.
The reason I chose my amp was that I wanted more than the 75-watts RMS power for the aftermarket speakers. However, the main reason was that the amp has a digital signal process (DSP) so I could tune the overall configuration and adjust for speaker delay. In addition, it had the preamp outputs to connect to my powered subwoofer and I can adjust and tune the bass via the DSP.
I decided to go a little further with my installation. I know that there might be a topic of debate on it and if I needed this, but I chose to do anyway. I wanted to install exhaust fans to remove the heat created by the amp since it was in the enclosed trim panel in the rear cargo area. I also installed a fan to move air across the amp’s cooling fins. Finally, I installed an adjustable time delay relay (setting P24) that allowed for the fans to turn on via the remote on signal. It will turn on 5 minutes after the remote signal is energized and the fans will stay on for 5 minutes after the signal is loss. As a part of the relay programming, the timing can be adjusted from seconds to minutes. The fans will hopefully reduce the temperature during operation and cool it after is shuts down. Not sure if it will really extend the life but I like to geek out on things like this.
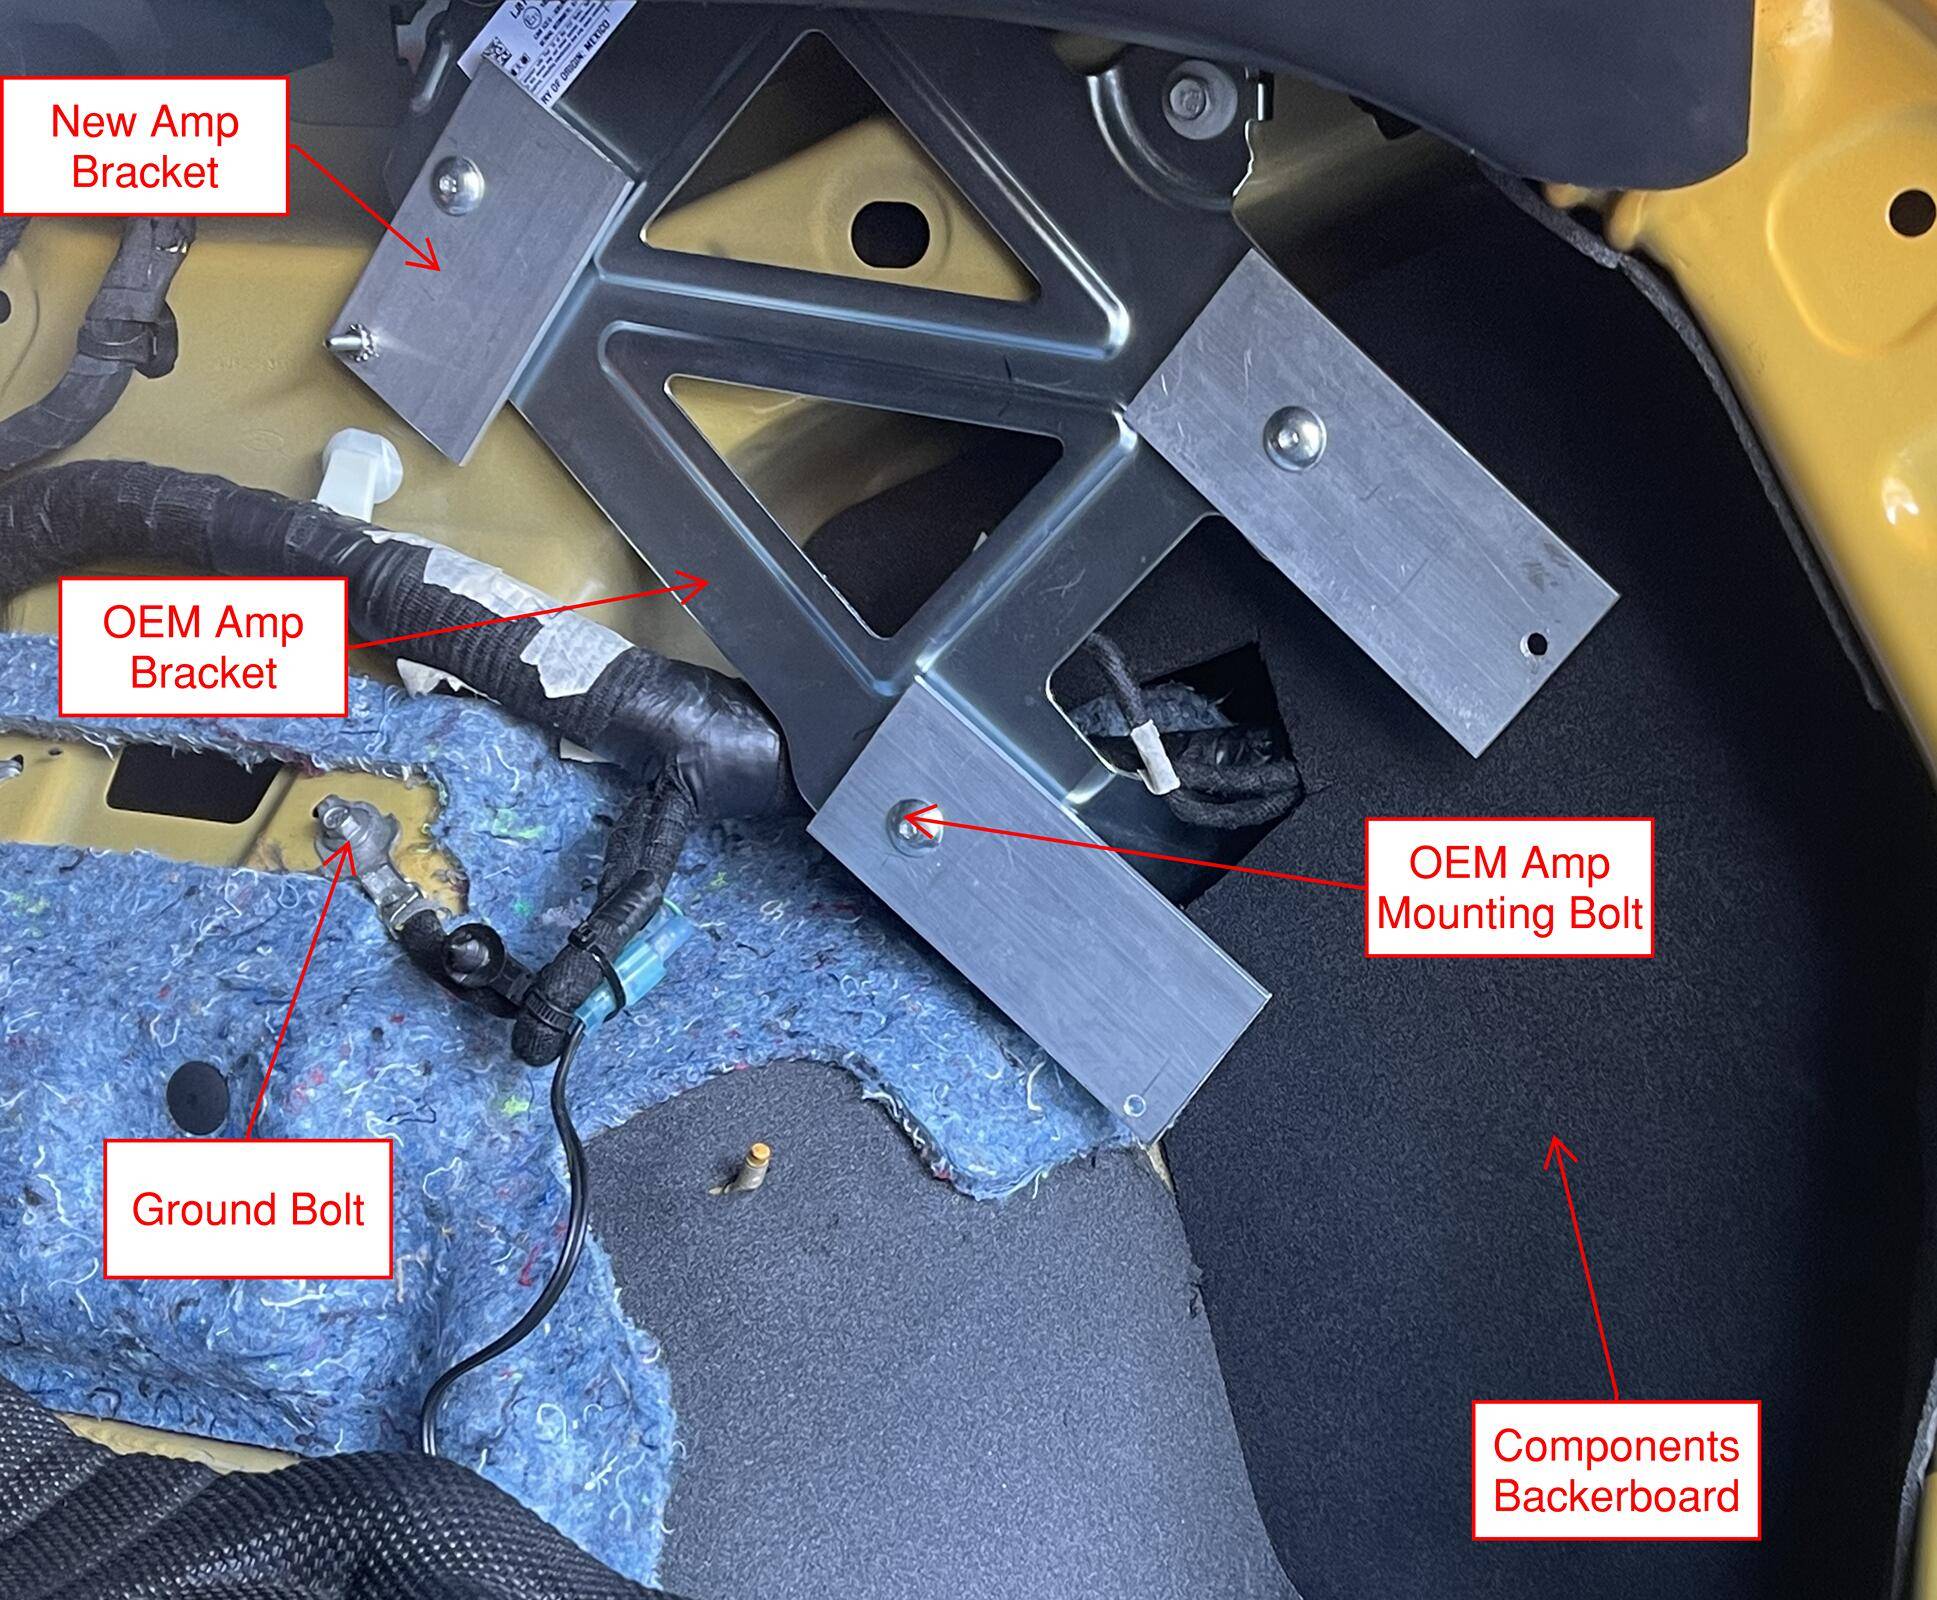
Removing the trim panel to get to the amp and mount the devices, requires removing the rear seats. I followed the write up from @21stCenturyPony. With the panel removed, I could easily remove the OEM amp and work toward mounting the new amp. I used the existing OEM amp bracket since it was secured to the car. The aluminum bracket will hopefully absorb some of the amps heat too. I used flat aluminum to extend the brackets holes to mount the new amp. I used cardboard as a template and then transferred them to the aluminum. I used the single OEM amp bracket bolt hole to mount the new bracket to the OEM bracket since it worked to keep the amp secure, and it also gave me some “wiggle room” to adjust the brackets for a final positioning. I only used three brackets to mount to the amp since getting to the top right amp mounting hole is not possible without removing the upper trim panel. Three is solid and secured the new amp.
With the amp location set, I worked to determine the best location for the PAC interface, the fused main power block, the ground block, the fan, the timing module, and the auxiliary fuse power block for the accessories. For the later, I could have tapped off the existing power on the car but decided to add it to allow for future growth. In fact, it came in handy. The amp location required the 12-volt outlet/socket to be relocated. I decided to install a 30-amp outlet instead of relocating or installing a 20-amp outlet. I plugged the existing hole with 30mm knock-out plug. To install the plug, it did require me to open the existing hole up just a bit with half round file. I installed the new outlet on the driver’s side rear cargo area trim panel. I routed the cable via the floor on the rear of the cargo area.
For the main power, I ran 4-gauge wire from the battery back to the cargo area with an in-line fuse in the frunk, close to the 12-volt battery. I routed the cable through an exist grommet in the firewall and sealed it with black RTV. There is limited access to install a firewall grommet. However, if that is a priority, you could do it by coming in from the inside, under the dash. The main power was run to a fused power block. I ran 8-gauge from the fused block to the sub-woofer and 4-gauge from the fused block to the amp. The unused and unfused side of the block was used to run 8-gauge inline fused cable to the auxiliary fuse block. This should give me enough growth on the auxiliary fuse block. I am not really pulling that much current for what is connected. I connected the 30-amp outlet, the exhaust/cooling fans and cargo LEDs to the auxiliary fuse block. The LED install is in another post.
I ran a short 4-gauge ground cable to a power block. Same as the above fused block but with metal connectors instead of fuses. Finding a ground bolt in this area is easy as there are several. I did connect the sub-woofer to a separate ground and not the ground block since there was a convenient ground bolt on the passenger side of the rear tailgate. The ground block was mounted on the top of the fender well, in the cargo area. I originally tried to mount them on the backerboard, but it was too crowded, and the wire routing was a bit more difficult.
If you are just mounting the main fused block and ground block, you can skip the paragraph below. You can find several locations to mount them under the trim panel in the cargo area.
Since I had the components to mount, I decided to install a 1/8” ABS plastic backerboard in the old location of the OEM subwoofer. I used cardboard to make a template and then transferred it to the ABS. Evan after that, I still had to trim and modify the backerboard. The 1/8” ABS can be easily cut and shaped. You can bend it to get it in and heat it up to shape it, thus the reason for not going with 3/16” or 1/4” ABS. You will need to do a bit of bending to get it installed with the OEM amp bracket in place. Used several small black sheet metal screws to mount the backerboard to the car. With the backerboard figured out, I worked out how I wanted to place the components on the backboard. The PAC fit perfect behind the OEM amp bracket as did the timing module. I put in a small computer fan below the amps cooling fins. I used a piece of scrap ABS to mount the auxiliary power block. I mounted this configuration to the two bolts that used to hold the subwoofer amp. Be careful of the mounting location of the auxiliary fuse block since it is close to the trim panel. Overall, this was not difficult, but it did take a weekend to get it all set up before I spend the next weekend wiring. I will say getting this in place, with the components mounted took the most time. I also installed two small fans and one larger computer fan on the trim panel to exhaust the hot air from behind the trim panel. You need to evaluate the fan location and depth relative to the amp. My first attempt at placing the fans, did not work since it hit the amp and I could not install the trim panel.
With all the components in place, I spent the next weekend routing all the cables to the various components. I used wire connectors to ensure I could remove and take out components, remove the trim panel in future, etc. I also spent some time putting sound deadening on the two rear trim panels. I removed the driver’s side trim panel to both put on deadening, install the 30-amp outlet and to install the cargo hooks ordered from @JohnFoxeSheets.
I also ran a AudioControl ACR-3 from the amp to the front of the car. This allows me to control the present configuration and adjust the volume level. I mounted it on the left-hand side under the main touch screen via 3M double sided tape. I did not want to drill into the car. I configured the presets with the speakers configured for just me in the car and with me and my wife (centered). The DSP allows you to configure the delay in speakers by distance or time. The volume level was set for the subwoofer. I have found that some songs need more bass and others need it turned down.
Both the PAC and the AudioControl amp have a USB-Micro cable interface. This is used to update the software and program the two units. You must download their software and use a PC to interface with the PAC unit and the amp. I updated the firmware first. On the PAC, you can adjust the chime volume level and sound settings (treble, mid and bass). The amp DSP will adjust the sound settings, so I did not use that function on the PAC. I did adjust the chime volume. If you want it quite or very loud, you have that option. The PAC does come with a removal volume knob with cable that allows you to adjust the chime volume, but I prefer to have access to the unit to adjust this and to be able to update the firmware. The amp USB cable allows you to update the software and to adjust the DSP. I left both USB cables in place and coiled up behind the trim panel, for future use and component adjustment.
With the components installed, I powered up the system and worked to adjust the chime volume and the DSP. Adjusting the DSP is a detailed write up that I am not going to do, since it will be dependent upon your amp, your taste, etc. There are plenty of videos on how to adjust your system. For my amp, I watched the video from @CarAudioFabrications and AudioControl online manual. I drove around for a week plus to ensure everything was functioning, the volume levels were good, the configuration was what I wanted, etc. There were a few items that did come up and required some attention. Once, I was happy, I put the trim panels back, and then the rear seats.
A few side notes: The OEM signal routed through the PAC is really a single channel. I installed two RCA cables and during tuning, the second signal was not full spectrum, so I chose to only use one RCA cable and use the signal for all the speakers. Since I connected the subwoofer via the line out, I did not connect the subwoofer signal from the OEM wiring harness to the PAC unit and thus did not connect the PAC unit via RCA to the amp or subwoofer. Your configuration may vary depending on your amp or set up. The sound setting on the touch screen, is no longer applicable. You cannot set the treble, mid and bass from the touch screen. With the single channel input into the amp, you also cannot fade the signal. You can control the balance. You can drill out the passenger side trim panel so that the grill, originally for the OEM subwoofer is removable. I put Velcro on so it can still attach. The space is small, but it can be used for storage, and I used it to access the USB cables and the fuses blocks.
I sure the question will be asked, is it worth all the work. That all depends on if you are satisfied with the OEM speakers and overall system. Also, is this something you can do and like to do. I love geeking out on this stuff and I was not happy with the B&O system. The speaker installation helped to improve the sound, but I could not adjust the “sound” of the speakers. The cars headend unit equalizer was too limited and was configured for the OEM speakers. The new amp with DSP gives me the versatility to adjust the system in so many ways and with 125 watts per channel there is enough power to allow me to rock out to Led Zeppelins’ Kashmir, jam out to Miles Davis’s So What, sing along to Carmen’s Habanera, “Air” cello to YoY o Ma’s Bach: Cello Suite No. 1 or let my wife “seat dance” to Uptown Funk.
Reply to this thread if you have questions or direct message me. Glad to help.
Below are some pictures of the installation:


I installed an aftermarket sub (thanks @markboris) the first month I owned the car. It definitely filled a void in the stereo system. I followed Mark’s write up and installed a JL Audio ACP110LG-TW1
I was still not satisfied with the sound, so I started to plan to replace the speakers and amp. I did the research on the how and the what. The speakers went on sale first, so I swapped out the OEM speakers and added sound deadening on the doors. I did a write up on installing speakers.
The next step was dependent up on Crutchfield putting my amp on sale and last month they dropped the price by ~30%. I order an AudioControl (D-6.1200) and the PAC (AP4-FD31). I planned install the amp and the PAC in the same location as the OEM amp (passenger side cargo area rear panel). The PAC connection to the wiring harness connectors in the rear, so it must go there. You could put the amp somewhere else, but I chose to use the OEM space and bracket for the new amp. This was open space and the amp (I measured prior to ordering) fit, so why not put it there. The OEM is amp is 40% the size of the new amp, so fit is a bit tight under the rear trim panel.
The PAC system is an amplifier integration interface and is needed to convert the digital signal to analog for an aftermarket amp. The front door speakers and the rear door speakers (6.5” and tweeter) are powered by the rear OEM amp. The front tweeter and center channel speakers are powered by the headend unit (i.e., the “stereo receiver”) via an analog signal. To powers the dash speakers, a front amp is required, or you can run speaker wires from your new amp. There is an PAC adapter (LPHFD31) to connect to the factor speaker wire harness for the dash speakers to the new amp. This is sold separately and not included in the PAC AP4-FD31. On a side not, @MrLoganRoss had a Mobridge interface installed instead of the PAC. He posted on his install.
I chose to run speaker wires directly from the rear amp to the front dash tweeters. I did not replace the center channel speaker and did not connect it to the new amp. I ran the wire under the carpet, near the floor door sill. There is room in the rear door sill but there is not room in the front door sills to run power or speaker wire. The cables for the front seats T-off and do not allow for pass-through from the rear to the front. I did not run new speaker wire to the rear door speakers or the front door speakers. The door “power plug” for the rear door is easily accessible and can be removed. There is room to drill this out and add speaker wire. I assume the front is the same and has room. However, the front door power plug is hard to get to and I could not remove it, thus the decision to use the OEM speaker wire and not to replace it with a heavier gauge wire. I sure the 16-gauge speaker wire would have added a bit more fidelity to the system and installing speaker wire may be a future endeavor.
The reason I chose my amp was that I wanted more than the 75-watts RMS power for the aftermarket speakers. However, the main reason was that the amp has a digital signal process (DSP) so I could tune the overall configuration and adjust for speaker delay. In addition, it had the preamp outputs to connect to my powered subwoofer and I can adjust and tune the bass via the DSP.
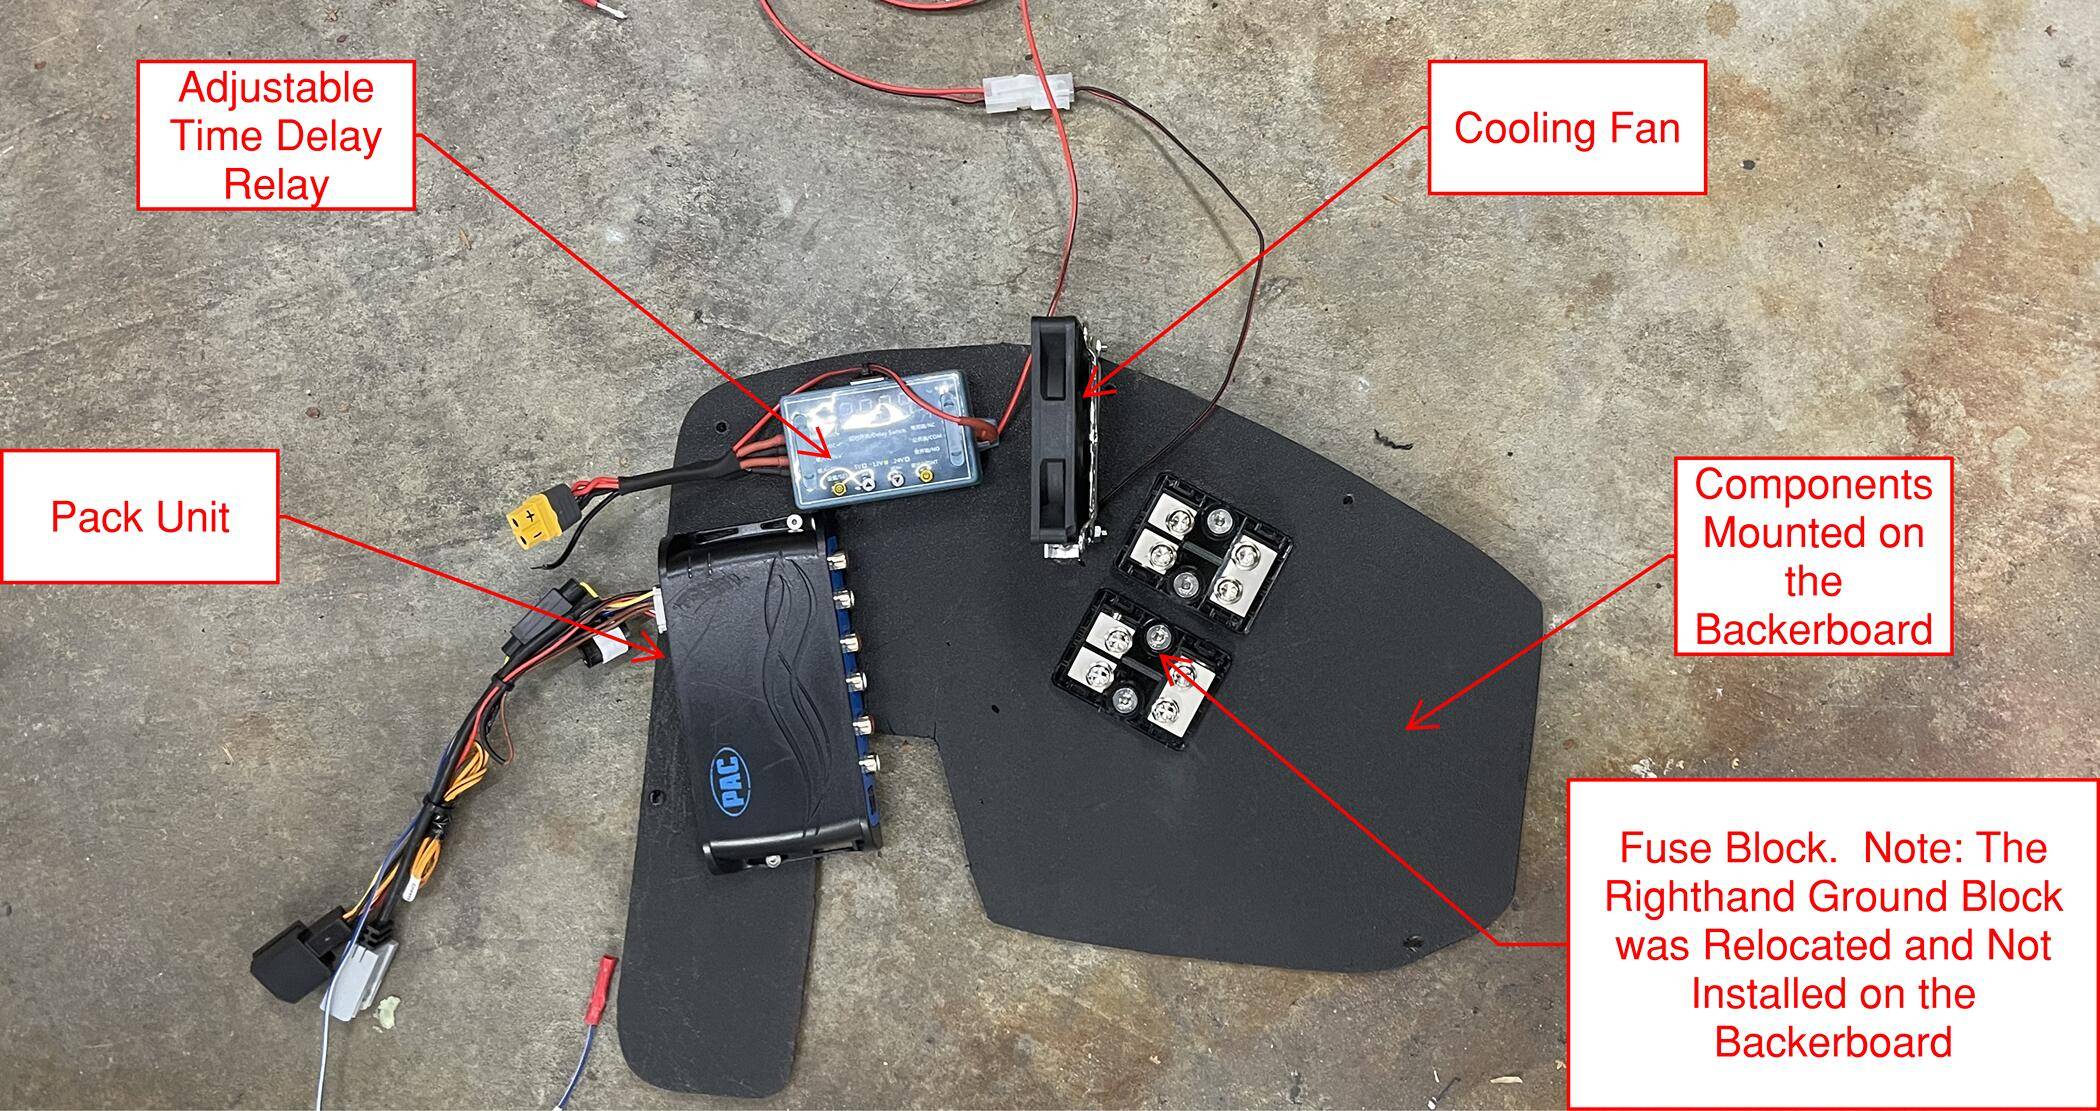
I decided to go a little further with my installation. I know that there might be a topic of debate on it and if I needed this, but I chose to do anyway. I wanted to install exhaust fans to remove the heat created by the amp since it was in the enclosed trim panel in the rear cargo area. I also installed a fan to move air across the amp’s cooling fins. Finally, I installed an adjustable time delay relay (setting P24) that allowed for the fans to turn on via the remote on signal. It will turn on 5 minutes after the remote signal is energized and the fans will stay on for 5 minutes after the signal is loss. As a part of the relay programming, the timing can be adjusted from seconds to minutes. The fans will hopefully reduce the temperature during operation and cool it after is shuts down. Not sure if it will really extend the life but I like to geek out on things like this.
Removing the trim panel to get to the amp and mount the devices, requires removing the rear seats. I followed the write up from @21stCenturyPony. With the panel removed, I could easily remove the OEM amp and work toward mounting the new amp. I used the existing OEM amp bracket since it was secured to the car. The aluminum bracket will hopefully absorb some of the amps heat too. I used flat aluminum to extend the brackets holes to mount the new amp. I used cardboard as a template and then transferred them to the aluminum. I used the single OEM amp bracket bolt hole to mount the new bracket to the OEM bracket since it worked to keep the amp secure, and it also gave me some “wiggle room” to adjust the brackets for a final positioning. I only used three brackets to mount to the amp since getting to the top right amp mounting hole is not possible without removing the upper trim panel. Three is solid and secured the new amp.
With the amp location set, I worked to determine the best location for the PAC interface, the fused main power block, the ground block, the fan, the timing module, and the auxiliary fuse power block for the accessories. For the later, I could have tapped off the existing power on the car but decided to add it to allow for future growth. In fact, it came in handy. The amp location required the 12-volt outlet/socket to be relocated. I decided to install a 30-amp outlet instead of relocating or installing a 20-amp outlet. I plugged the existing hole with 30mm knock-out plug. To install the plug, it did require me to open the existing hole up just a bit with half round file. I installed the new outlet on the driver’s side rear cargo area trim panel. I routed the cable via the floor on the rear of the cargo area.
For the main power, I ran 4-gauge wire from the battery back to the cargo area with an in-line fuse in the frunk, close to the 12-volt battery. I routed the cable through an exist grommet in the firewall and sealed it with black RTV. There is limited access to install a firewall grommet. However, if that is a priority, you could do it by coming in from the inside, under the dash. The main power was run to a fused power block. I ran 8-gauge from the fused block to the sub-woofer and 4-gauge from the fused block to the amp. The unused and unfused side of the block was used to run 8-gauge inline fused cable to the auxiliary fuse block. This should give me enough growth on the auxiliary fuse block. I am not really pulling that much current for what is connected. I connected the 30-amp outlet, the exhaust/cooling fans and cargo LEDs to the auxiliary fuse block. The LED install is in another post.
I ran a short 4-gauge ground cable to a power block. Same as the above fused block but with metal connectors instead of fuses. Finding a ground bolt in this area is easy as there are several. I did connect the sub-woofer to a separate ground and not the ground block since there was a convenient ground bolt on the passenger side of the rear tailgate. The ground block was mounted on the top of the fender well, in the cargo area. I originally tried to mount them on the backerboard, but it was too crowded, and the wire routing was a bit more difficult.
If you are just mounting the main fused block and ground block, you can skip the paragraph below. You can find several locations to mount them under the trim panel in the cargo area.
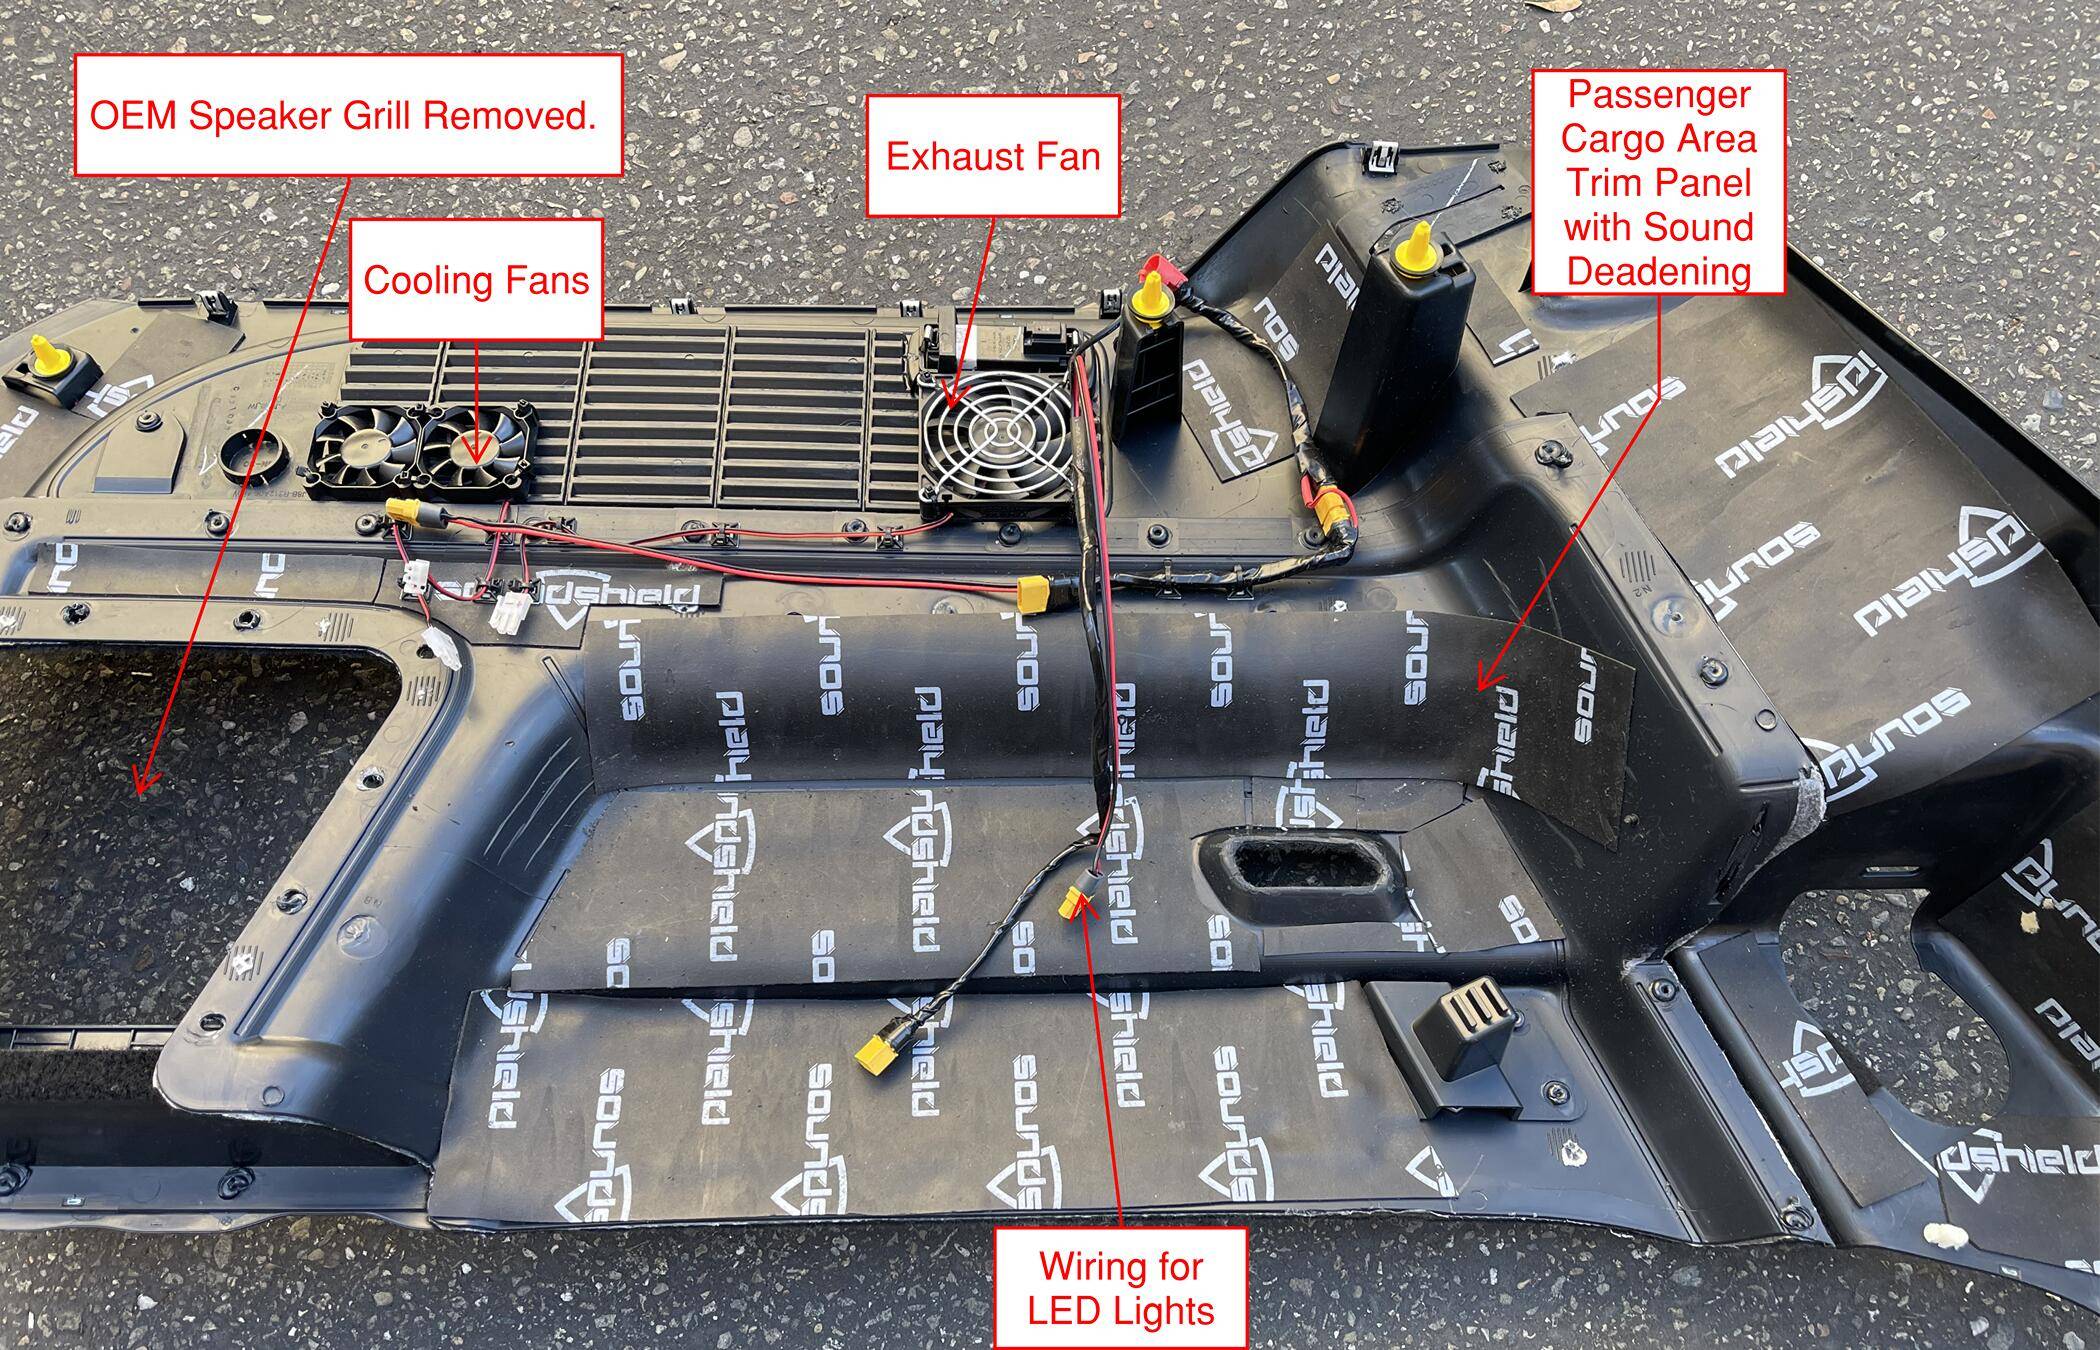
Since I had the components to mount, I decided to install a 1/8” ABS plastic backerboard in the old location of the OEM subwoofer. I used cardboard to make a template and then transferred it to the ABS. Evan after that, I still had to trim and modify the backerboard. The 1/8” ABS can be easily cut and shaped. You can bend it to get it in and heat it up to shape it, thus the reason for not going with 3/16” or 1/4” ABS. You will need to do a bit of bending to get it installed with the OEM amp bracket in place. Used several small black sheet metal screws to mount the backerboard to the car. With the backerboard figured out, I worked out how I wanted to place the components on the backboard. The PAC fit perfect behind the OEM amp bracket as did the timing module. I put in a small computer fan below the amps cooling fins. I used a piece of scrap ABS to mount the auxiliary power block. I mounted this configuration to the two bolts that used to hold the subwoofer amp. Be careful of the mounting location of the auxiliary fuse block since it is close to the trim panel. Overall, this was not difficult, but it did take a weekend to get it all set up before I spend the next weekend wiring. I will say getting this in place, with the components mounted took the most time. I also installed two small fans and one larger computer fan on the trim panel to exhaust the hot air from behind the trim panel. You need to evaluate the fan location and depth relative to the amp. My first attempt at placing the fans, did not work since it hit the amp and I could not install the trim panel.
With all the components in place, I spent the next weekend routing all the cables to the various components. I used wire connectors to ensure I could remove and take out components, remove the trim panel in future, etc. I also spent some time putting sound deadening on the two rear trim panels. I removed the driver’s side trim panel to both put on deadening, install the 30-amp outlet and to install the cargo hooks ordered from @JohnFoxeSheets.
I also ran a AudioControl ACR-3 from the amp to the front of the car. This allows me to control the present configuration and adjust the volume level. I mounted it on the left-hand side under the main touch screen via 3M double sided tape. I did not want to drill into the car. I configured the presets with the speakers configured for just me in the car and with me and my wife (centered). The DSP allows you to configure the delay in speakers by distance or time. The volume level was set for the subwoofer. I have found that some songs need more bass and others need it turned down.
Both the PAC and the AudioControl amp have a USB-Micro cable interface. This is used to update the software and program the two units. You must download their software and use a PC to interface with the PAC unit and the amp. I updated the firmware first. On the PAC, you can adjust the chime volume level and sound settings (treble, mid and bass). The amp DSP will adjust the sound settings, so I did not use that function on the PAC. I did adjust the chime volume. If you want it quite or very loud, you have that option. The PAC does come with a removal volume knob with cable that allows you to adjust the chime volume, but I prefer to have access to the unit to adjust this and to be able to update the firmware. The amp USB cable allows you to update the software and to adjust the DSP. I left both USB cables in place and coiled up behind the trim panel, for future use and component adjustment.
With the components installed, I powered up the system and worked to adjust the chime volume and the DSP. Adjusting the DSP is a detailed write up that I am not going to do, since it will be dependent upon your amp, your taste, etc. There are plenty of videos on how to adjust your system. For my amp, I watched the video from @CarAudioFabrications and AudioControl online manual. I drove around for a week plus to ensure everything was functioning, the volume levels were good, the configuration was what I wanted, etc. There were a few items that did come up and required some attention. Once, I was happy, I put the trim panels back, and then the rear seats.
A few side notes: The OEM signal routed through the PAC is really a single channel. I installed two RCA cables and during tuning, the second signal was not full spectrum, so I chose to only use one RCA cable and use the signal for all the speakers. Since I connected the subwoofer via the line out, I did not connect the subwoofer signal from the OEM wiring harness to the PAC unit and thus did not connect the PAC unit via RCA to the amp or subwoofer. Your configuration may vary depending on your amp or set up. The sound setting on the touch screen, is no longer applicable. You cannot set the treble, mid and bass from the touch screen. With the single channel input into the amp, you also cannot fade the signal. You can control the balance. You can drill out the passenger side trim panel so that the grill, originally for the OEM subwoofer is removable. I put Velcro on so it can still attach. The space is small, but it can be used for storage, and I used it to access the USB cables and the fuses blocks.
I sure the question will be asked, is it worth all the work. That all depends on if you are satisfied with the OEM speakers and overall system. Also, is this something you can do and like to do. I love geeking out on this stuff and I was not happy with the B&O system. The speaker installation helped to improve the sound, but I could not adjust the “sound” of the speakers. The cars headend unit equalizer was too limited and was configured for the OEM speakers. The new amp with DSP gives me the versatility to adjust the system in so many ways and with 125 watts per channel there is enough power to allow me to rock out to Led Zeppelins’ Kashmir, jam out to Miles Davis’s So What, sing along to Carmen’s Habanera, “Air” cello to YoY o Ma’s Bach: Cello Suite No. 1 or let my wife “seat dance” to Uptown Funk.
Reply to this thread if you have questions or direct message me. Glad to help.
Below are some pictures of the installation:

Sponsored
 Seriously, I love all the updates and changes you make and then you post them for us to review. The mods you do give me inspiration and make me think I should be do more.
 ")