Mach-Lee
Well-Known Member
- First Name
- Lee
- Joined
- Jul 16, 2021
- Threads
- 262
- Messages
- 11,442
- Reaction score
- 25,249
- Location
- Wisconsin
- Vehicles
- 2022 Mach-E Premium AWD
- Occupation
- Sci/Eng
- Thread starter
- #1
NOTE: This topic applies to "Failed" OTA installs only. This topic does NOT apply to "Not Completed" updates, these steps will not help whatsoever. There is nothing you can do about a "Not Completed" update, other than wait for the next OTA to come (sometimes it takes many months before Ford releases another OTA). If your update screen says "Not Completed" just ignore it and move on with life.
Ford's OTA process can be frustrating at times, with some users experiencing multiple failures in a row without success. Following this guide should increase your chances of an OTA installing successfully.
There are many conditions that must be met before an OTA can install. Some are obvious, such as the car needing to be off and in park. But other conditions, such as the 12V battery status, may not be obvious to you.
There are many reasons why an OTA update fails, but a low 12V battery is the most common cause of failed OTA installs, by far. About 80% of the OTA install failures I've seen are caused by a low 12V battery. It can be extremely difficult to get the 12V battery to a high enough state of charge to install updates, especially if the car is driven or charged infrequently. Due to the charging system design and lead acid charging kinetics, it can take an extremely long time (hours) to get the 12V fully charged up. Most OTAs require the 12V battery to be above 75% SoC (state-of-charge), and sometimes up to 90%. The 12V SoC is not visible to the user, and can only be accessed with an OBD scan tool. In lieu of direct monitoring, you can follow these methods to ensure the 12V battery is fully charged before applying OTAs.
Disconnect any idle draw devices such as dashcams, OBD dongles, or radar detectors first. If these items are powered while the car is off, they may impact your ability to get OTAs installed.
Unplug everything from the USB ports when attempting an APIM/SYNC update.
Please follow these methods (including times) exactly for best success. These have worked for people I've helped in the past.
"30 Minute Drive" Method
This is the least successful method, but is the easiest and may be enough in some cases (if you don't drive much). If this method doesn't work, move on to one of the longer methods below.
"Long Charge" Method
"Slow Charge" Method
Very similar to the above, but if you have a smart EVSE you can set it to a low amperage (8A) to prolong charging time.
"Stay On" Method
"Blower Charge" Method
12V system voltage is increased when blower speed is set to 5 or higher with a key present inside the vehicle. Only perform this method if the vehicle can be parked in a safe location (e.g. a closed garage) to avoid theft. Battery will charge to a high SoC faster with this method due to a higher voltage set point (14.3V vs 13.4V).
12V Battery Charger Method
Battery charger must be the automatic type, 4 amp or larger, and have a float or maintenance mode that continues to provide power after the battery is fully charged.
NOTE: Just because the battery charger says the battery is fully charged does NOT mean it actually is. Some battery chargers terminate charge early (so you are really only getting an 80% charge, not 100%).
BMS Reset Method
This method should be considered "last resort" since it resets 12V BMS (battery management system) learned parameters. The 12V battery must be close to full charge before resetting the BMS (via one of the above methods). The best method is to disconnect the 12V battery, fully charge it, reconnect it, and reset the BMS. WARNING: Do not reset the BMS on a suspected failing battery, as this can potentially cause an OTA to BRICK the car if the 12V battery dies during the update. Resetting the BMS tells the computer you have a brand new battery at 100% heath, if the battery is way off from this it can cause major issues. If you have doubts about a failing battery before resetting the BMS, contact me for assistance.
lf I tell you your OTAs are failing because of poor BMS data quality, please follow these steps. (Note: this is rare.) Conditions: The car must be parked with a 12V load of less than 200 mA for greater than 6 continuous hours without interruption. This is necessary for the BMS to accurately learn the 12V SoC and clear the data quality flag.
Background
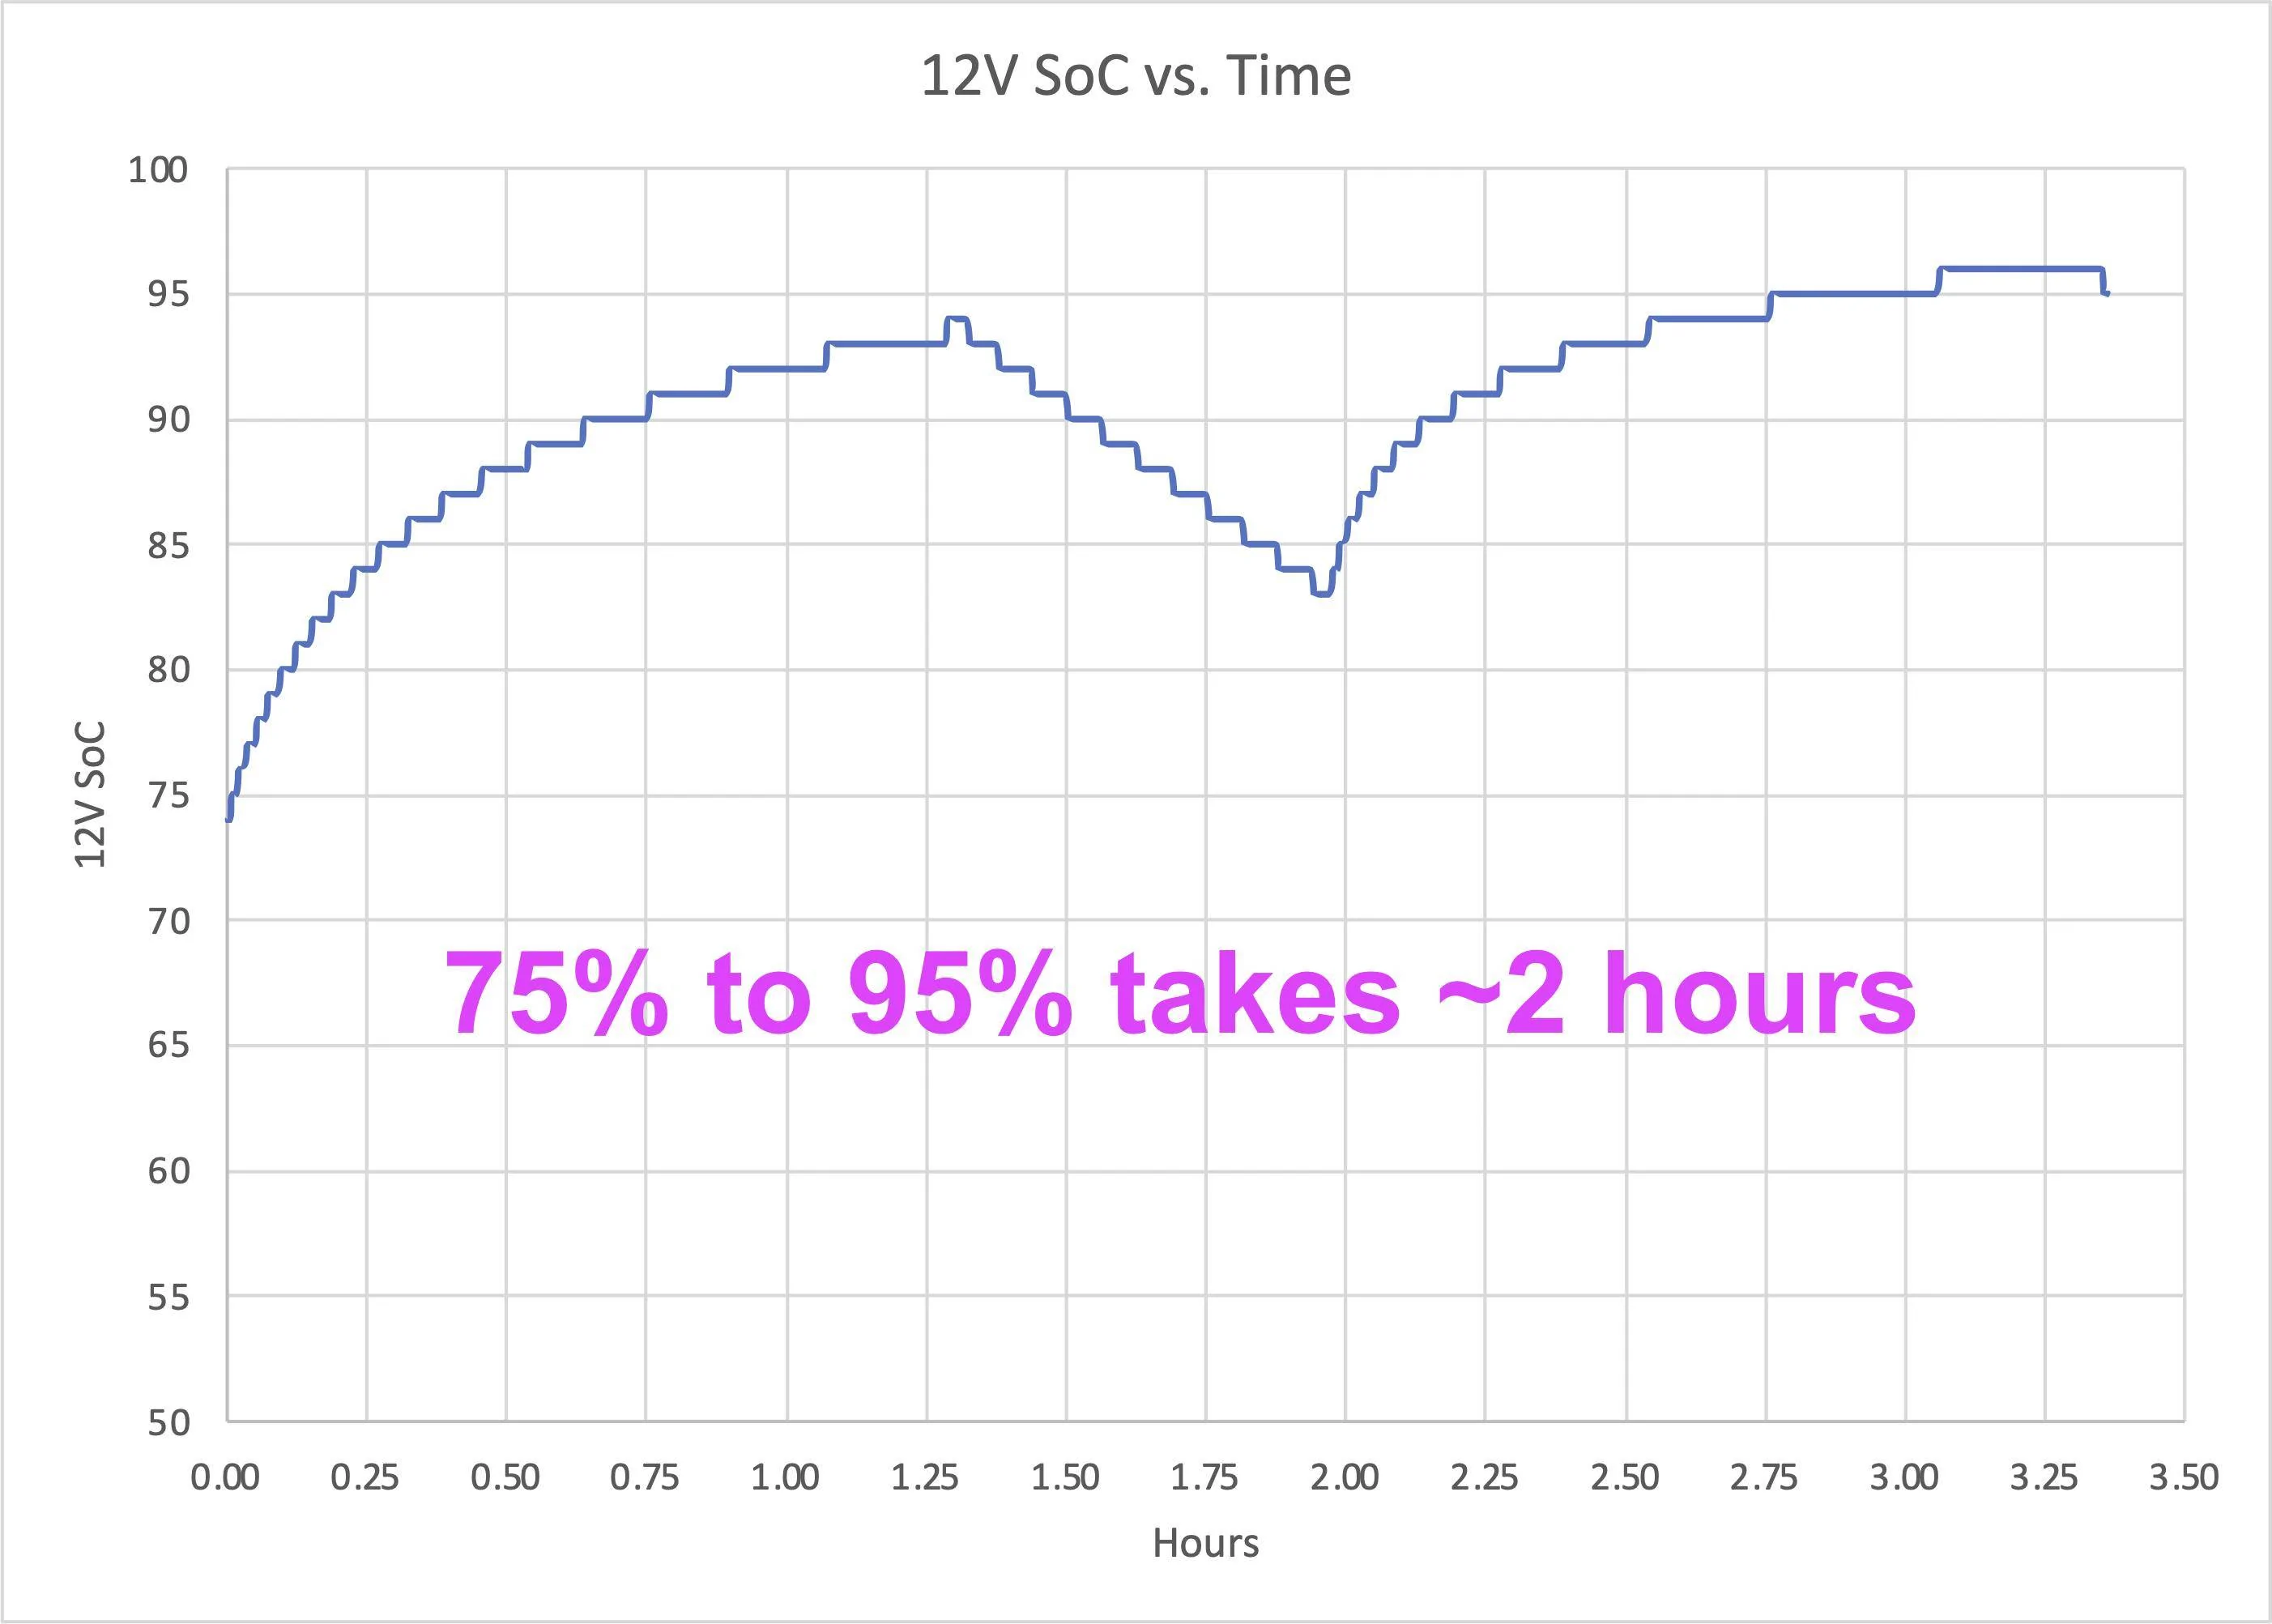
Due to the module design of the Mach-E, there is a very high 12V power draw while performing OTA updates, and the DC/DC converter cannot run to maintain the system voltage while updates are being applied. This means the 12V battery must be nearly full before starting an OTA. If it's not full enough, it may drain completely dead during the update and result in your car being bricked (you'll need a tow to the dealer for unbricking). So that's why it's so picky. Before the OTA starts, the system will look at how much energy is in your 12V battery, and decide if it has enough to cover the install and uninstall process. If not, then the OTA fails and will try again later. The best time to apply updates is right after you've driven the car (start them manually).
The other factor here is the charging rate of the 12V battery is not linear (see below figure). This has to do with lead acid battery kinetics and voltage setpoints in the charging system, but as a result the AGM battery will charge extremely quickly up to about 80%, but then very slowly past 90%. It can take up to 6 hours to charge the battery from 80% to 95%, hence the long times. Some vehicles also have outdated BCM software, which contributes to difficulties maintaining adequate 12V levels. Depending on a multitude of conditions, the BMS may not want to charge the battery much past 90% SoC, but some updates require 95% SoC.

Non-linear charging behavior of the Mach-E 12V battery. High SoC levels can take hours to reach.
Ford's OTA process can be frustrating at times, with some users experiencing multiple failures in a row without success. Following this guide should increase your chances of an OTA installing successfully.
There are many conditions that must be met before an OTA can install. Some are obvious, such as the car needing to be off and in park. But other conditions, such as the 12V battery status, may not be obvious to you.
There are many reasons why an OTA update fails, but a low 12V battery is the most common cause of failed OTA installs, by far. About 80% of the OTA install failures I've seen are caused by a low 12V battery. It can be extremely difficult to get the 12V battery to a high enough state of charge to install updates, especially if the car is driven or charged infrequently. Due to the charging system design and lead acid charging kinetics, it can take an extremely long time (hours) to get the 12V fully charged up. Most OTAs require the 12V battery to be above 75% SoC (state-of-charge), and sometimes up to 90%. The 12V SoC is not visible to the user, and can only be accessed with an OBD scan tool. In lieu of direct monitoring, you can follow these methods to ensure the 12V battery is fully charged before applying OTAs.
Disconnect any idle draw devices such as dashcams, OBD dongles, or radar detectors first. If these items are powered while the car is off, they may impact your ability to get OTAs installed.
Unplug everything from the USB ports when attempting an APIM/SYNC update.
Please follow these methods (including times) exactly for best success. These have worked for people I've helped in the past.
"30 Minute Drive" Method
This is the least successful method, but is the easiest and may be enough in some cases (if you don't drive much). If this method doesn't work, move on to one of the longer methods below.
- Drive your car for at least 30 minutes
- Leave car ON and park (do not shut off yet)
- Set the parking brake
- Turn OFF the headlights fully (rotate knob counterclockwise)
- Manually start the update on the screen with the "Update Now" button
- Turn OFF the vehicle, exit, and close all doors
- Wait for the update to complete (up to 30 mins)
"Long Charge" Method
- Drive the car until the high voltage battery is down to 50% or less.
- Level 2 charge the car up to 100% in one session
- As soon as possible after the car finishes charging...
- Unplug the car
- Turn ON the car and set the parking brake
- Turn OFF the headlights fully (rotate knob counterclockwise)
- Manually start the update on the screen with the "Update Now" button
- Turn OFF the vehicle, exit, and close all doors
- Wait for the update to complete (up to 30 mins)
"Slow Charge" Method
Very similar to the above, but if you have a smart EVSE you can set it to a low amperage (8A) to prolong charging time.
- Drive the car until the high voltage battery is down to 50% or less.
- Set smart EVSE to lowest amperage (e.g. 8 amps)
- Let the car charge for at least 6 hours or overnight
- Unplug the car
- Turn ON the car and set the parking brake
- Turn OFF the headlights fully (rotate knob counterclockwise)
- Manually start the update on the screen with the "Update Now" button
- Turn OFF the vehicle, exit, and close all doors
- Wait for the update to complete (up to 30 mins)
"Stay On" Method
- Unplug the car
- Turn ON the car (fully ON, do not use accessory mode)
- Disable "Vehicle Power Down Timer" in vehicle settings
- Set the parking brake
- Turn OFF the headlights fully (rotate knob counterclockwise)
- Exit, taking all key fobs with you, and lock the doors if necessary
- Leave the car ON in Park for 6+ hours
- Manually start the update on the screen with the "Update Now" button
- Turn OFF the vehicle, exit, and close all doors
- Wait for the update to complete (up to 30 mins)
"Blower Charge" Method
12V system voltage is increased when blower speed is set to 5 or higher with a key present inside the vehicle. Only perform this method if the vehicle can be parked in a safe location (e.g. a closed garage) to avoid theft. Battery will charge to a high SoC faster with this method due to a higher voltage set point (14.3V vs 13.4V).
- Unplug the car
- Turn ON the car
- Disable "Vehicle Power Down Timer" in vehicle settings
- Set the parking brake
- Turn OFF the headlights fully (rotate knob counterclockwise)
- Set blower speed to 5 (you may turn off A/C if you like)
- Place key fob inside vehicle
- Leave the car ON in Park for 2 hours
- Manually start the update on the screen with the "Update Now" button
- Turn OFF the vehicle, exit, and close all doors
- Wait for the update to complete (up to 30 mins)
12V Battery Charger Method
Battery charger must be the automatic type, 4 amp or larger, and have a float or maintenance mode that continues to provide power after the battery is fully charged.
NOTE: Just because the battery charger says the battery is fully charged does NOT mean it actually is. Some battery chargers terminate charge early (so you are really only getting an 80% charge, not 100%).
- Open the frunk
- Remove the top and drivers side frunk covers only (Video)
- Connect a 4 amp or larger battery charger to the + and - jump posts (Video)
- Do not connect the charger to the negative battery post!
- Leave the battery charger connected overnight (12+ hours)
- Unplug the J1772 if plugged in
- Turn ON the car and set the parking brake
- Remove the battery charger and close the frunk (panels can stay removed)
- Turn OFF the headlights fully (rotate knob counterclockwise)
- Manually start the update on the screen with the "Update Now" button
- Turn OFF the vehicle, exit, and close all doors
- Wait for the update to complete (up to 30 mins)
BMS Reset Method
This method should be considered "last resort" since it resets 12V BMS (battery management system) learned parameters. The 12V battery must be close to full charge before resetting the BMS (via one of the above methods). The best method is to disconnect the 12V battery, fully charge it, reconnect it, and reset the BMS. WARNING: Do not reset the BMS on a suspected failing battery, as this can potentially cause an OTA to BRICK the car if the 12V battery dies during the update. Resetting the BMS tells the computer you have a brand new battery at 100% heath, if the battery is way off from this it can cause major issues. If you have doubts about a failing battery before resetting the BMS, contact me for assistance.
- Press the START button without pressing the brake (ACCESSORY mode)
- Flash the high beams with the stalk 5x
- Press the brake pedal 3x
- Battery icon on instrument cluster should flash 3x
- Turn OFF the car and open the driver's door
- Close and park the vehicle undisturbed for 6+ hours to allow the BMS to verify the battery SoC (this step is important or the OTA will fail for bad data quality)
- After the rest period, continue with one of the other methods listed above to charge the battery again before attempting the OTA.
lf I tell you your OTAs are failing because of poor BMS data quality, please follow these steps. (Note: this is rare.) Conditions: The car must be parked with a 12V load of less than 200 mA for greater than 6 continuous hours without interruption. This is necessary for the BMS to accurately learn the 12V SoC and clear the data quality flag.
- Disconnect any and all accessories from the vehicle including hardwired dashcams, dashcam batteries, radar detectors, OBD port scan devices, 12V battery chargers etc. (Verify no fuses are tapped, nothing plugged in to OBD port, 12V ports, USB ports, or connected to the 12V battery).
- Fully close all windows and doors
- Remove all key fobs from the vehicle and place them at least 25' away (including vertically)
- Park the car on the street or in a parking lot to meet distance requirements if you have a small home
- Disable Bluetooth on your phone(s) so PAAK connections are not possible
- Disable any apps or widgets that ping the car for data
- Fully unplug the car (no charging of any kind, including 12V)
- Park the vehicle undisturbed for 6+ hours (8 hours recommended)
- Do not open, lock, or unlock any doors during this sleep period, ping the vehicle, refresh FordPass status, or cause any lights or screens to activate
- After the undisturbed sleep period, you may turn on the car for 30 minutes and proceed with the update.
Background
Due to the module design of the Mach-E, there is a very high 12V power draw while performing OTA updates, and the DC/DC converter cannot run to maintain the system voltage while updates are being applied. This means the 12V battery must be nearly full before starting an OTA. If it's not full enough, it may drain completely dead during the update and result in your car being bricked (you'll need a tow to the dealer for unbricking). So that's why it's so picky. Before the OTA starts, the system will look at how much energy is in your 12V battery, and decide if it has enough to cover the install and uninstall process. If not, then the OTA fails and will try again later. The best time to apply updates is right after you've driven the car (start them manually).
The other factor here is the charging rate of the 12V battery is not linear (see below figure). This has to do with lead acid battery kinetics and voltage setpoints in the charging system, but as a result the AGM battery will charge extremely quickly up to about 80%, but then very slowly past 90%. It can take up to 6 hours to charge the battery from 80% to 95%, hence the long times. Some vehicles also have outdated BCM software, which contributes to difficulties maintaining adequate 12V levels. Depending on a multitude of conditions, the BMS may not want to charge the battery much past 90% SoC, but some updates require 95% SoC.
Non-linear charging behavior of the Mach-E 12V battery. High SoC levels can take hours to reach.
Sponsored
Last edited: