TheVirtualTim
Well-Known Member
- First Name
- Tim
- Joined
- Oct 11, 2020
- Threads
- 26
- Messages
- 1,366
- Reaction score
- 2,469
- Location
- Dearborn, MI
- Vehicles
- ‘21 Mach-E First Edition, ‘23 Mach-E GT Performance
- Thread starter
- #1
Now that I've done the install once (it took 3 hours), I could install one much faster. Note that part of my "install" was carpentry work to trim out the wall panel where I planned to install it.
You will need:
A Torx T6 bit screwdriver (very tiny) for the clamps that hold the charging cable in place.
A Torx T25 bit screwdriver for all the Torx screws that hold the weather cover (not the cosmetic cover) in place. That cover is held on with just 3 screws when you pull it out of the box ... but the rest of the screws are in a bag. When you put the cover back on you'll use all of them.
Most people probably already have the rest of the tools (tape measure, pliers, screwdrivers, allen wrench, etc.) I've bolded the Torx sizes because it's less common for someone to just have those on-hand ... pick 'em up if you don't own them.
But it really is as basic as:
1. Shut off the supply power at the breaker to make sure nothing is live during the install.
2. Decide how you want to route the supply power to the EVSE (either up through the bottom or in from the back). You'll need to cut out one of the bottom tabs if coming up from the bottom. You'll need to drill out one of the access ports on the back if bringing power in from the back.
3. Mount the metal mounting bracket.
4. Insert the charging cord through that spring whip (a bit of a fuss because the wires like to get caught on the spring), connect to the lugs and tighten. It is easiest to do this when the charger is NOT yet mounted on the wall. There's a clamp that holds the charging cord in place and that clamp takes a very tiny Torx 6 (T6) screwdriver. It's easiest to do this with the charger laying down on a table rather than hanging on the wall.
5. Mount the charger on the mounting bracket. Two screws lock it onto the mount.
6. Route the 240v supply power in and tighten the lugs.
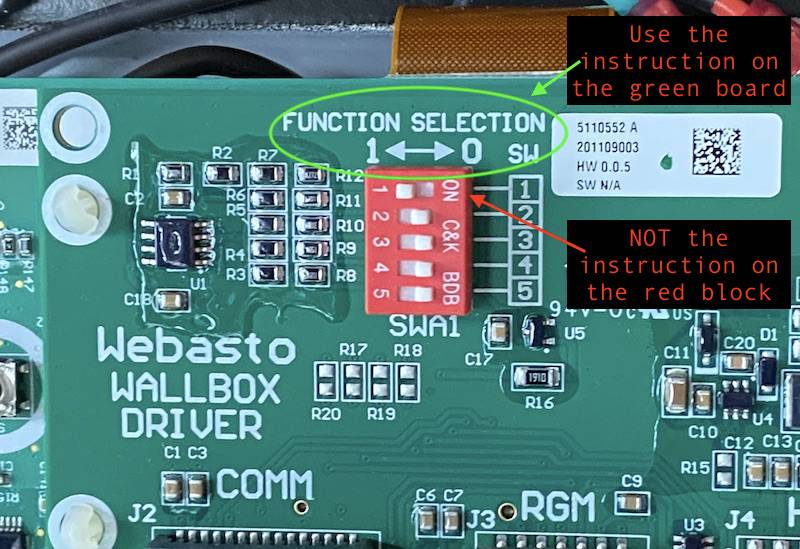
7. Set the DIP switches. D5 must be set to '0' (off). D1 through D4 can be set based on the amperage limits. If using the full 48 amps then D1 is set to '1' (on) and the position of D2, D3, and D4 don't actually matter. If using less than 48 amps (D1 is '0' / off) then D2, D3, and D4 *do* matter and the table tells you what to set.
EDIT: IMPORTANT NOTE: There is some confusion over the DIP switch settings. The labels indicating the 1 vs. 0 on the green board are correct. The labeling on the red DIP switch block is incorrect.
NEW EDIT: IMPORTANT NOTE: Ford recently gave me new information on the DIP switch settings. These EVSEs are made for Ford by Webasto in Germany (that's probably pretty common knowledge as soon as you open it and see the Webasto name on everything). HOWEVER ... Ford had numerous complaints on the DIP switch settings not working and pressed Webasto to please validate those settings. Webasto finally validated the settings that the DIP switch settings on the switch BLOCK are correct... NOT the silk-screening on the green printed circuit board. So basically the opposite of the photo I have here. It took Ford some time to get them to do this. I'm told the new batch of EVSE's is having the silk-screened instructions removed and only the numbers on the switch block will be used.
I will try to get time to open up on my EVSE and get a new photo with it correctly configured. In the meantime, PLEASE follow the settings on the DIP switch block and ignore the circuit board. (Humorous side story... during a phone call the Ford engineer was having a call with the Webasto engineers in Germany ... when the Webasto engineer asserted that "yes ... 0 means ON" ... IN WHAT UNIVERSE does anyone think that 0 means ON??? Is this a common German thing?)
Any invalid configuration of DIP switches will result in the EVSE defaulting to 48 amps.
In the photo below, the DIP switches are correctly configured to allow for 48 amp charging (circuit breaker should be 60 amp to use this setting.)

8. The front panel LED lights connect to a wire harness ... that wire is currently taped to the inside of the cover. Remove the tape and plug in the wire harness (figure 12 in the front of the manual shows the location). The plug is keyed so it can only be plugged in one way.)
9. Do a final inspection on all those wires secured on all the lugs ... make sure they are all pretty tight. If you have 4-wire (for NEMA 14-50) make sure you cap & tuck the 'Neutral' wire away (it isn't used).
10. Put the inside cover on (the weather-sealed cover)... and all those Torx 25 screws (I think there are 10 of them)
11. There two plugs that close off any un-used access holes on the bottom.
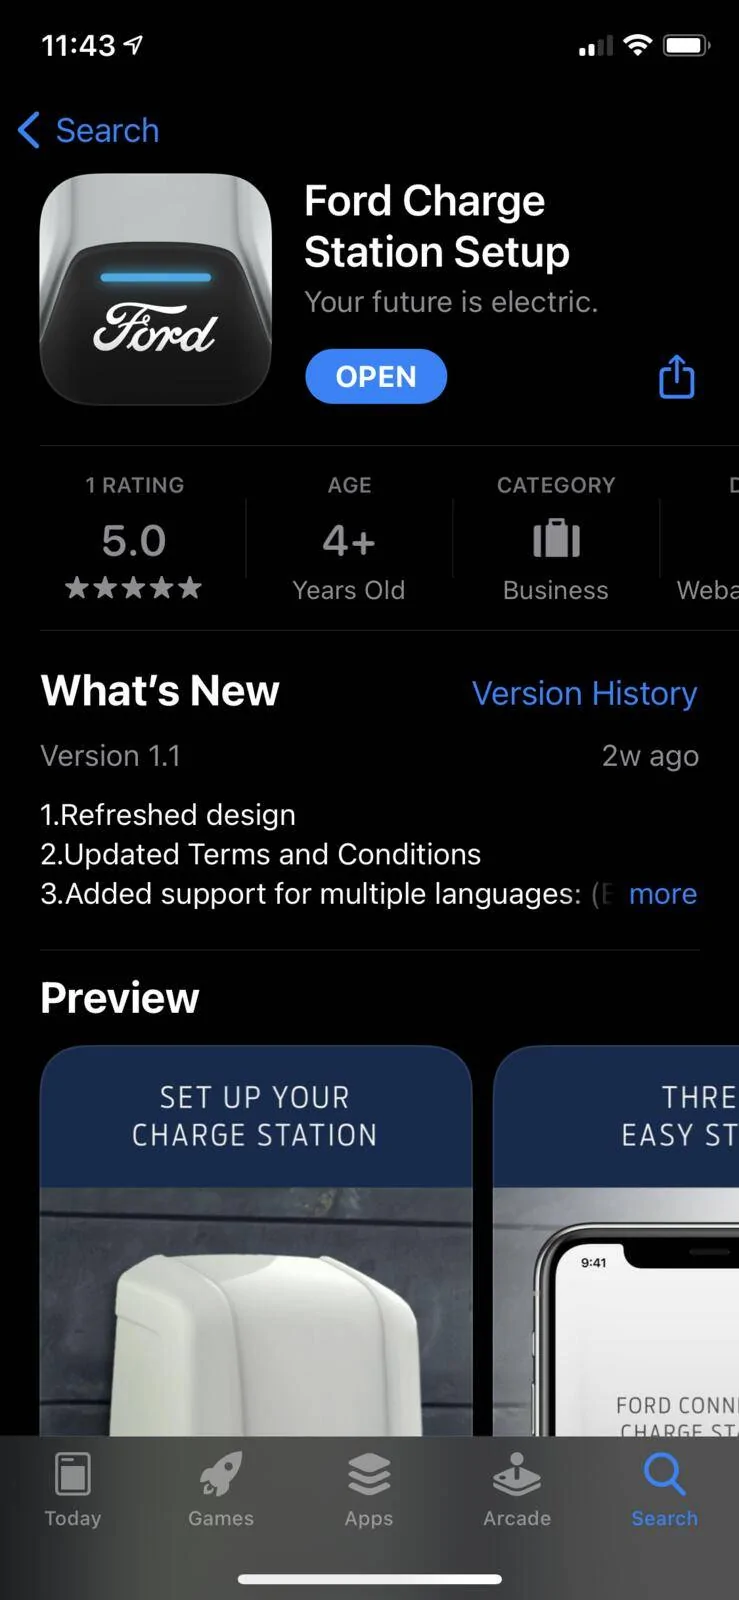
12. Don't put the cosmetic cover on (yet). Instead, download and launch the FordChargeStation setup app. (This is NOT the Ford Pass app)
13. Turn on the power at the breaker (Smoke test! Do not let the smoke out of the box. Smoke must remain inside the box for proper function of the charger.)
14. Follow the instructions in the phone setup app. The reason you left the cosmetic cover off is because the app is going to ask you to key in an access code ... printed on a sticker on the weather-cover (so you'll want to be able to see that). Same code is also on a sticker on the front of the user's guide (but not the install guide).
15. After you key in all the info, select your WiFi network, etc. it will offer to configure the Ford Pass app with all this ... and auto-launches Ford Pass. At this point the charger will show up in Ford Pass.
I got a message that it was successful ... but for roughly the first ... 15 minutes (not exactly sure how long ... but it was a while) the Ford Pass app complained that the charger was not connected to the server. (Possibly some delays on the server-side of the configuration. Possibly it was doing a software update??). But this eventually went away on it's own and it's been great ever since.
16. Put the cosmetic cover on.
Oh... and mount the holster/cable-holder.
17. Take photos and post here!
18. Drink beer (or beverage of choice)
You will need:
A Torx T6 bit screwdriver (very tiny) for the clamps that hold the charging cable in place.
A Torx T25 bit screwdriver for all the Torx screws that hold the weather cover (not the cosmetic cover) in place. That cover is held on with just 3 screws when you pull it out of the box ... but the rest of the screws are in a bag. When you put the cover back on you'll use all of them.
Most people probably already have the rest of the tools (tape measure, pliers, screwdrivers, allen wrench, etc.) I've bolded the Torx sizes because it's less common for someone to just have those on-hand ... pick 'em up if you don't own them.
But it really is as basic as:
1. Shut off the supply power at the breaker to make sure nothing is live during the install.
2. Decide how you want to route the supply power to the EVSE (either up through the bottom or in from the back). You'll need to cut out one of the bottom tabs if coming up from the bottom. You'll need to drill out one of the access ports on the back if bringing power in from the back.
3. Mount the metal mounting bracket.
4. Insert the charging cord through that spring whip (a bit of a fuss because the wires like to get caught on the spring), connect to the lugs and tighten. It is easiest to do this when the charger is NOT yet mounted on the wall. There's a clamp that holds the charging cord in place and that clamp takes a very tiny Torx 6 (T6) screwdriver. It's easiest to do this with the charger laying down on a table rather than hanging on the wall.
5. Mount the charger on the mounting bracket. Two screws lock it onto the mount.
6. Route the 240v supply power in and tighten the lugs.
EDIT: IMPORTANT NOTE: There is some confusion over the DIP switch settings. The labels indicating the 1 vs. 0 on the green board are correct. The labeling on the red DIP switch block is incorrect.
NEW EDIT: IMPORTANT NOTE: Ford recently gave me new information on the DIP switch settings. These EVSEs are made for Ford by Webasto in Germany (that's probably pretty common knowledge as soon as you open it and see the Webasto name on everything). HOWEVER ... Ford had numerous complaints on the DIP switch settings not working and pressed Webasto to please validate those settings. Webasto finally validated the settings that the DIP switch settings on the switch BLOCK are correct... NOT the silk-screening on the green printed circuit board. So basically the opposite of the photo I have here. It took Ford some time to get them to do this. I'm told the new batch of EVSE's is having the silk-screened instructions removed and only the numbers on the switch block will be used.
I will try to get time to open up on my EVSE and get a new photo with it correctly configured. In the meantime, PLEASE follow the settings on the DIP switch block and ignore the circuit board. (Humorous side story... during a phone call the Ford engineer was having a call with the Webasto engineers in Germany ... when the Webasto engineer asserted that "yes ... 0 means ON" ... IN WHAT UNIVERSE does anyone think that 0 means ON??? Is this a common German thing?)
Any invalid configuration of DIP switches will result in the EVSE defaulting to 48 amps.
8. The front panel LED lights connect to a wire harness ... that wire is currently taped to the inside of the cover. Remove the tape and plug in the wire harness (figure 12 in the front of the manual shows the location). The plug is keyed so it can only be plugged in one way.)
9. Do a final inspection on all those wires secured on all the lugs ... make sure they are all pretty tight. If you have 4-wire (for NEMA 14-50) make sure you cap & tuck the 'Neutral' wire away (it isn't used).
10. Put the inside cover on (the weather-sealed cover)... and all those Torx 25 screws (I think there are 10 of them)
11. There two plugs that close off any un-used access holes on the bottom.
12. Don't put the cosmetic cover on (yet). Instead, download and launch the FordChargeStation setup app. (This is NOT the Ford Pass app)
13. Turn on the power at the breaker (Smoke test! Do not let the smoke out of the box. Smoke must remain inside the box for proper function of the charger.)
14. Follow the instructions in the phone setup app. The reason you left the cosmetic cover off is because the app is going to ask you to key in an access code ... printed on a sticker on the weather-cover (so you'll want to be able to see that). Same code is also on a sticker on the front of the user's guide (but not the install guide).
15. After you key in all the info, select your WiFi network, etc. it will offer to configure the Ford Pass app with all this ... and auto-launches Ford Pass. At this point the charger will show up in Ford Pass.
I got a message that it was successful ... but for roughly the first ... 15 minutes (not exactly sure how long ... but it was a while) the Ford Pass app complained that the charger was not connected to the server. (Possibly some delays on the server-side of the configuration. Possibly it was doing a software update??). But this eventually went away on it's own and it's been great ever since.
16. Put the cosmetic cover on.
Oh... and mount the holster/cable-holder.
17. Take photos and post here!
18. Drink beer (or beverage of choice)
Sponsored
Last edited:
")