mpshizzle
Well-Known Member
- Joined
- Mar 22, 2021
- Threads
- 65
- Messages
- 1,274
- Reaction score
- 1,605
- Location
- Utah
- Vehicles
- Mustang Mach E 4X
- Thread starter
- #1
(See updates and "Additional Notes" at the end of this post)
In this guide I'll be covering FDRS, what it is and how to use it.
What is FDRS?
It stands for "Ford Diagnosis and Repair System". Made by Ford for reading trouble codes, programming modules, updating modules, etc.
Why Would I Want to Use it?
This is really only for the die-hard DIYer. If your dealer is a **Insert nasty word of your choice here** and/or you just want to tinker this is for you.
Are there alternatives to FDRS?
Yes! Forscan is a great, free option. I won't cover it here but it has much of the same diagnostic and programming functionality. It is missing some key features though, such as updating module software as well as some service routines.... You may now snigger at how bad that name sounds in the English language.
A Few Disclaimers to Start
What You'll Need to Run FDRS
A Laptop Running Windows 7 or 10
I used a MacBook Pro running Windows 10 on bootcamp. Mac Silicon devices (M1, M2, etc.) will not work.
Windows 11 seems to work as well if you're on the bleeding edge
Change your computer's settings so it doesn't go to sleep during the process.
A J2534 Interface
This is what connects your computer to the OBD II port on the car. Quick disclaimer, cheap OBD adapters like this DO NOT work. They're fine for Forscan and Torque, but FDRS specifically requires support for the J2534 protocol.
FDRS Officially supports these devices:
The adapter I used was This. It's a third party option that worked for what I did and the price is... less... ridiculous
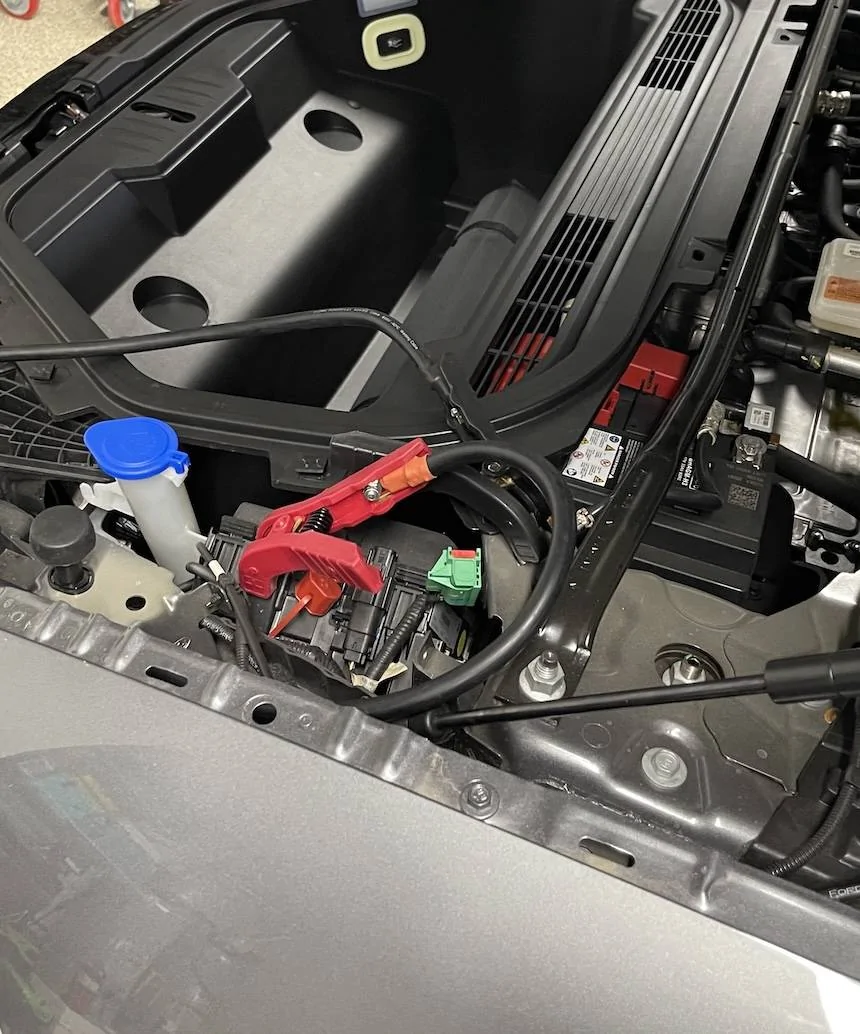
A 12 Volt Power Supply
Some updates can take over an hour. During these updates the car will not be maintaining the little baby 12v battery the Mach E comes equipped with. If the battery goes kaput during the update, the update goes kaput as well. Since we're not in the business of making bricks here you need a power supply to keep this from happening. Mind you I said "power supply" not "battery charger". I didn't measure, but I hear the car can draw upwards of 30A during the updates. A 4WD vehicle often pulls 35A during updates.
I DO NOT recommend doing what I did, but I'm overly cheap sometimes. I happen to have a gigantic RV battery just sitting around for another project, so I ran jumpers to the RV battery to assist. It did the job just fine. But again, that is NOT a recommendation.
An FDRS License
There are a few websites that pop up if you Google this, but the one you want is Ford's official https://www.motorcraftservice.com/
To get the license


If you are using the mongoose adapter like me, make sure you visit their website, download, and install the driver before running FDRS.


I unfortunately didn't take any screen shots of the update itself but there are 2 kinds of updates. One just runs straight from the laptop. The other requires the use of a USB flash drive that you plug into the SYNC system.
A couple of things on the USB drive part.
Making this Guide Complete
I am not the most knowledgeable person on this forum about this. So if anyone has anything to add or correct, please do so!
If you'd like to see all of this in action, @scoopman made a great video of the process
Additional Notes
Since this original guide was written, several aspects have changed or the community has gained additional knowledge about them. Below are random notes attempting to gather together that knowledge:
(copied and pasted (within minor edits) from a post by @Mike G)
In this guide I'll be covering FDRS, what it is and how to use it.
What is FDRS?
It stands for "Ford Diagnosis and Repair System". Made by Ford for reading trouble codes, programming modules, updating modules, etc.
Why Would I Want to Use it?
This is really only for the die-hard DIYer. If your dealer is a **Insert nasty word of your choice here** and/or you just want to tinker this is for you.
Are there alternatives to FDRS?
Yes! Forscan is a great, free option. I won't cover it here but it has much of the same diagnostic and programming functionality. It is missing some key features though, such as updating module software as well as some service routines.... You may now snigger at how bad that name sounds in the English language.
A Few Disclaimers to Start
- FDRS comes with risks. It's meant to be used by dealers and shops. If something goes wrong you can brick your car. So using it is NOT for the faint of heart. It's not for the cheap of heart either, but we will get to that in a moment ?
- Seriously, you have been warned. FDRS and your car's hardware do have built in safety measures to prevent damage. But if something happens while following this guide, YOU are liable for any repair/replacement. If the idea that something could go wrong makes you squeamish, this is not for you.
- Yes yes yes.. I know this information is found elsewhere on the forum, but I wanted to make a central location with all of the information together.
- To find help in this thread, open this thread, then use the forum search box, click on "Everywhere" and change to "This thread".
What You'll Need to Run FDRS
A Laptop Running Windows 7 or 10
I used a MacBook Pro running Windows 10 on bootcamp. Mac Silicon devices (M1, M2, etc.) will not work.
Windows 11 seems to work as well if you're on the bleeding edge
Change your computer's settings so it doesn't go to sleep during the process.
A J2534 Interface
This is what connects your computer to the OBD II port on the car. Quick disclaimer, cheap OBD adapters like this DO NOT work. They're fine for Forscan and Torque, but FDRS specifically requires support for the J2534 protocol.
FDRS Officially supports these devices:
- VCM II
- VCMM
- VCM3
The adapter I used was This. It's a third party option that worked for what I did and the price is... less... ridiculous
A 12 Volt Power Supply
Some updates can take over an hour. During these updates the car will not be maintaining the little baby 12v battery the Mach E comes equipped with. If the battery goes kaput during the update, the update goes kaput as well. Since we're not in the business of making bricks here you need a power supply to keep this from happening. Mind you I said "power supply" not "battery charger". I didn't measure, but I hear the car can draw upwards of 30A during the updates. A 4WD vehicle often pulls 35A during updates.
I DO NOT recommend doing what I did, but I'm overly cheap sometimes. I happen to have a gigantic RV battery just sitting around for another project, so I ran jumpers to the RV battery to assist. It did the job just fine. But again, that is NOT a recommendation.
An FDRS License
There are a few websites that pop up if you Google this, but the one you want is Ford's official https://www.motorcraftservice.com/
To get the license
- Create a Motorcraft account
- Go to this menu
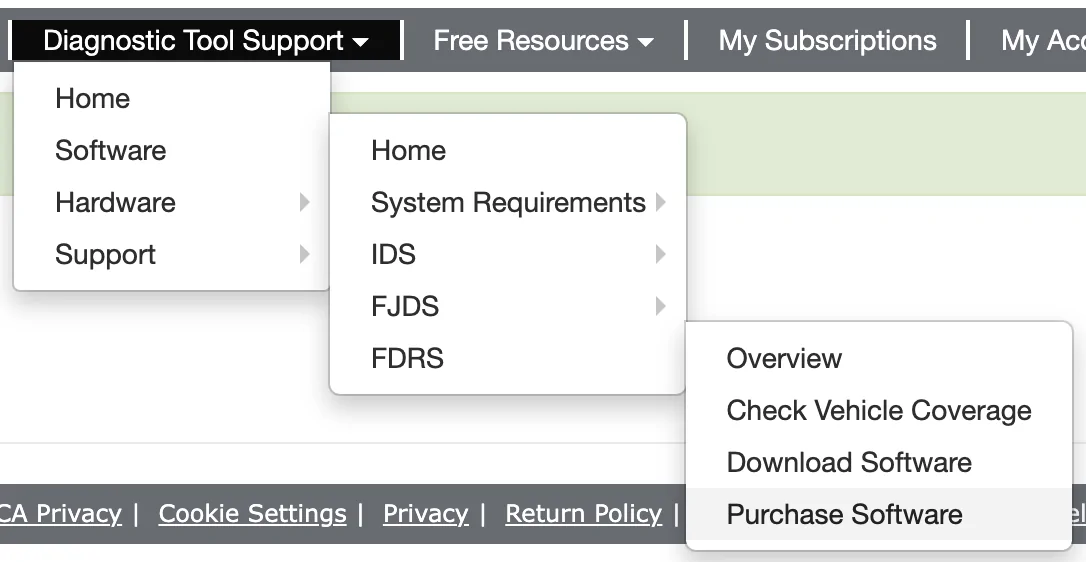
3. Once you click through you'll be prompted to log in again on a wonderfully 90s looking website.
4. Click Purchase Additional Licenses (It may just say Purchase Licenses for you)

5. Choose which subscription period you want. Note it says FJDS on here, not FDRS. Don't fret, this license is still the right one
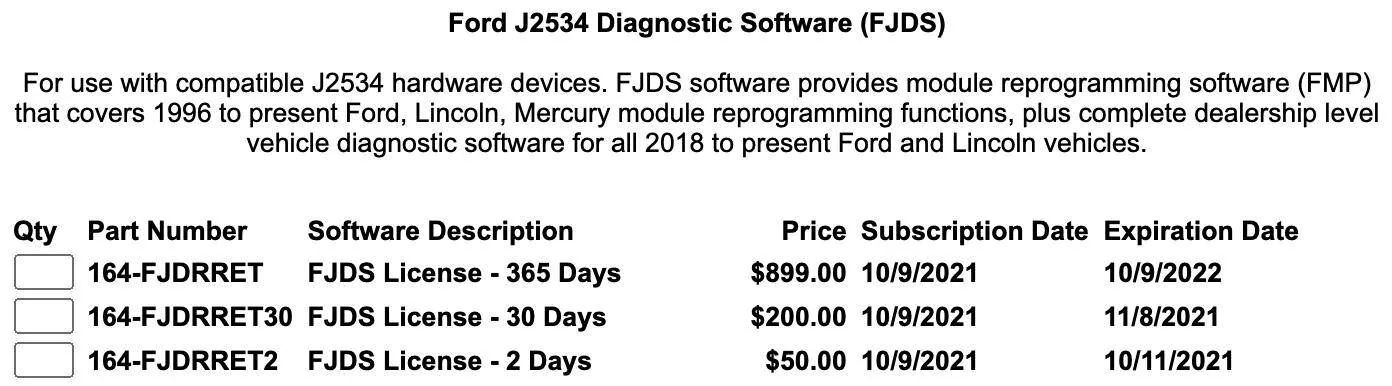
6. Once the purchase is complete it will take you to a download page with installation instructions.
Running Updates on FDRSIf you are using the mongoose adapter like me, make sure you visit their website, download, and install the driver before running FDRS.
- Plug in the adapter and turn on the car
- Open FDRS. Choose " Non-Dealer Motorcraft" and log in.
- It will then ask you how you are connecting to the car. If you're using the same adapter I did it should show up under "other device"
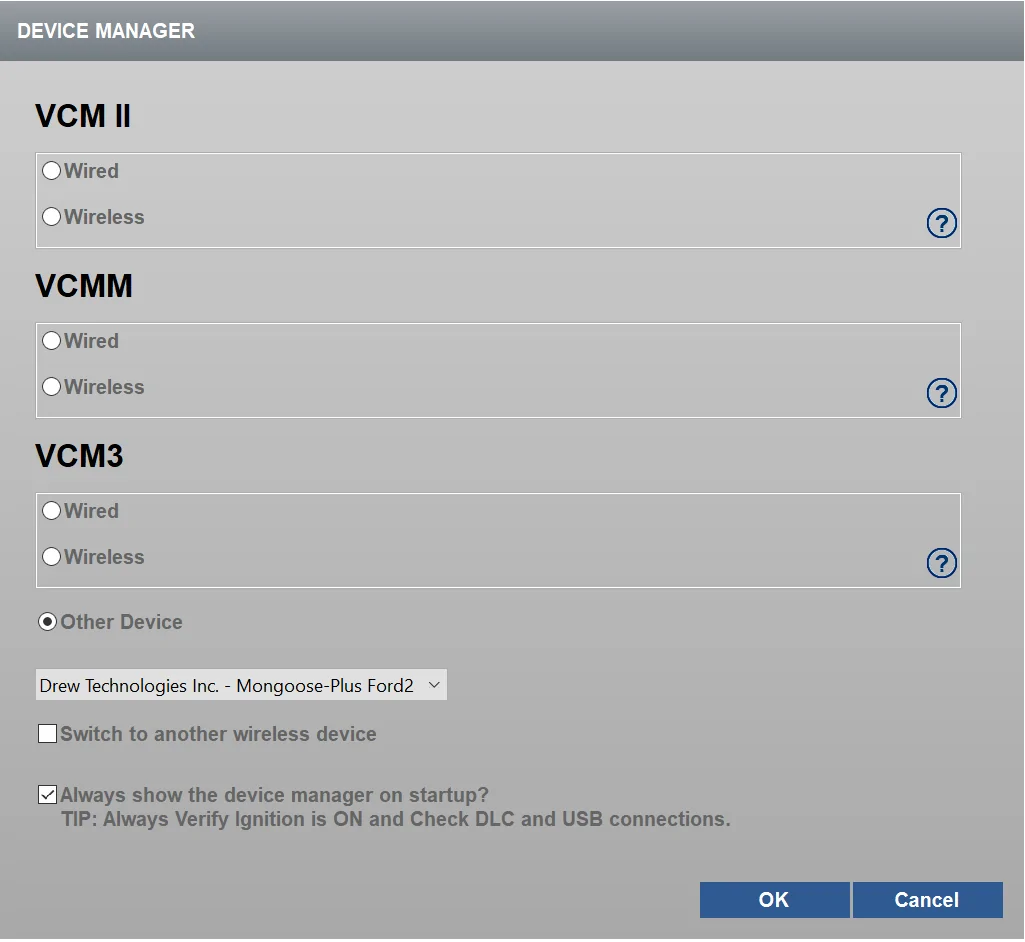
4. Hit "Read VIN from vehicle" and then "Go"

5. After a few moments it will take you to the vehicle page. Click Continue
6. Go to the "SW Updates" tab and it will show you any modules that aren't up to date (mine had a lot). From here you can download and run them. The system does a great job of walking you through the process. If there are particular updates that have to happen in a specific order, FDRS will automatically take care of that and install all of them one after the other.

How Updates WorkI unfortunately didn't take any screen shots of the update itself but there are 2 kinds of updates. One just runs straight from the laptop. The other requires the use of a USB flash drive that you plug into the SYNC system.
A couple of things on the USB drive part.
It says it wants a 32 GB drive, but of the updates I installed the largest was like 150 MB. So my 16GB drive did the job just fine. The other "gotcha" is there's a restart involved. At some point the sync screen will tell you that the update is complete, and that you need to turn off and get out of the vehicle. At this point I removed the USB drive. DON'T DO THAT. After a few failed attempts I realized that once you restart, it'll think for a moment and then tell you that the update is finished (again) and that you can remove the USB drive. THEN you can remove the drive. I felt like an idiot but it fooled me.
If your USB device gets a "for charging only" error when plugged into the car, check that it is formatted for exFAT and that the boot record is MBR not GPT. I had a 1 GB SSD, and it turned out it was using a GPT boot record. It's hard on a windows machine to check this, but follow the instructions that Microsoft provides for changing a GPT to MBR disk and you'll be fine.
Making this Guide Complete
I am not the most knowledgeable person on this forum about this. So if anyone has anything to add or correct, please do so!
If you'd like to see all of this in action, @scoopman made a great video of the process
Additional Notes
Since this original guide was written, several aspects have changed or the community has gained additional knowledge about them. Below are random notes attempting to gather together that knowledge:
- When logging in to FDRS, instead of "Non-Dealer Motorcraft", sign in as an "Independent"
- FDRS frequently goes offline on Sunday mornings for maintenance.
- When starting FDRS, the vehicle should be in accessory mode, also known as "key on, engine off." This is accomplished by pressing the "start" button when the brake is NOT pressed.
- Some modules require the use of a 32GB (or larger) USB thumb drive formatted as exFAT. Some people have used a USB SSD drive instead (and reported that it's much faster.)
- While this original post implies a 30A power supply might be sufficient, 45 to 55A might be better, especially for AWD vehicles (that have a higher draw due to additional motors to cool.)
- Before updating each module, ensure that wipers are turned (all the way) off, headlights are turned off, and the HVAC is turned off. (You will likely have to turn off the headlights many times.)
- Before downloading new modules, clear and retest all DTCs. Clear and retest all DTCs _after_ each module is updated as well.
- It's suggested to start with the following modules, doing each one repeatedly if/when it (re)appears: GWM, TCU, and IPC. Then APIM if it appears.
- Some modules have dependencies on other modules. These will automatically kick off updating the dependent modules. This frequently is the case for powertrain related modules (PSCM/IPMA. Also SOBDM, ABS, BECM, etc.)
- Do the cruise control related items in this sequence, IPC, CMR, IPMA/PSCM (those two are coordinated to update together).
- While updating modules, your car will do very strange things and report all kinds of extremely scary errors and failures. This is normal and is partially due to modules being unable to communicate with each other while they are being updated. Those errors will be cleared as part of the "clear and retest" that you should be doing after programming each module.
- One error that may not clear is the SOBDMC error regarding the shift knob. Drive the car a bit, come back, and then the error should be able to be cleared.
(copied and pasted (within minor edits) from a post by @Mike G)
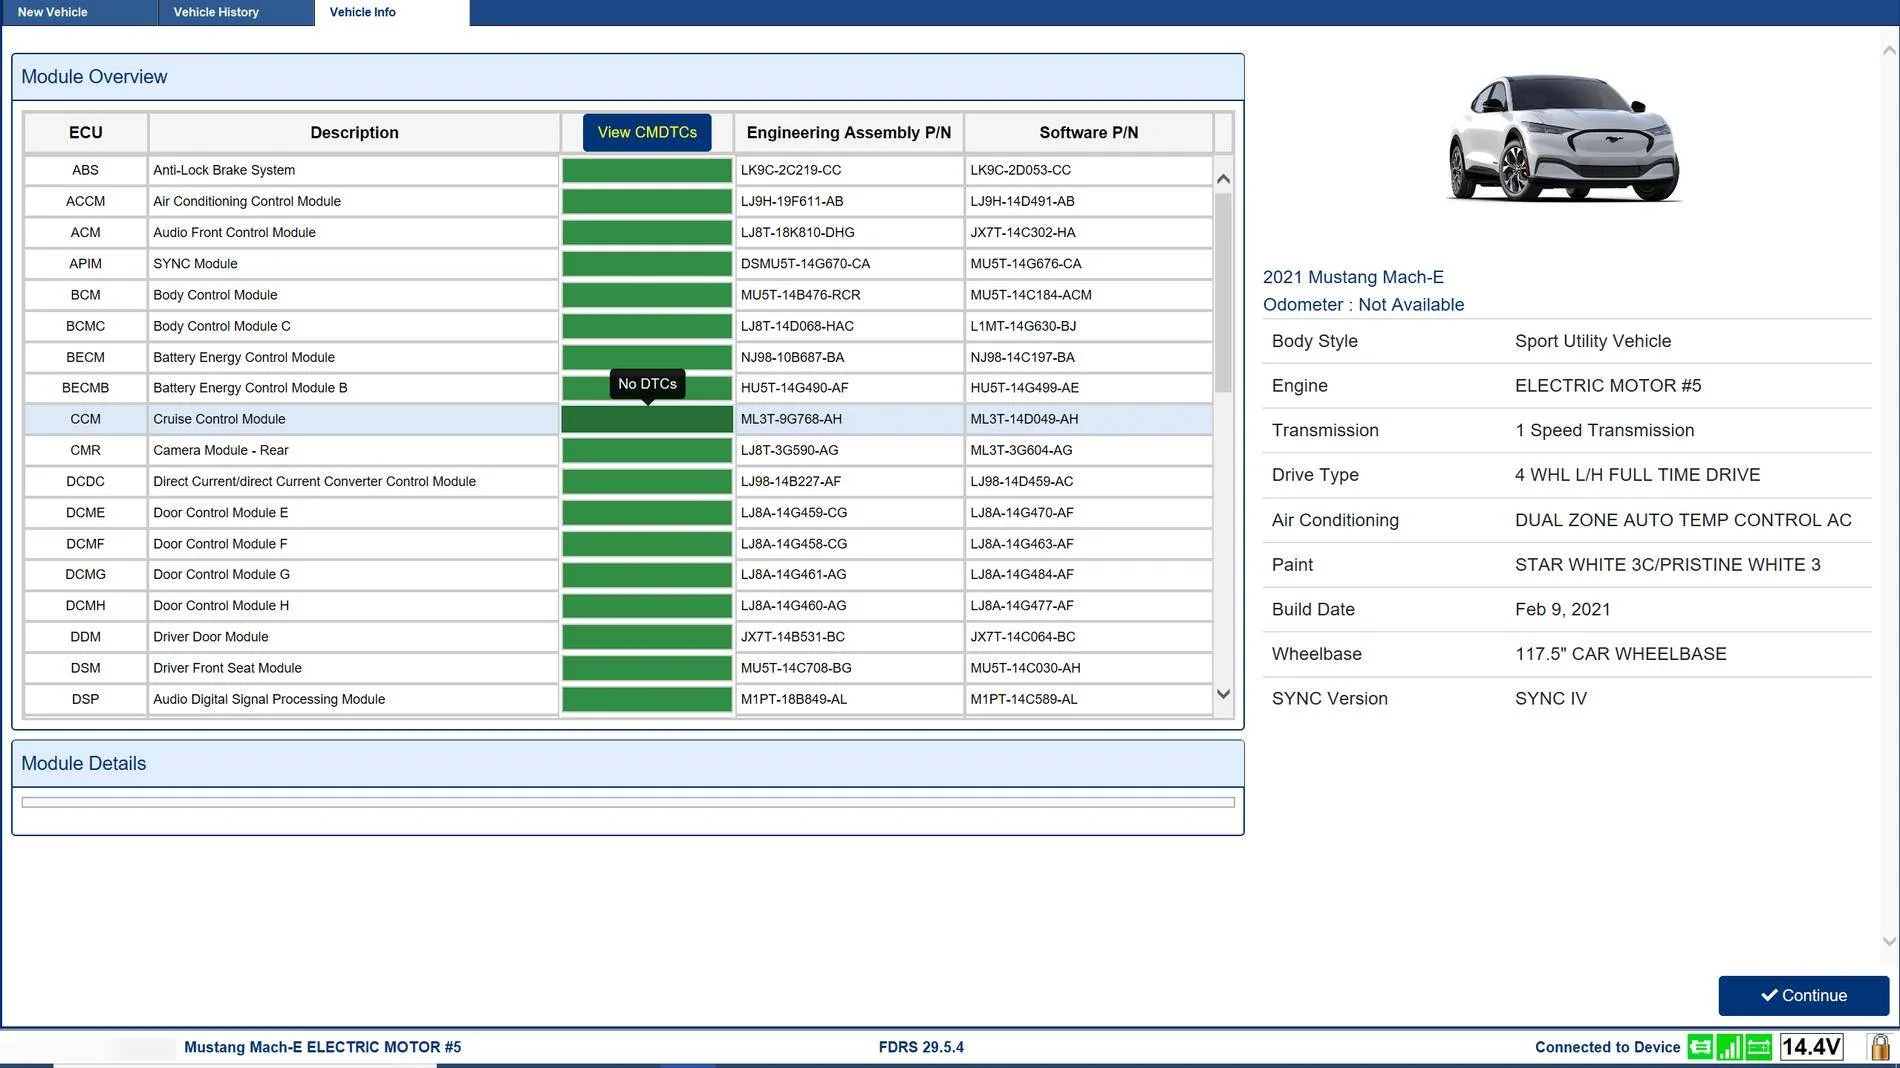
- Before starting any programming you need to clear and retest to get rid of the orange (or red) module indicators.
- From the Vehicle Identification Tab look for the blue button that says "View CMDTCS" and press that.
- Scroll through the list when that refreshes and review the orange (you hope never to see red) module tiles and you can expand the hyperlink text to view the details.
- When you've finished the light reading then select the "Clear and retest" button and hopefully all those modules will be reset to a green status.
Sponsored
Last edited by a moderator:
")