DennisR

Well-Known Member
First Name
Dennis
Joined
Aug 10, 2021
Threads
27
Messages
77
Reaction score
42
Location
Southern England
Vehicles
Mach E GT Absolute Black
Occupation
Retired
Country flag
This is a lengthy tutorial with photos showing how I added my dash cam and radar detector to my Mach-E

A few points before we get started:

  • While this is not a difficult project, it is not for the faint of heart. Messing with a brand new car could potentially void your warranty or cause more serious problems.
  • There are sharp metal edges behind all of the pretty stuff - wear gloves!
  • This is my fifth or sixth vehicle doing similar upgrades. The rest were 2 BMW's, an Audi, a Tesla model S, and 2 Subarus. This car was by far the easiest to do but that also could be because I have more experience.
  • Never pry plastic panels with a screwdriver. Either use your fingers or a simple plastic pry set similar to this one on Amazon:
  • When you do pry these plastic components with your fingers or a pry tool, occasionally the little plastic retaining clips may break. While you can buy these from Ford, AutoZone sells them in bunches of three or four at half the price. I found out the hard way that Tesla was charging large sums of money for clips that I could easily have purchased for a Subaru at less than $.50 a pop.

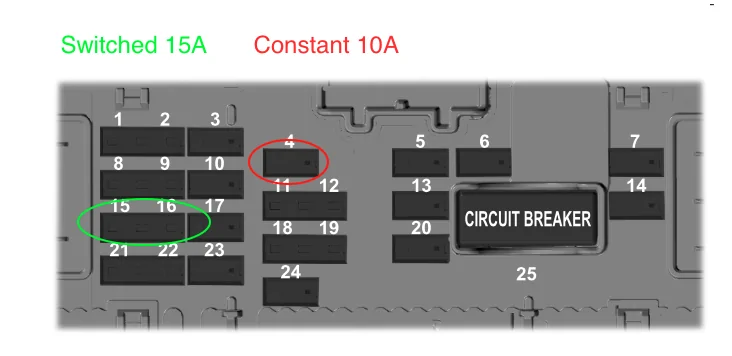
Obtaining switched and constant 12 V power

The radar detector needs a switched 12 V power supply and the dash cam needs both a switched 12 V supply and a constant 12 V supply to record problems while the car is parked. In previous vehicles, I had no trouble finding both switched and constant power somewhere in the overhead mirror compartment but could only find switched on this car.

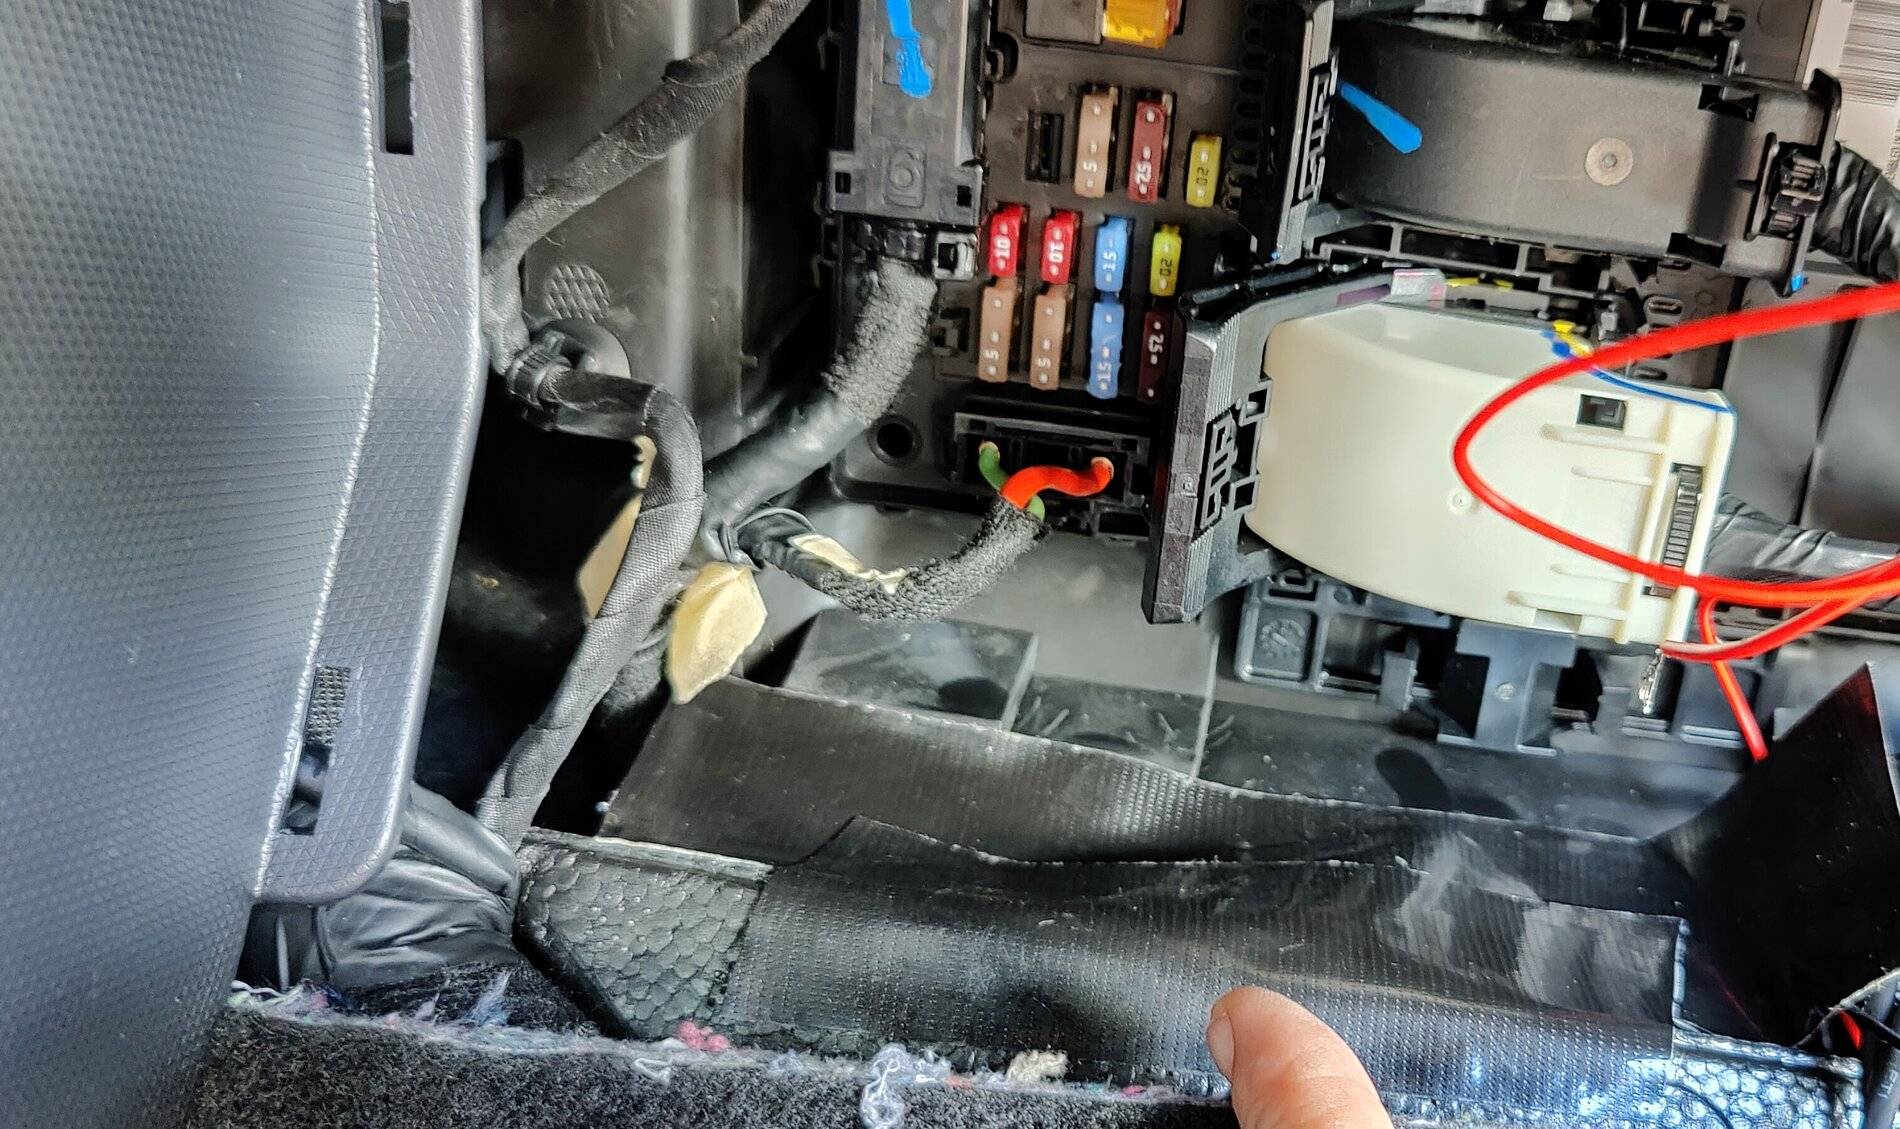
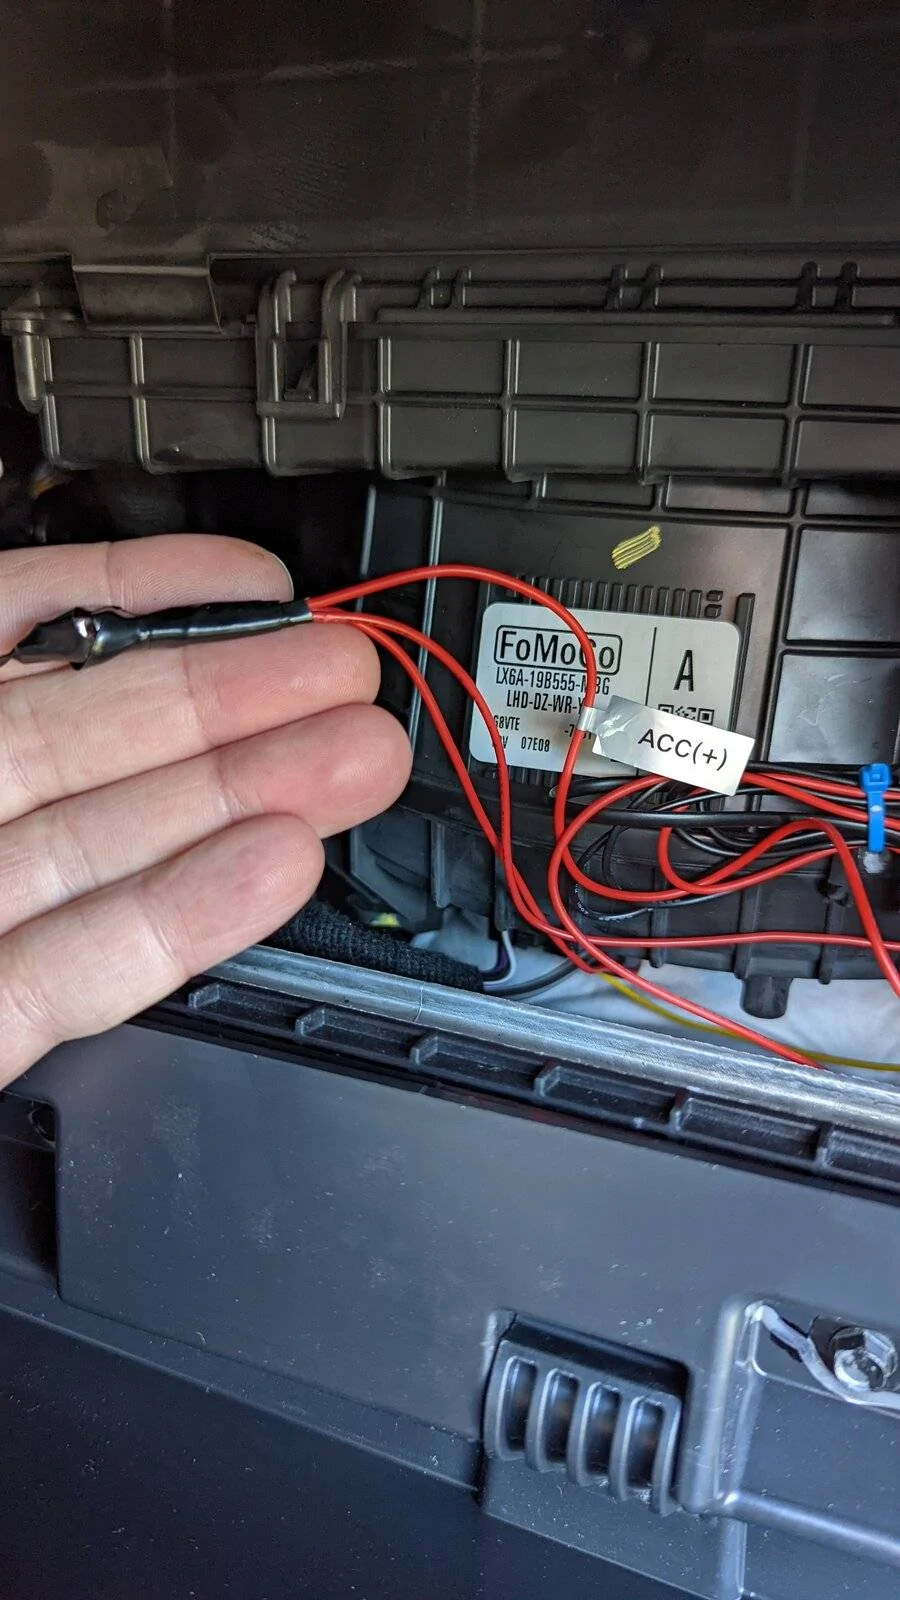
I also do not like to overly strain the built-in wires. When possible, I prefer to run new circuits from the fuse box up to the windshield to power both toys. That is what I did in this case. There is a fuse box behind the passenger kick panel. With a little experimentation, I found high capacity circuits of both types. Page 278 of the owners manual will show you how to remove that kick plate.

From page 279 of the owners manual:

Pic1.png


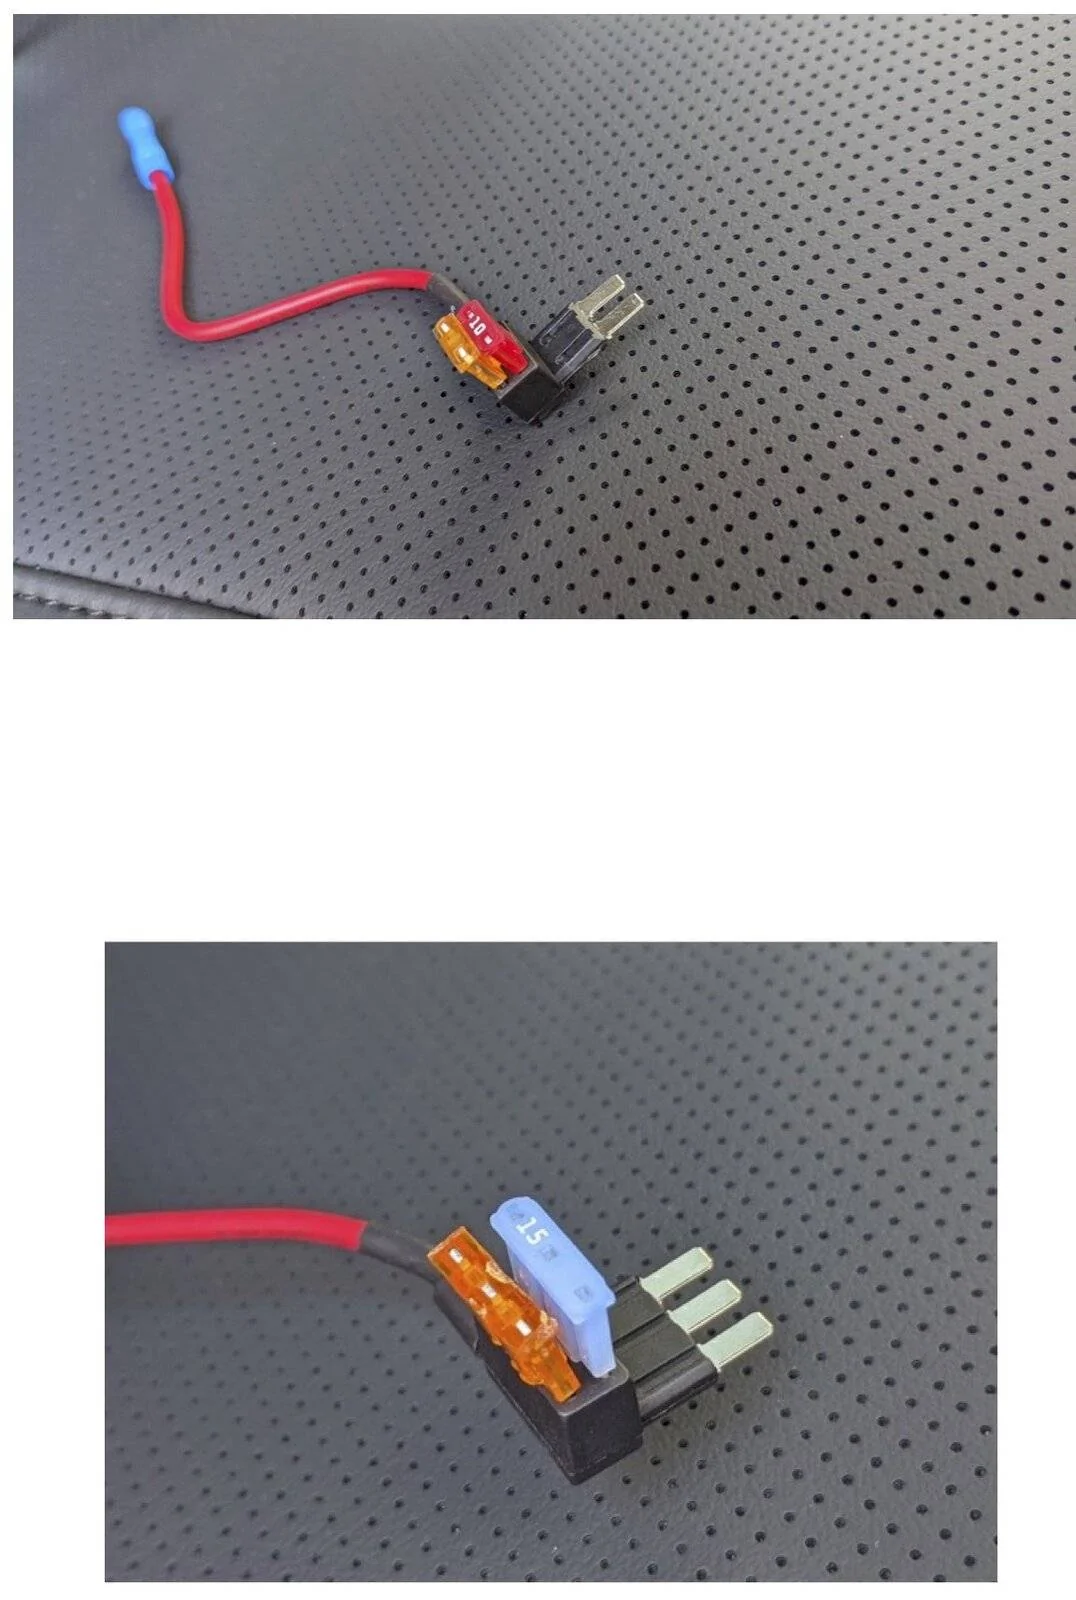
While I previously would simply tap into an existing wire, I like my toys to have their own fuses in case something goes wrong. I recently started using these "add a tap" products to make tapping-in easier and safer. The existing fuse gets moved into the bottom slot and a new 2.5 amp fuse goes to my toys.

merge2.jpg


The physically smaller fuse it is called a Micro 2 and the larger one is called a Micro 3.

Here are the links for the add-a-taps:

https://www.amazon.com/gp/product/B082YZWSSY/ref=ppx_yo_dt_b_asin_title_o03_s00?ie=UTF8&psc=1

https://www.amazon.com/gp/product/B07R8R2T7T/ref=ppx_yo_dt_b_asin_title_o04_s00?ie=UTF8&psc=1


I normally have extra three conductor wire around the house however I had to purchase some for this project. I normally like 20 gauge wire but somehow accidentally bought 22 gauge wire. This is definitely capable of carrying enough power for these two small devices.

Routing Wires

I was able to easily route this wire up towards the mirror housing. First I removed this side panel using a small plastic pry tool. It is held on by six plastic clips:

Pic4.jpg


Next, I carefully pried off the A column cover with the pry tools. There is an airbag in here. Any wires you run must go behind the airbag. I prefer to zip tie them to ensure they do not fall in front of the airbag.

Pic5.jpg


I next removed the cover over the mirror housing. I did this with gentle finger pressure pulling downward to release the 5 clips.

Pic6.jpg


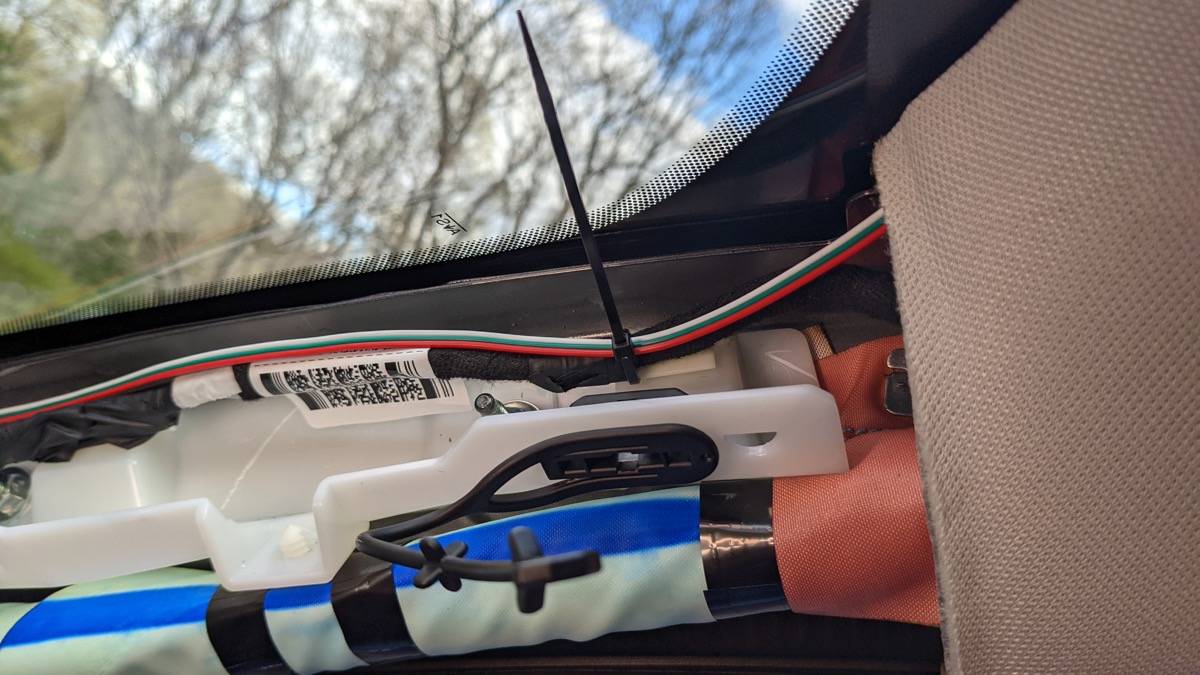
Next, I connected the appropriate switched power to my radar detector, switched and constant to the dash cam plug and both to negative. I prefer to solder all wires and cover with shrink wrap tubing. I also have serious OCD therefore labeled everything however in this picture you cannot read the labels because they are facing away from you. Red is constant, green is switched and the white is my negative.

Pic 7.jpg


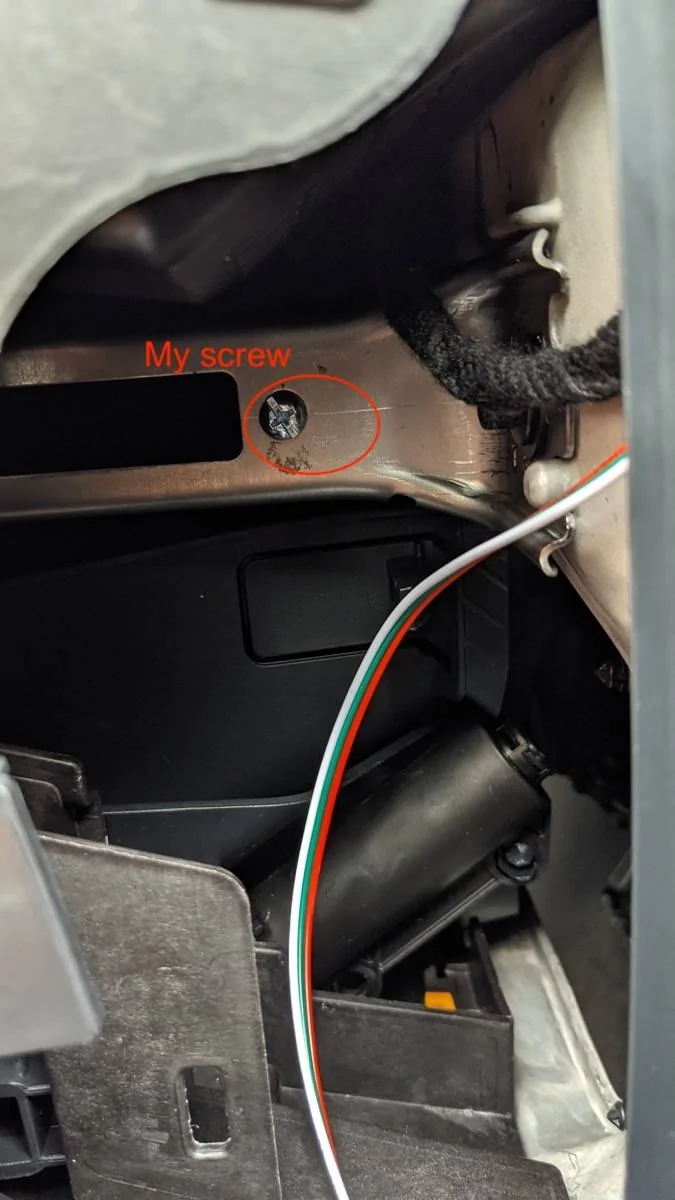
I almost forgot, speaking about the negative lead, I could not find a good metal anchoring point anywhere in that fuse box. Everything is plastic in there. Therefore, I found a nice piece of steel in that side compartment below the A column. There were two round holes. I took a metal machine screw, washer and nut and fastened the raw white wire directly to that piece of the frame. Again, with the OCD, I used thread locker liquid on the bolt to ensure it never came loose accidentally.

Pic 8.jpg


At this point, I connected the red and green leads to the add-a-taps below in the fuse box, plugged everything in, and made sure everything worked as I expected with the car on and off.

Connection to Rear Camera

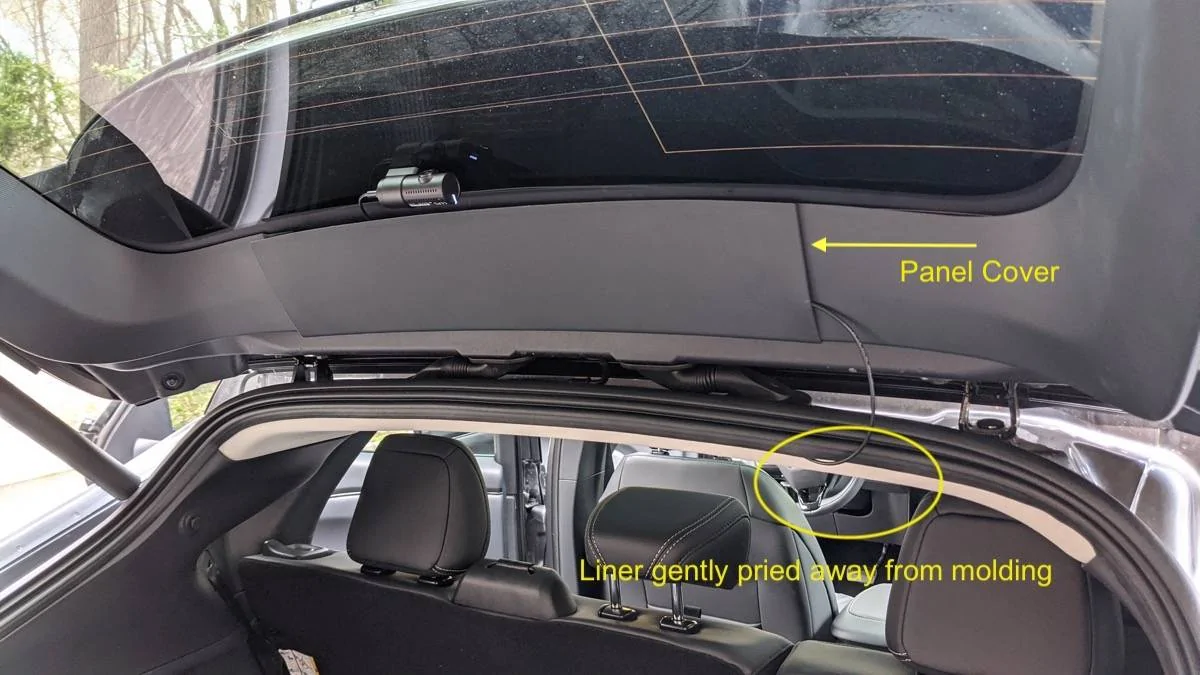
The next step was to run the video lead to the rear camera. Fortunately, the ceiling liner is not strongly attached to the roof as in the other cars I had to work on. Simply pull down gently using a pry tool to work under the rubber gasket. Going between the front and rear doors around the B column required a little work. Instead of using my fish tape, I took a small diameter wire hanger to thread the wire through. Once the wire hanger is visible on both ends, I simply used electrical tape and pulled it through. Note: I could not pry the B column cover off easily and didn't want to risk breaking anything. Likewise, going to the trunk, the plastic holding the liner in place felt too sturdy and I simply used fish tape to pull the wire all the way into the trunk.

pic9.jpg


Pic10.jpg


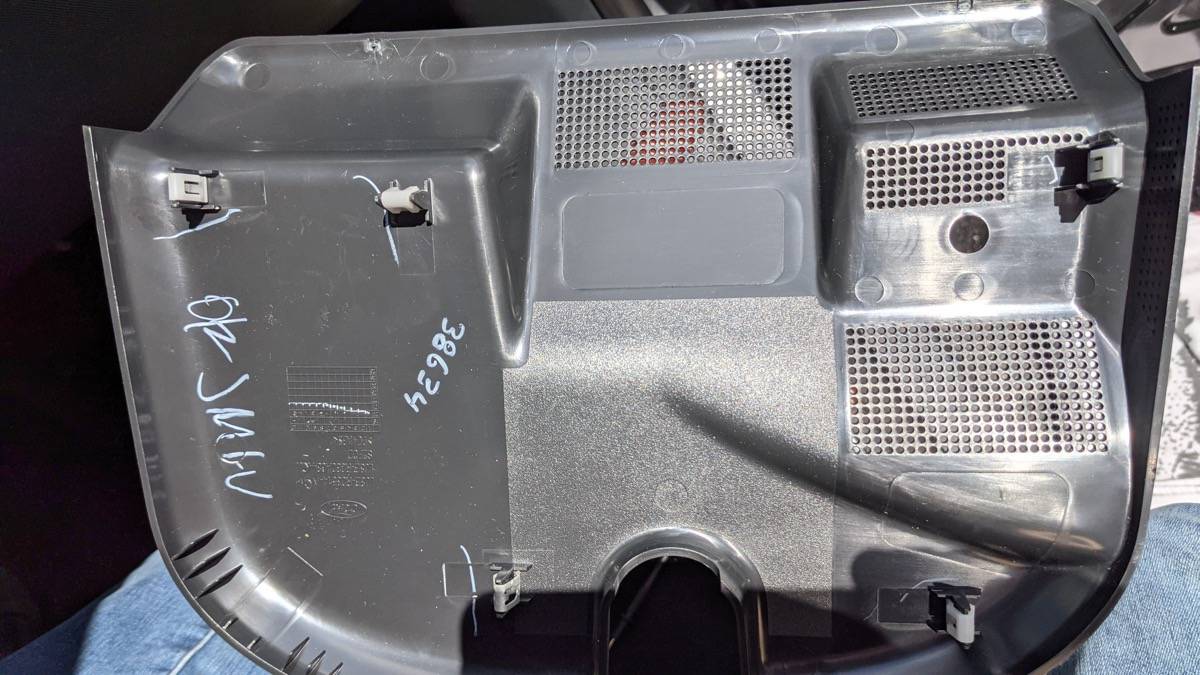
To make the job as neat as possible, I also pried off the plastic cover noted in the photo above. It is held on by six retaining clips. I then mounted the rear camera as high up as possible on the window.


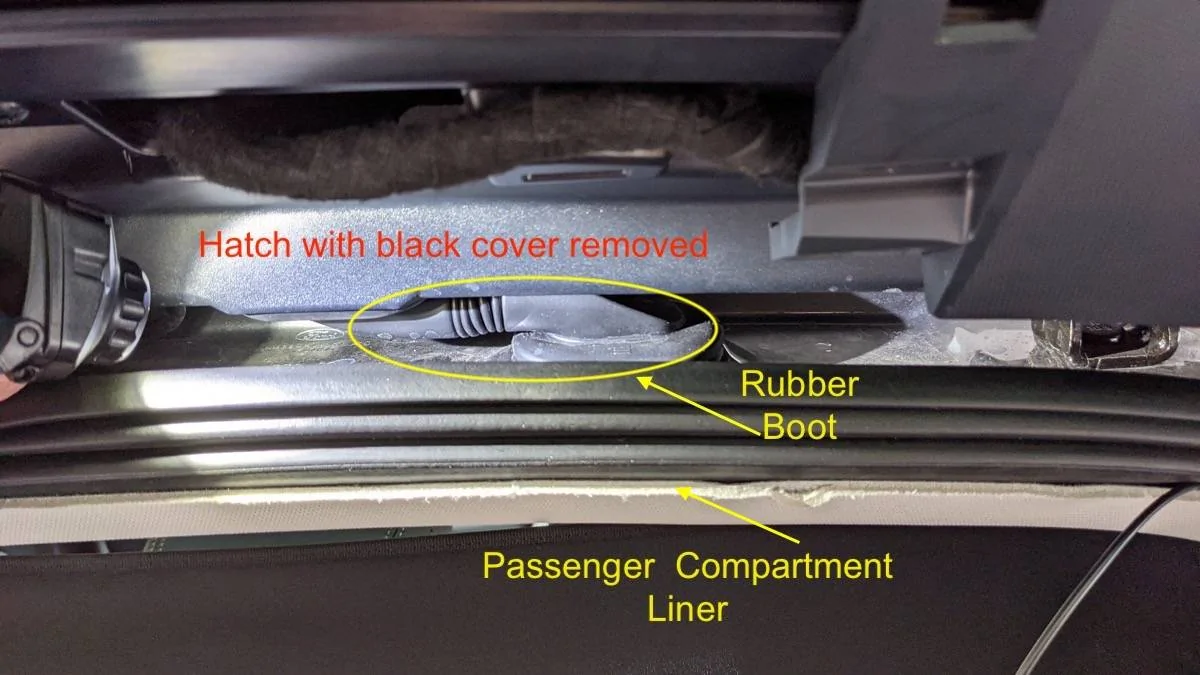
Normally, I would run the wire to the rear camera through the "boot" between the main compartment and the hatch. This is the first car that I was not able to do so. The boot is sufficiently deep under the liner and into the hatch, that no amount of manipulation with fish tape would let me get a string through there. Therefore, I will have that little bit of wire hanging down between the liner and the hatch on the right side but it is not visible when I look in the rearview mirror.

Pic11.jpg


Once that was done, it was simply a matter of putting everything back together. The only difficult part was getting the A column to sit properly. Work slowly. There is a vent built into that column that has to be seated at the base in order for the column to fit properly.


The final result:

Merge4.jpg


Please write with any questions. I am happy to help out anyone trying a similar project.

Jeff
Nicely done, going to do a similar install on my rhd, the small panel on the side of the dash that needs to come off has an air bag switch for the passenger will this be a problem ?
 

Megabueno

Well-Known Member
Joined
Oct 1, 2020
Threads
9
Messages
106
Reaction score
134
Location
San Diego
Vehicles
MME GTPE
Country flag
Just wrapped up my Thinkware install front/rear cameras and separate battery. The guide here is elite! I mounted my battery right behind the glovebox via Velcro.
 

scoopman

Well-Known Member
Joined
Jan 30, 2021
Threads
60
Messages
2,769
Reaction score
5,801
Location
Bay Area
Vehicles
2023 KIA EV6 GT, 2021 VW ID.4 Pro S
Occupation
former electric pony jockey
Country flag
This thread was great. I've successfully wired my new BlackVue DR900X Plus with parking mode. I used 1-2 for switched power, and 4 for constant power. I also wired up a BlackVue Power Magic Pro just in case to prevent any 12V problems.

One tip: I put a piece of very wide tape over the bottom underneath the fuses. I had Mach N Cheese eat a mini 10A fuse because they're very tiny and there's a hole right underneath the fuses... The tape prevented any future mishaps.

I do have a question: I have a Uniden R7 radar detector that I also want to wire with switched power. Using the same circuit as the dashcam made the BlackVue Power Magic & dashcam unhappy.

Can anyone suggest another switched power fuse to tap in that same fuse box? The 15-16 one is unavailable to me as the fuse tap I'm using covers up that one and I don't have enough room. So far, the other fuses I've tried are always-on power it seems.

Alternatively, I do have mirror taps for the radar detector, but this thread doesn't detail exactly which pins or colored wires to tap for positive and ground in the mirror. Does someone have good photos or knows this detail?

Here's a photo of my solution to prevent my fat fingers from dropping more fuses into the abyss below that panel:

Ford Mustang Mach-E DIY Tutorial for Hardwiring a Dashcam and Radar Detector IMG_20211031_132303
 

DevSecOps

Well-Known Member
First Name
Todd
Joined
Sep 22, 2021
Threads
69
Messages
4,741
Reaction score
11,509
Location
Sacramento, CA
Vehicles
'21 Audi SQ5 / '23 Rivian R1T / '23 M3P
Occupation
CISO
Country flag
I do have a question: I have a Uniden R7 radar detector that I also want to wire with switched power. Using the same circuit as the dashcam made the BlackVue Power Magic & dashcam unhappy.
Hmmm that's strange because I tapped into that same tap 1-2 with a BlackVue, power magic and escort redline 360c. No problems at all. Are you sure you got a good connection?

All of the mini fuses are always on. The only switched are the larger double micro fuses.

I just went out and took a picture of what I did for the accessory power. You can see 3 wires, 2 in and 1 out.

Ford Mustang Mach-E DIY Tutorial for Hardwiring a Dashcam and Radar Detector PXL_20211031_231321684
 
Last edited:

scoopman

Well-Known Member
Joined
Jan 30, 2021
Threads
60
Messages
2,769
Reaction score
5,801
Location
Bay Area
Vehicles
2023 KIA EV6 GT, 2021 VW ID.4 Pro S
Occupation
former electric pony jockey
Country flag
Hmmm that's strange because I tapped into that same tap 1-2 with a BlackVue, power magic and escort redline 360c. No problems at all. Are you sure you got a good connection?

All of the mini fuses are always on. The only switched are the larger double micro fuses.

I just went out and took a picture of what I did for the accessory power. You can see 3 wires, 2 in and 1 out.

Ford Mustang Mach-E DIY Tutorial for Hardwiring a Dashcam and Radar Detector PXL_20211031_231321684
Thanks for the quick reply! It could have been my connection wasn't good -- I also hadn't set up the BlackVue yet and I think I might have also misinterpreted what it was doing (which was that it didn't like my SD card in it). It seemed to turn itself off after a little while. I've since set it up, and I can't remember if I did so and then tested before also disconnecting the radar from the circuit to eliminate these separate variables. I had lots of distractions with my "helpers."

I have to take my kids (aka "helpers") trick-or-treating soon, so I had to get my car back together. Will need to play around with this more later tonight, especially since I know you have nearly the exact same setup.


scoopman

Well-Known Member
Joined
Jan 30, 2021
Threads
60
Messages
2,769
Reaction score
5,801
Location
Bay Area
Vehicles
2023 KIA EV6 GT, 2021 VW ID.4 Pro S
Occupation
former electric pony jockey
Country flag
Okay, I performed surgery by flashlight after my sugar-filled kids finally fell asleep last night.

Success! It turns out one of grounds didn't have a great connection. Once I did this, both radar and dashcam are working great.

The only negative is that I was a little over-ambitious in trying to put the plastic back together last night and I munched one of the hard clips on the "LHD Hush Panel A" piece. I decided to leave the plastic out and try again today in the daylight when I need a break from work.

As proof my dashcam works, here's my test run after school drop-off. You'll see the Rivian R1T in the other lane in Rivian Blue from my Cyber Orange Mach E :) Pretty nice way to break in the dashcam, and I think he looked at me as much as I looked at him.

Thanks again to this thread and the encouragement from @DevSecOps!

Ford Mustang Mach-E DIY Tutorial for Hardwiring a Dashcam and Radar Detector Screen Shot 2021-11-01 at 8.24.52 AM
 

DevSecOps

Well-Known Member
First Name
Todd
Joined
Sep 22, 2021
Threads
69
Messages
4,741
Reaction score
11,509
Location
Sacramento, CA
Vehicles
'21 Audi SQ5 / '23 Rivian R1T / '23 M3P
Occupation
CISO
Country flag
Okay, I performed surgery by flashlight after my sugar-filled kids finally fell asleep last night.

Success! It turns out one of grounds didn't have a great connection. Once I did this, both radar and dashcam are working great.

The only negative is that I was a little over-ambitious in trying to put the plastic back together last night and I munched one of the hard clips on the "LHD Hush Panel A" piece. I decided to leave the plastic out and try again today in the daylight when I need a break from work.

As proof my dashcam works, here's my test run after school drop-off. You'll see the Rivian R1T in the other lane in Rivian Blue from my Cyber Orange Mach E :) Pretty nice way to break in the dashcam, and I think he looked at me as much as I looked at him.

Thanks again to this thread and the encouragement from @DevSecOps!

Ford Mustang Mach-E DIY Tutorial for Hardwiring a Dashcam and Radar Detector Screen Shot 2021-11-01 at 8.24.52 AM
Interesting placement choice. Is there a reason you went to the side? Here's what I did and you can't even see it when driving


scoopman

Well-Known Member
Joined
Jan 30, 2021
Threads
60
Messages
2,769
Reaction score
5,801
Location
Bay Area
Vehicles
2023 KIA EV6 GT, 2021 VW ID.4 Pro S
Occupation
former electric pony jockey
Country flag
Seemed like that would be more obvious when looking from outside the car, thought it was more stealthy mounted mostly on the black portion of the windshield. It doesn't bother me that I can see it, would rather not have it as visible through the windshield.
 

DevSecOps

Well-Known Member
First Name
Todd
Joined
Sep 22, 2021
Threads
69
Messages
4,741
Reaction score
11,509
Location
Sacramento, CA
Vehicles
'21 Audi SQ5 / '23 Rivian R1T / '23 M3P
Occupation
CISO
Country flag
Seemed like that would be more obvious when looking from outside the car, thought it was more stealthy mounted mostly on the black portion of the windshield. It doesn't bother me that I can see it, would rather not have it as visible through the windshield.
I purposefully wanted people to see it as a deterrent. Respect your choice tho! On that side I have my FasTrak.
 

scoopman

Well-Known Member
Joined
Jan 30, 2021
Threads
60
Messages
2,769
Reaction score
5,801
Location
Bay Area
Vehicles
2023 KIA EV6 GT, 2021 VW ID.4 Pro S
Occupation
former electric pony jockey
Country flag
I purposefully wanted people to see it as a deterrent. Respect your choice tho! On that side I have my FasTrak.
Yeah I thought the light on it was enough to let people know there was something there, and it's also a careful balance with the car not being a smash and grab the camera target. Hopefully this will never have to be tested!
 

scoopman

Well-Known Member
Joined
Jan 30, 2021
Threads
60
Messages
2,769
Reaction score
5,801
Location
Bay Area
Vehicles
2023 KIA EV6 GT, 2021 VW ID.4 Pro S
Occupation
former electric pony jockey
Country flag
@DevSecOps or others with BlackVue cameras -- are you experiencing a slight rattle from the proximity sensor side of the camera? The car is so quiet otherwise this and one of my childseats are driving me crazy. I think I need to do this, it's this exact rattle: https://www.rdforum.org/threads/77494/#post-1170677

(I'm on a felt tape mission with the child seat too!)
 

DevSecOps

Well-Known Member
First Name
Todd
Joined
Sep 22, 2021
Threads
69
Messages
4,741
Reaction score
11,509
Location
Sacramento, CA
Vehicles
'21 Audi SQ5 / '23 Rivian R1T / '23 M3P
Occupation
CISO
Country flag
@DevSecOps or others with BlackVue cameras -- are you experiencing a slight rattle from the proximity sensor side of the camera? The car is so quiet otherwise this and one of my childseats are driving me crazy. I think I need to do this, it's this exact rattle: https://www.rdforum.org/threads/77494/#post-1170677

(I'm on a felt tape mission with the child seat too!)
On the side where you can tap to perform whatever you programmed it to do? I haven't noticed it but I normally drive with the radio obnoxiously loud. I'll listen for it on my drive home. As for the link you sent, I assume it's not on the recording that you are worried about, it's in the cabin correct?

I don't have audio recording enabled on mine unless I tap the side.
 

Lord Polymath

Well-Known Member
Joined
Sep 13, 2021
Threads
9
Messages
710
Reaction score
719
Location
Arkansas
Vehicles
2021 Sienna, '22 Mach-E Premium ER AWD (PWRPONY)
Occupation
Computer nerd
Country flag
For those of you that tapped into the 1-2 fuse, I have in my notes that it is only 5A. BlackBoxMyCar suggests using one that is 10A-30A.
Is there a fuse in the "unused" spots or is it empty?
 

DevSecOps

Well-Known Member
First Name
Todd
Joined
Sep 22, 2021
Threads
69
Messages
4,741
Reaction score
11,509
Location
Sacramento, CA
Vehicles
'21 Audi SQ5 / '23 Rivian R1T / '23 M3P
Occupation
CISO
Country flag
For those of you that tapped into the 1-2 fuse, I have in my notes that it is only 5A. BlackBoxMyCar suggests using one that is 10A-30A.
Is there a fuse in the "unused" spots or is it empty?
The fuse for the camera is only 3 amps so I'm not sure why they would recommend that. Now if it's on a used spot they could possibly recommend that because between the previously used fuse and the new fuse the total would be higher. I'm gonna have to say they are incorrect.

A 3 amp fuse will trip at +3 amps regardless if the previous fuse was 5 amps, 10 or 30. What they are suggesting just doesn't make sense. And the majority of fuse taps are not rated for 10 or 30 amps so I'm slightly perplexed.
 

Lord Polymath

Well-Known Member
Joined
Sep 13, 2021
Threads
9
Messages
710
Reaction score
719
Location
Arkansas
Vehicles
2021 Sienna, '22 Mach-E Premium ER AWD (PWRPONY)
Occupation
Computer nerd
Country flag
The fuse for the camera is only 3 amps so I'm not sure why they would recommend that. Now if it's on a used spot they could possibly recommend that because between the previously used fuse and the new fuse the total would be higher. I'm gonna have to say they are incorrect.

A 3 amp fuse will trip at +3 amps regardless if the previous fuse was 5 amps, 10 or 30. What they are suggesting just doesn't make sense. And the majority of fuse taps are not rated for 10 or 30 amps so I'm slightly perplexed.
Glad I'm not the only one! Thanks
Sponsored


Top