Mach-Lee
Well-Known Member
- First Name
- Lee
- Joined
- Jul 16, 2021
- Threads
- 262
- Messages
- 11,350
- Reaction score
- 24,977
- Location
- Wisconsin
- Vehicles
- 2022 Mach-E Premium AWD
- Occupation
- Sci/Eng
- Thread starter
- #1
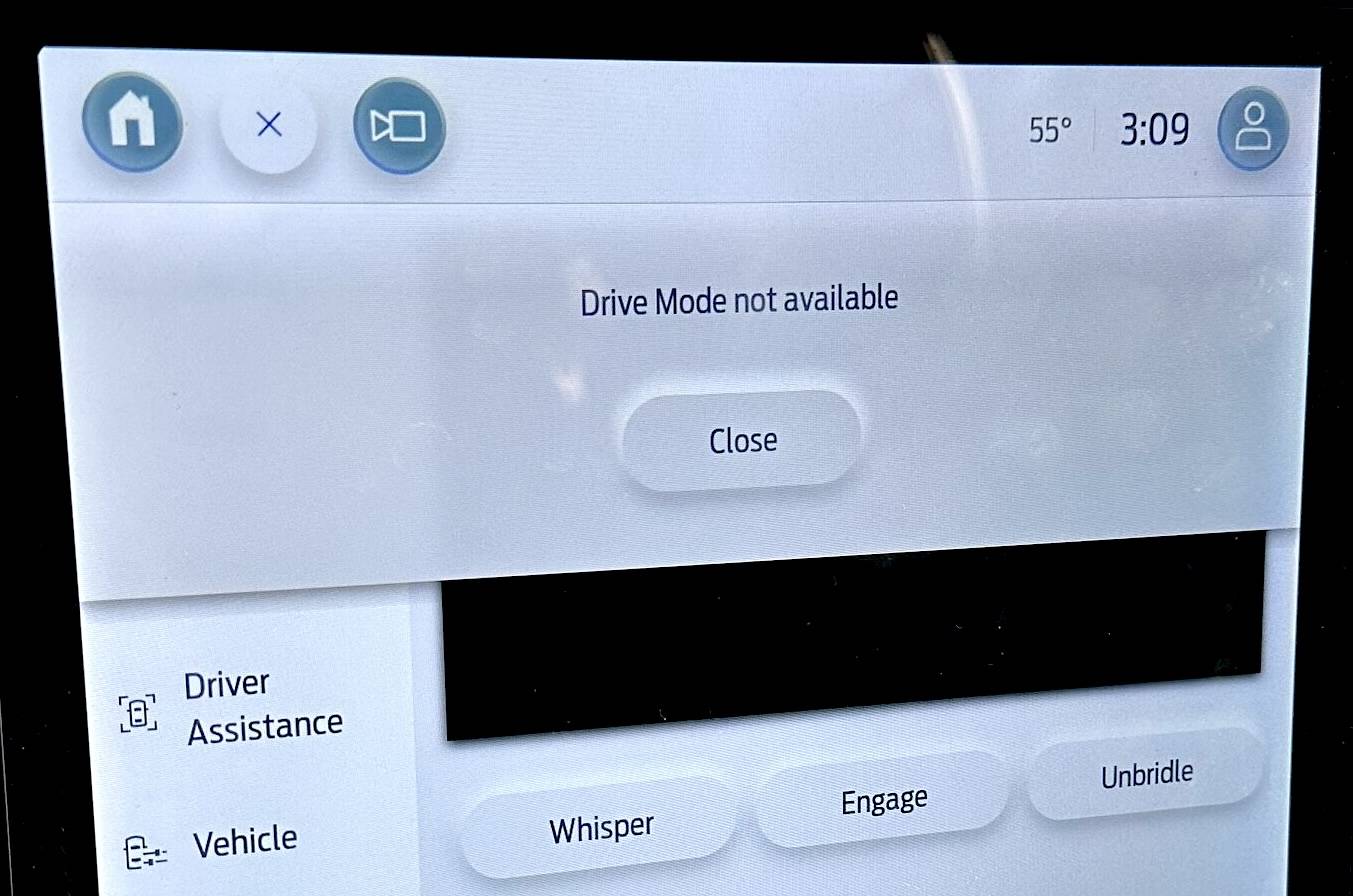
The fix for the "Drive Mode not available" message is available. It involves a SYNC (APIM) update, but needs to be coordinated with other modules including the GWM, TCU, and IPC. These four modules should have been updated in the 6.2.1, 6.1.0, 6.3.0, and 6.8.0 OTAs. Additionally, 2021 vehicles will also need an IPMA module update (no OTA yet), which triggers additional coordinated modules including PSCM, CCM, and CMR. All said, this could take a decent chunk of time to do all the updates.
Hopefully dealers are not sticklers about needing to reproduce this message. Just give them this TSB.

Hopefully dealers are not sticklers about needing to reproduce this message. Just give them this TSB.
| TECHNICAL SERVICE BULLETIN Drive Mode Defaults To Normal Mode While Driving And Drive Mode Not Available Message Displays In The Center Display Screen With Or Without DTC U0253 Stored In The ABS Module | 24-2012 12 January 2024 | |||||||||||||||||
Model:
Summary Issue: Some 2021-2023 Mach-E vehicles may exhibit the drive mode default to normal mode while driving and Drive Mode Not Available message displays in the center display screen with or without DTC U0253 stored in the ABS module. This may be due to the software in the APIM. To correct the condition, follow the Service Procedure steps to reprogram the APIM. NOTE: The APIM software update that addresses the symptom listed in this bulletin may have been sent via Ford Power-Up software updates delivered over-the-air (OTA) to connected vehicles that have automatic updates enabled through the center display screen. Enter the VIN in PTS and check the OTA Dashboard under the Connected Vehicle tab for OTA update history. If an update to the APIM has successfully completed recently and the customer is reporting the symptoms are no longer present, this article may not apply. Action: Follow the Service Procedure to correct the condition on vehicles that meet all of the following criteria:
Parts
Warranty Status: Eligible under provisions of New Vehicle Limited Warranty (NVLW)/Service Part Warranty (SPW)/Special Service Part (SSP)/Extended Service Plan (ESP) coverage. Limits/policies/prior approvals are not altered by a TSB. NVLW/SPW/SSP/ESP coverage limits are determined by the identified causal part and verified using the OASIS part coverage tool. Labor Times
Service Procedure NOTE: Ask the customer to bring their spare key fob to assist in the FDRS programming. The time required to complete this procedure will vary depending on several factors including the number of module software updates required, available internet bandwidth, USB flash drive variability, and the potential that CAN flashing (software update via the DLC with FDRS) may be required. It is recommended to connect to the internet with an ethernet cable and use a USB 3.0/3.1 capable flash drive when performing software updates. 1. Start an FDRS session and navigate to Toolbox tab > Datalogger > body control module (BCM) and select the BATT_SOC PID. Verify the PID reads 50% or higher. If SOC is less than 50%, charge the battery then navigate back to Toolbox tab > BCM > Reset Battery Monitor Sensor Learned Values application. Perform the BMS reset. (1). If the battery is unable to achieve an 50% SOC then a new battery may be required. Use the Rotunda GRX-3590 or DCA-8000 testers to verify if replacement is required. If the battery is replaced, fully recharge the new battery. Then disconnect the Rotunda charger and perform a BMS reset using the FDRS scan tool. 2. Reconnect the battery charger and set it to maintain a vehicle voltage of 12.6-13.6 volts. A low battery SOC while performing a software update to any module may result in a repeat Restart Required message in the vehicle's center display screen or a message on the FDRS saying Part Number Validation Failed or DID Validation Failed. 3. Are there any updates available for the GWM? (1). Yes - proceed to Step 4. (2). No - this article does not apply. Refer to WSM, Section 415-00. 4. Perform the Module Software Updating Procedures outlined below for the GWM, TCU, APIM and IPC. Perform a network test after each software update using the latest software level of the FDRS scan tool. This will refresh the list of modules that have available software updates based current module software levels. Continue performing software updates to the GWM until all available software updates for those modules are complete. If any error conditions are experienced during programming, refer to WSM, Section 418-01A > General Procedures > Module Programming for the Error Condition Table. 5. For 2021 vehicles only, perform the IPMA Software Updating Procedure. When performing the IPMA software update, additional modules receive software updates. Depending on vehicle features, the coordinated software update includes the IPMA, PSCM, CCM and/or CMR. (1). Reprogram the IPMA using the latest FDRS software level. Follow all on-screen instructions carefully to complete all coordinated module software updates. (2). Perform the FDRS Image Processing Module A (IPMA) Alignment procedure. (3). Perform the appropriate FDRS camera alignment procedure. (4). For vehicles equipped with 360 degree cameras, perform the IPMA - 360 Degree View Camera Alignment procedure. (5). For vehicles not equipped with 360 degree cameras, perform the IPMA - Pro Trailer Backup Assist Camera Alignment procedure. This procedure should be performed on all vehicles without 360 degree cameras, even if the vehicle is not equipped with PTBA. 6. For 2021 vehicles only, perform the Module Software Updating Procedures again outlined below for the GWM, TCU and APIM. Module Software Updating Procedure The following instructions apply when performing a software update on any of the following modules: NOTE: A 32GB or larger USB flash drive is required for software updates. Make sure the USB flash drive being used is formatted correctly. To see the available drives, hold down the Windows icon keyboard key and press the E keyboard key. Right click on the USB flash drive and select Properties. If File System under the General tab is not exFAT, the drive must be formatted. To format the USB flash drive: 1. Using the FDRS, begin module programming by selecting the SW Updates tab. Download and run the application for the desired module. Follow all on-screen instructions carefully. 2. When prompted, connect the USB flash drive to the FDRS. 3. When prompted by the FDRS, safely remove/eject the USB flash drive from the personal computer (PC), turn the vehicle to KOER. Connect the USB flash drive to the media hub to install the software update. The update starts automatically and may take 10 minutes or longer to complete. NOTE: It may take up to 5 minutes for the vehicle to recognize the USB flash drive with software update. 4. When center display screen prompts to restart the vehicle: (1). Turn the vehicle off. (2). Wait 10 minutes. (3). Turn the vehicle to KOER. (4). Leave the USB flash drive inserted into the vehicle, until the vehicles infotainment display screen states programming successful. NOTE: It may take up to 5 minutes before the center display screen displays the Update Successful pop-up. After 5 minutes if Successful pop-up is not shown on the vehicle's center display screen, remove the USB flash drive and select YES on the FDRS Was The USB Update Successful prompt ( FDRS verifies if the module software update was successfully installed on the module). 5. Continue following the FDRS prompts to complete GWM, TCU, APIM and IPC software update. |
Sponsored
Attachments
-
190.5 KB Views: 384
Last edited:
")