360alaska
Well-Known Member
- First Name
- Josh
- Joined
- Aug 21, 2023
- Threads
- 4
- Messages
- 89
- Reaction score
- 123
- Location
- Northwest Louisiana
- Vehicles
- 2021 MACH-E RWD, 2019 Model 3, 1997 Ranger 4.0
- Thread starter
- #1
Introduction (TLDR at bottom)
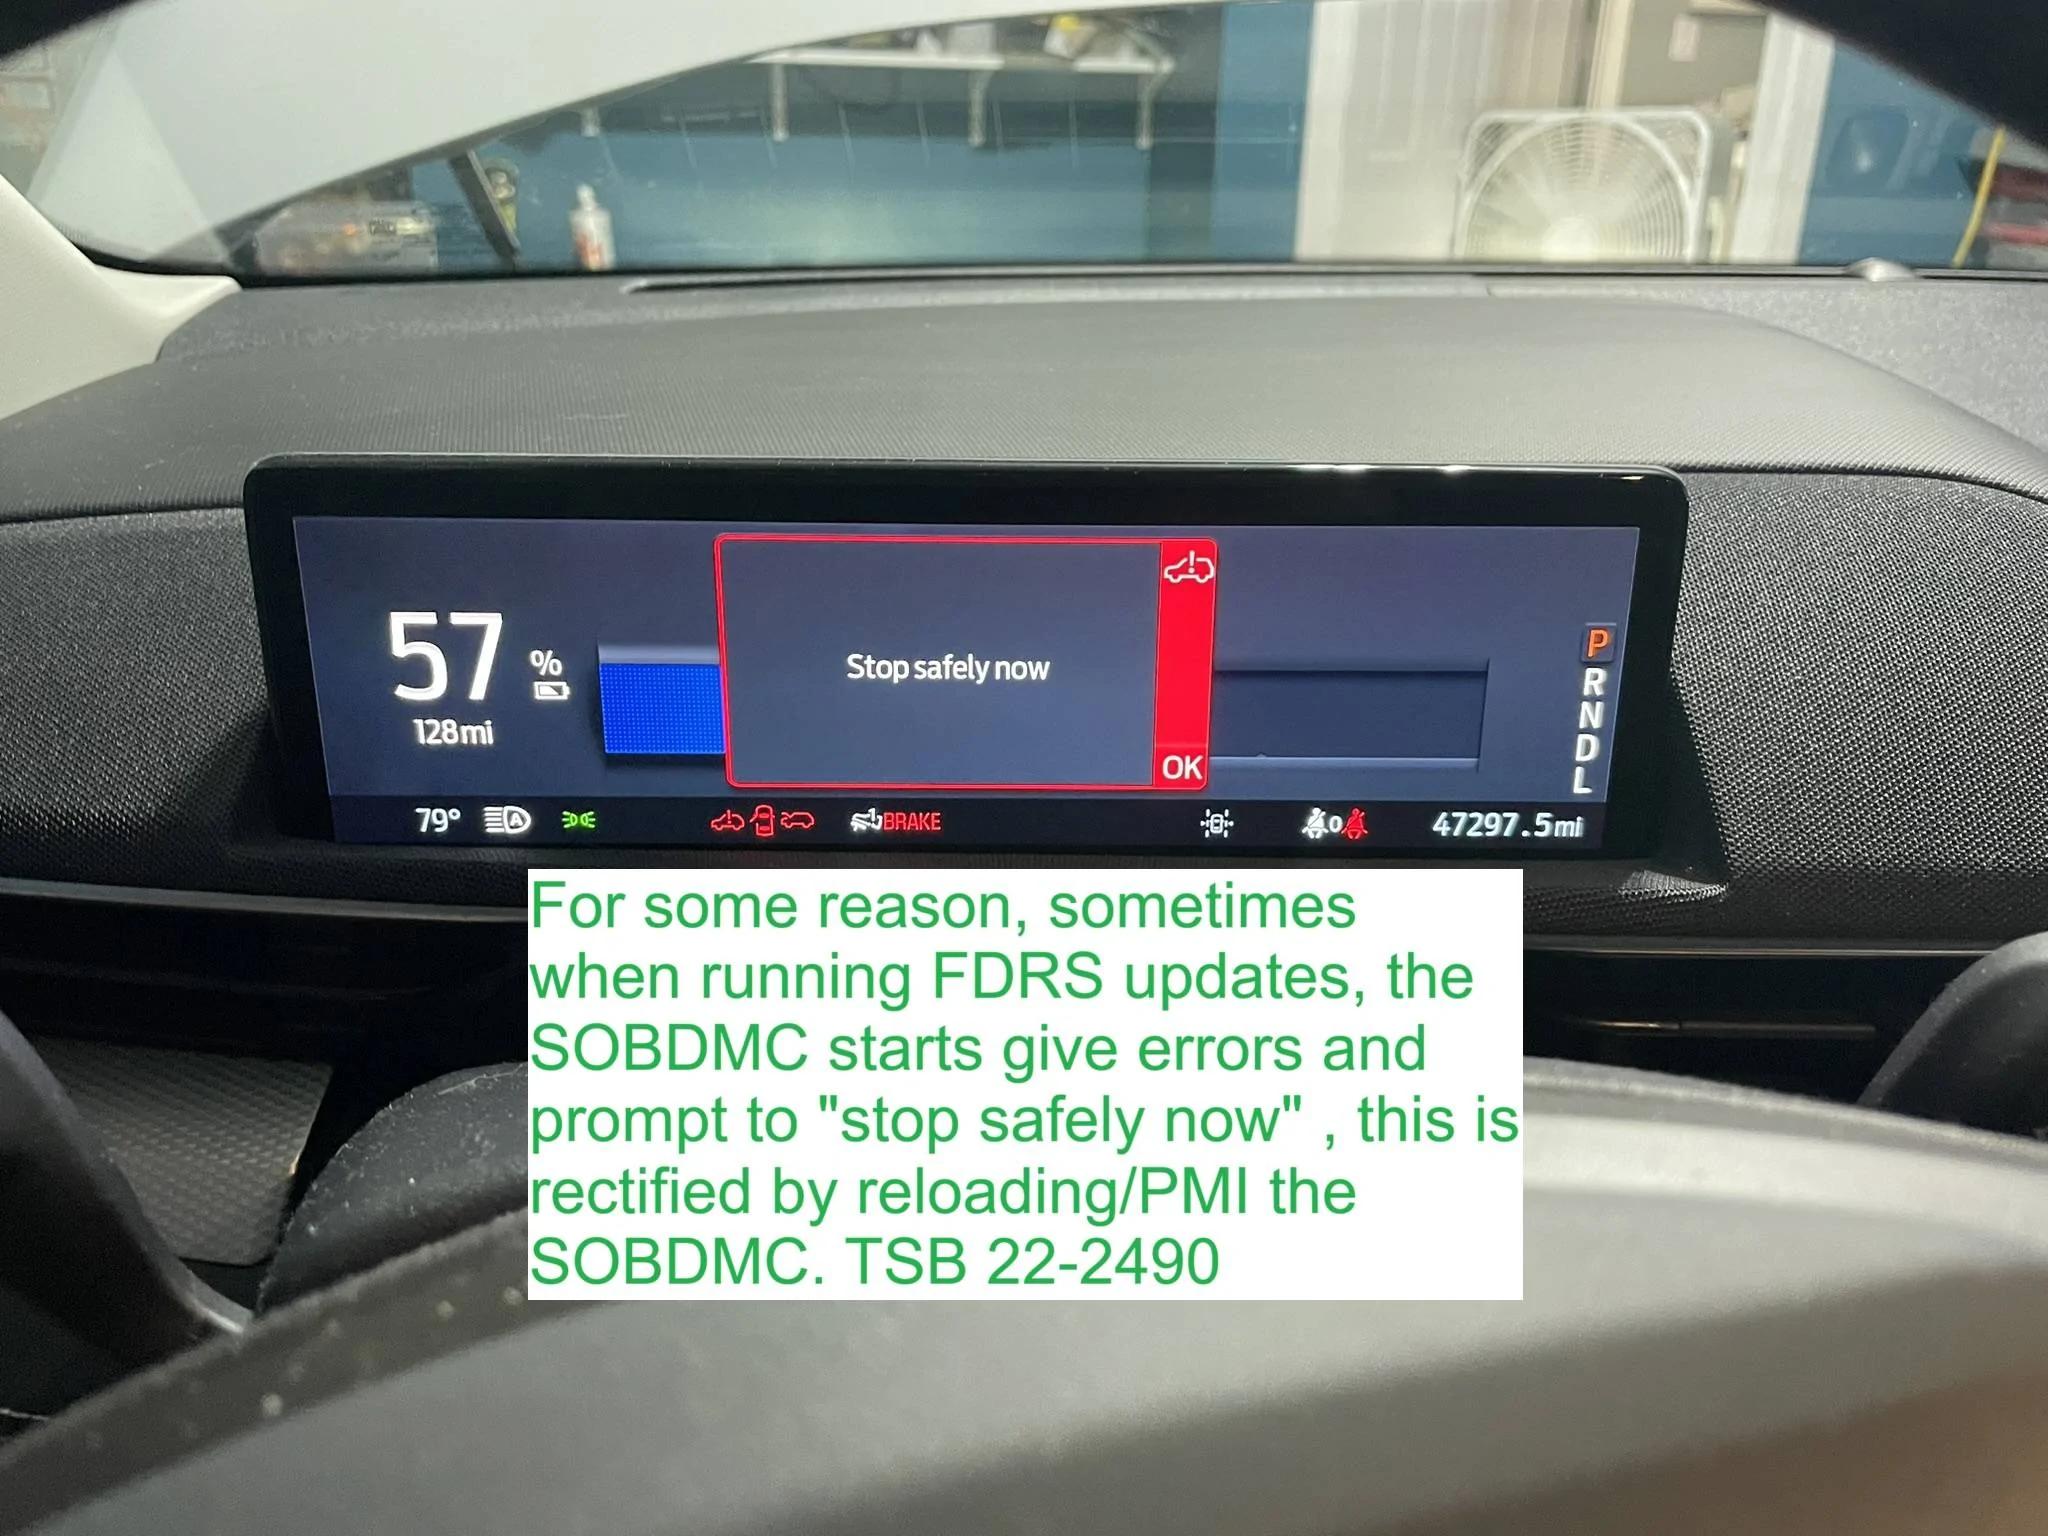
On a family trip to Florida, our 2021 Mach-E suddenly lost its audio and GPS functions. After consulting a forum, I tried disconnecting the battery—a quick fix that temporarily restored the radio and GPS. Using a ¼” socket set from Harbor Freight, I performed this reset. Initially, this solution worked well, but the problem recurred several times. Frustrated, I purchased an FDRS subscription and planned to reload the ACM software. Unfortunately, the ACM stayed offline. Ford suggested that replacing the ACM would require removing the entire dashboard, including draining the coolant and recovering the refrigerant. Having previously removed a dashboard on a late-model Fusion but lacking the tools to bleed the HV battery, I was hesitant. With 45,000 miles on the car and no longer under bumper-to-bumper warranty, the repair cost was estimated at $2,000-$3,000. Despite being able to afford it, I lacked trust in my local dealership due to prior botched repairs.


Diagnosis
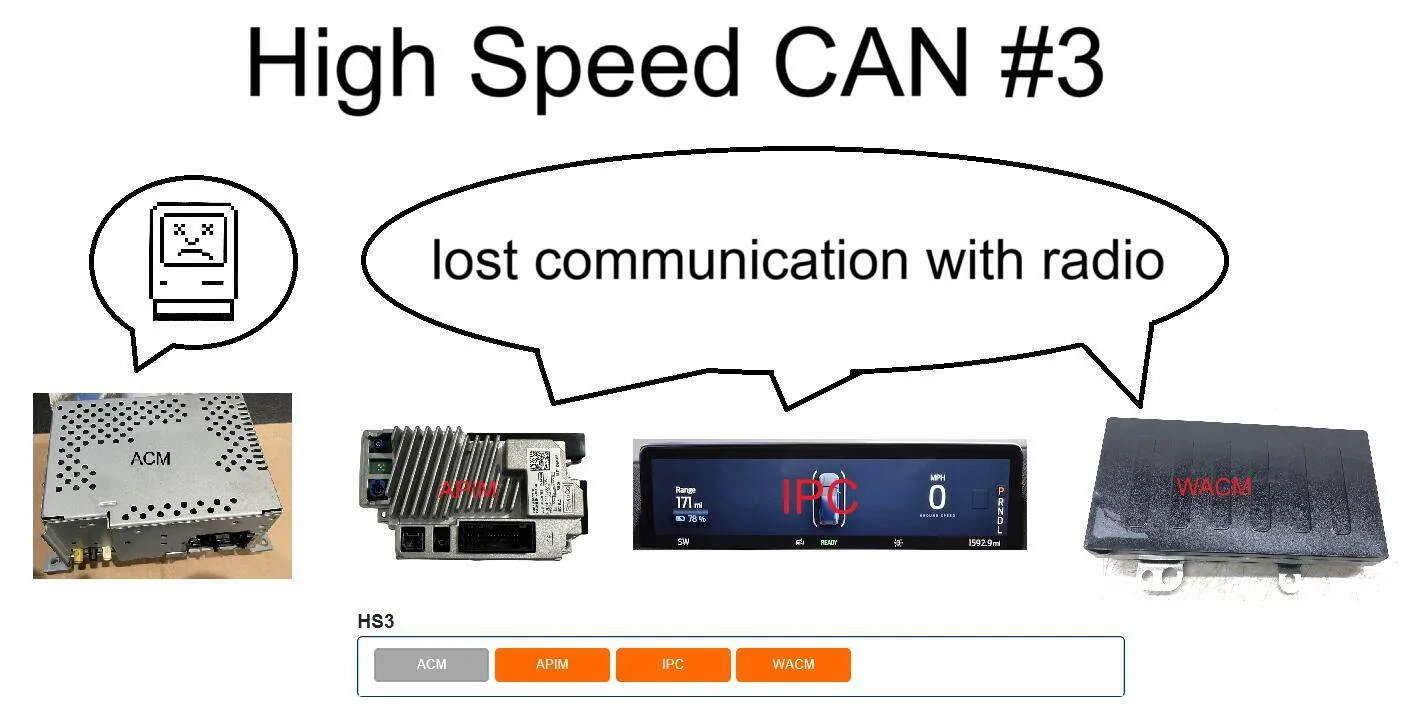
The diagnosis was straightforward. I used FDRS to check communication errors and found that each module sharing the HS3 bus with the ACM could not connect with the radio. After verifying power supply and wiring integrity with a voltmeter, I concluded that the ACM was indeed non-functional. This left me with two choices: drive to a reputable dealership in Dallas or Houston, or source the part myself and hope for a simpler fix. (Crazy 3rd choice: create an extension harness set and relocate the new unit to where the DSP would be since my car is 6 channel model.)

Sourcing a Part
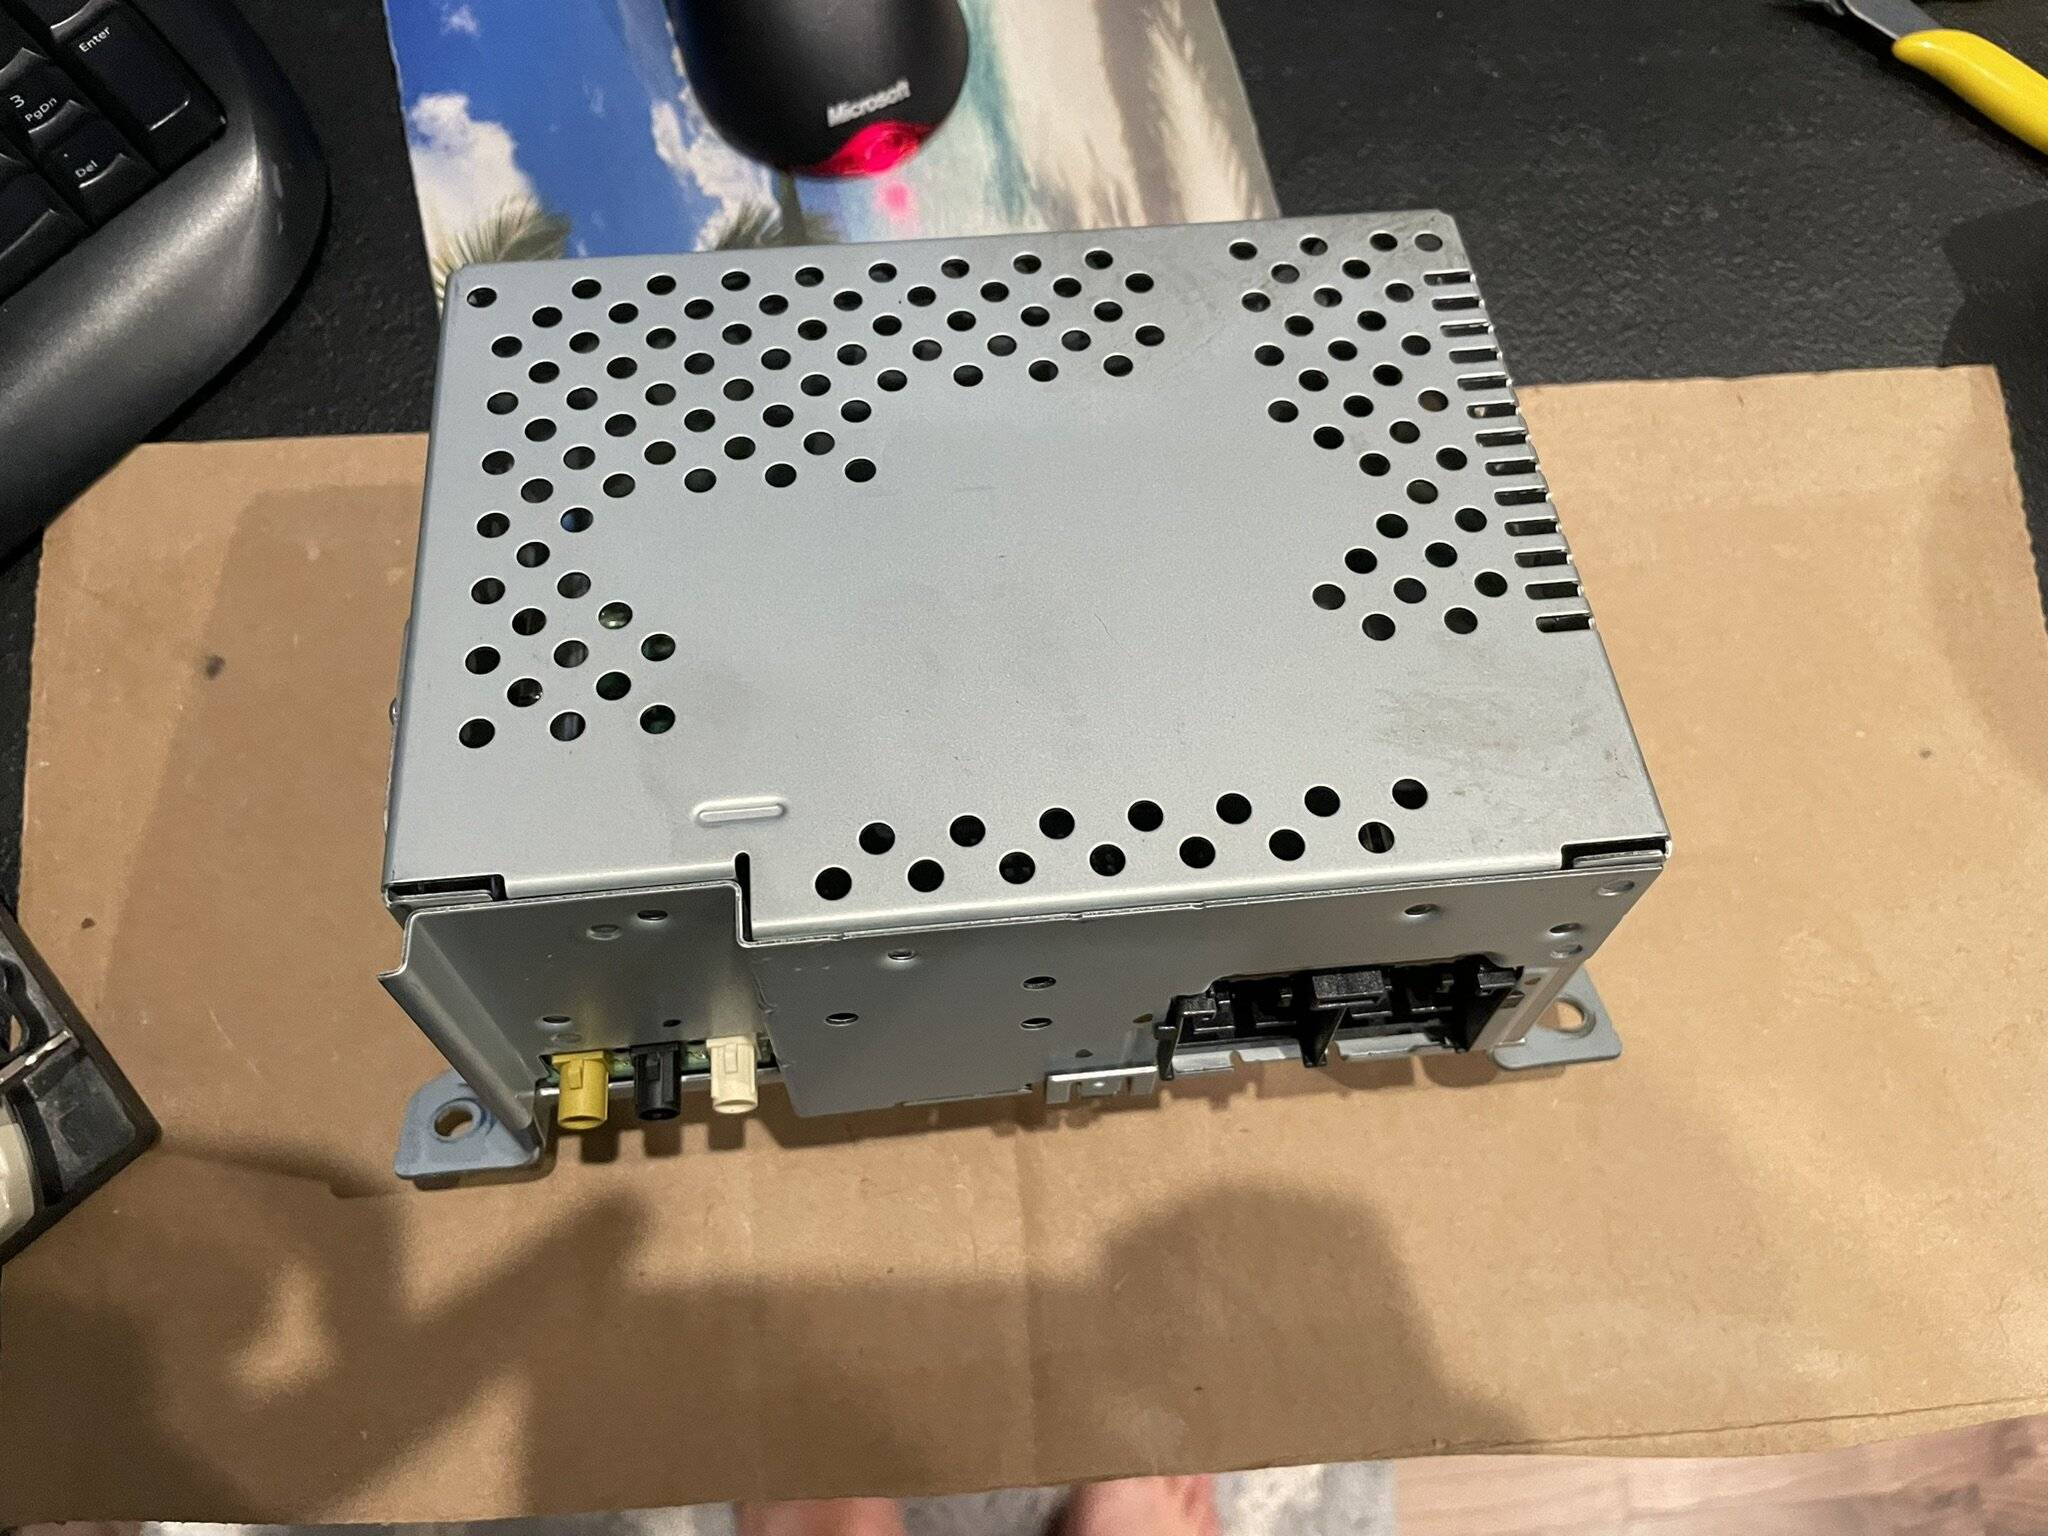
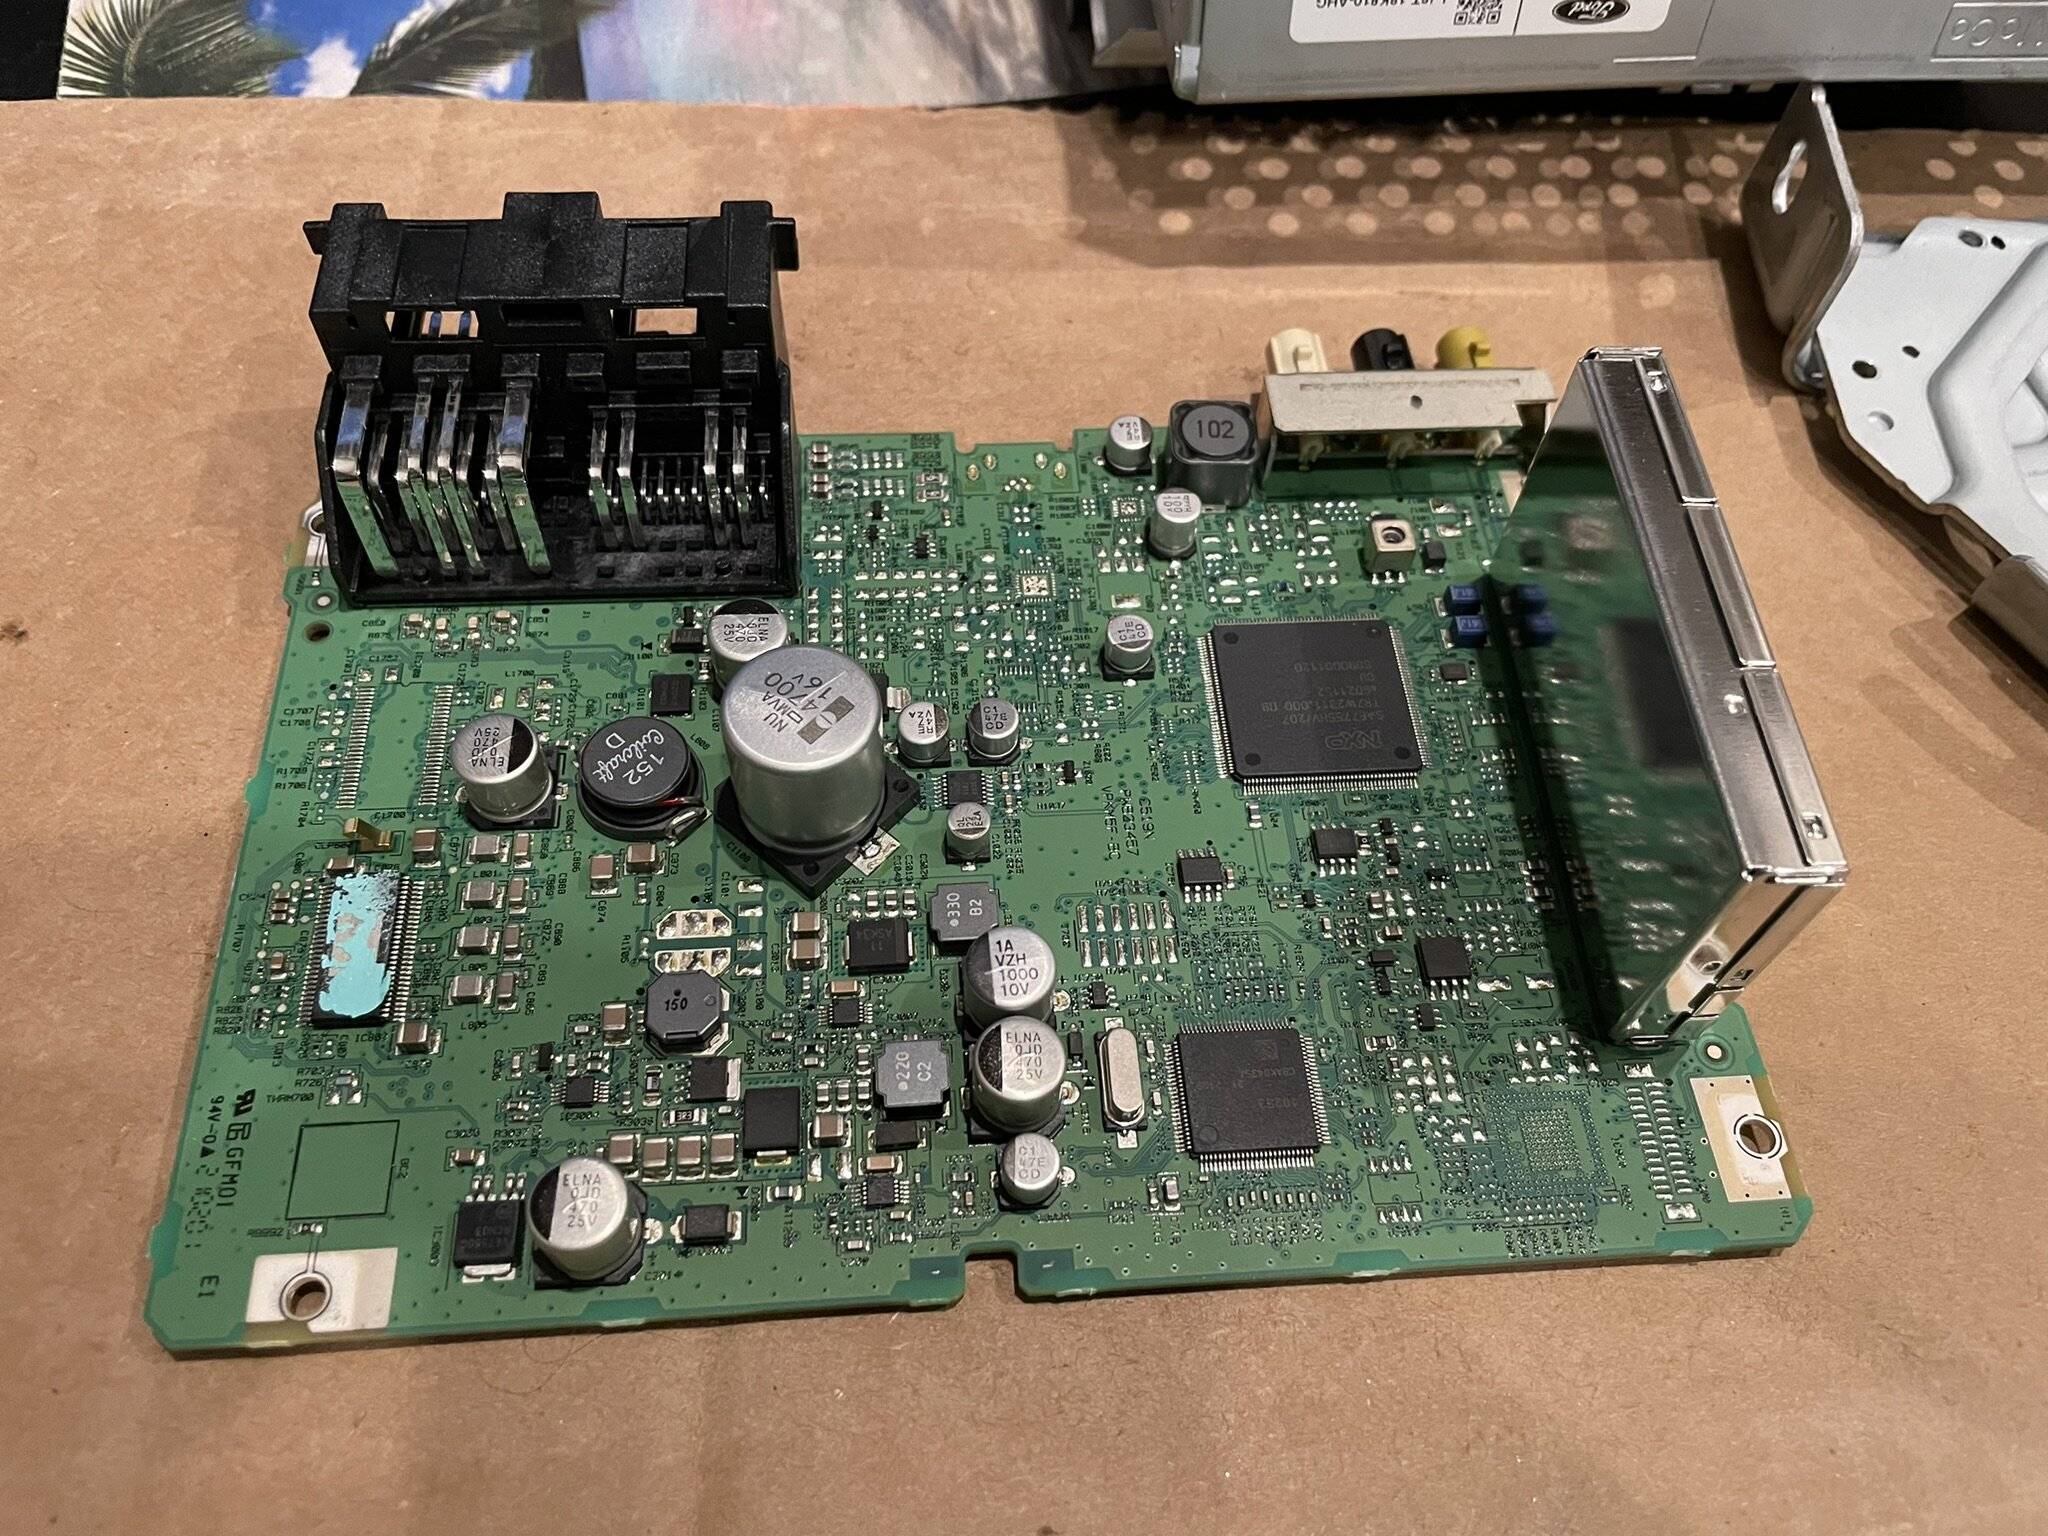
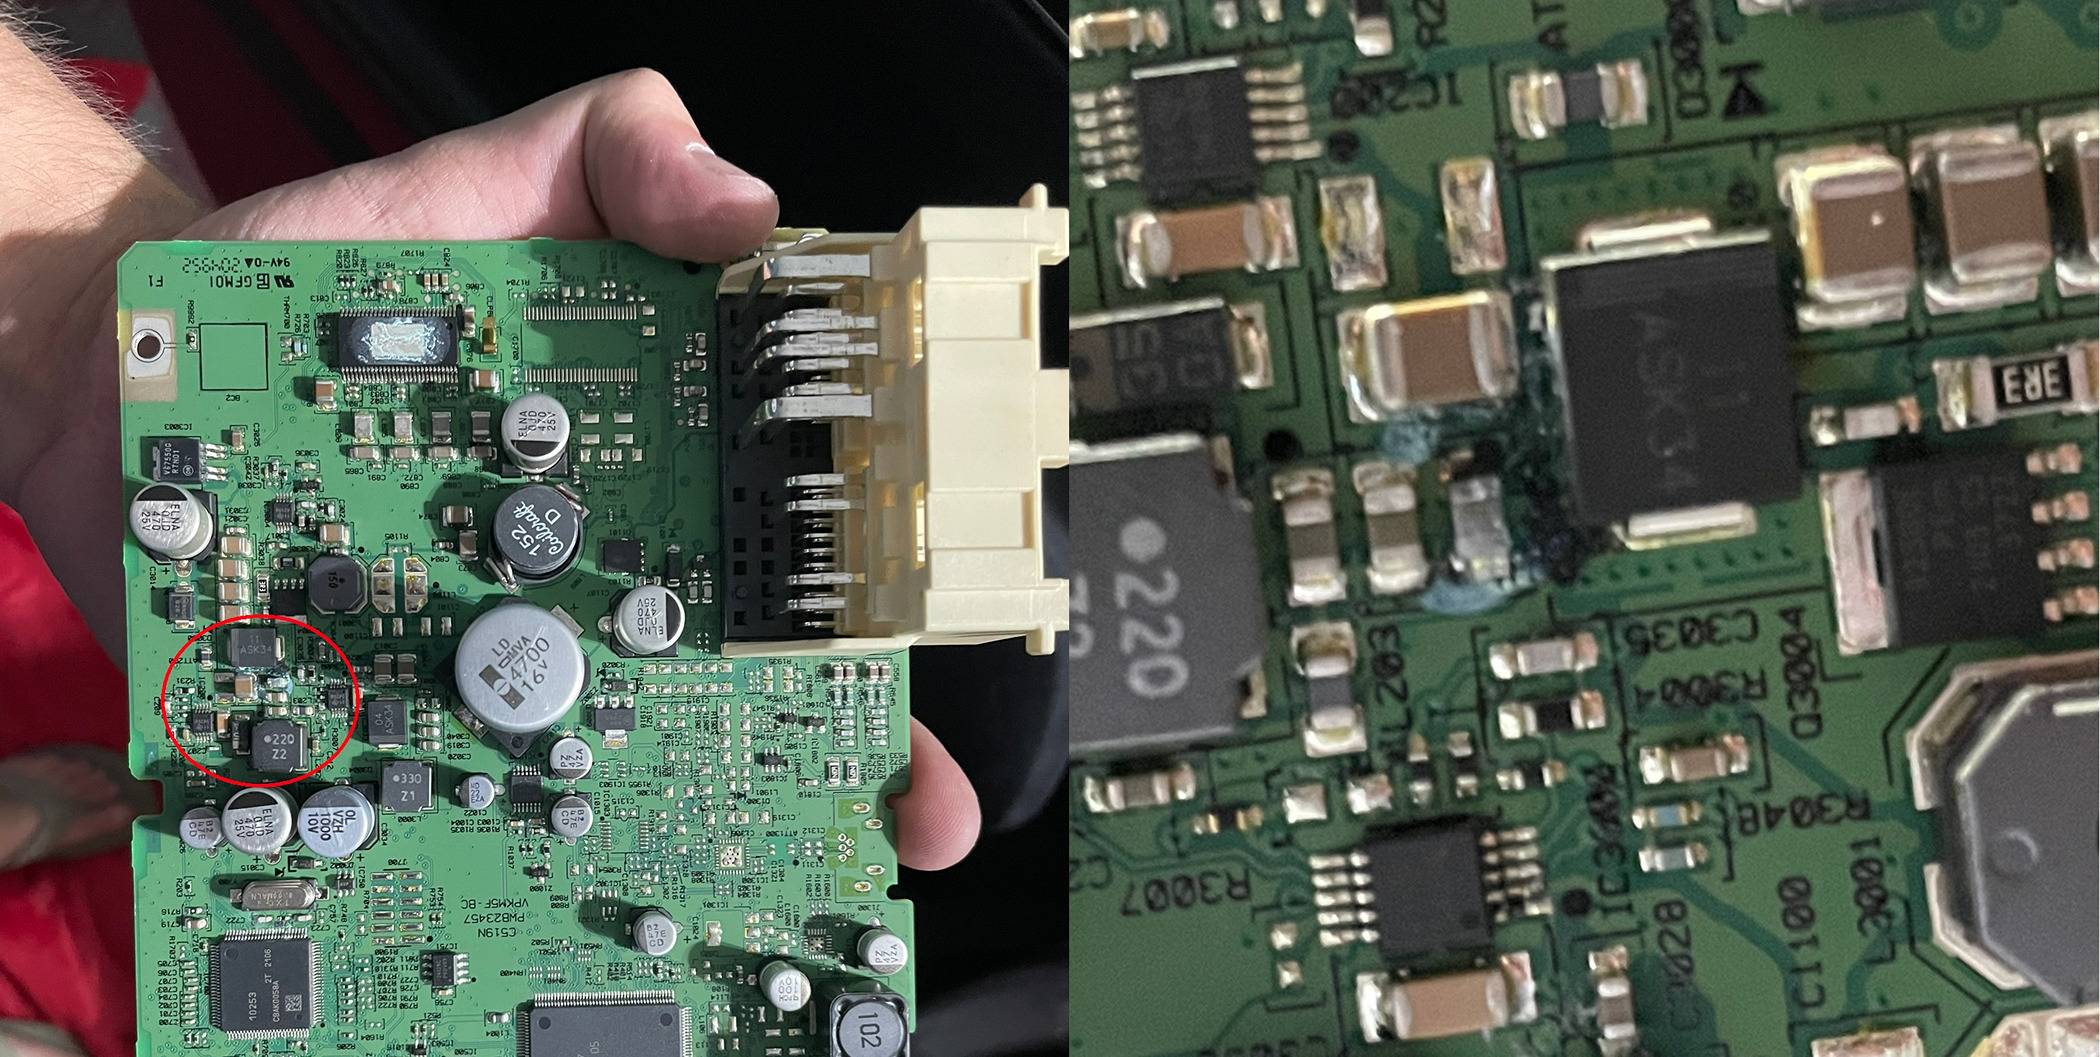
Locating the part proved challenging. The specific ACM model (LJ8T-18K810-AHG / LJ8T-18K810-AHL) was not listed as available from Ford, so I turned to eBay, securing one from a slightly newer Job 2 2021 model. I considered a 2023 part (LJ8T-18D890-AHC), but uncertain if FDRS would program it, I opted for caution. The part arrived covered in oil, which led me to carefully clean it with plastic-safe electronics cleaner. Upon inspection, the board was noticeably smaller than its housing, suggesting the design was carried over from models previously equipped with a CD player.

Confirming the Diagnosis
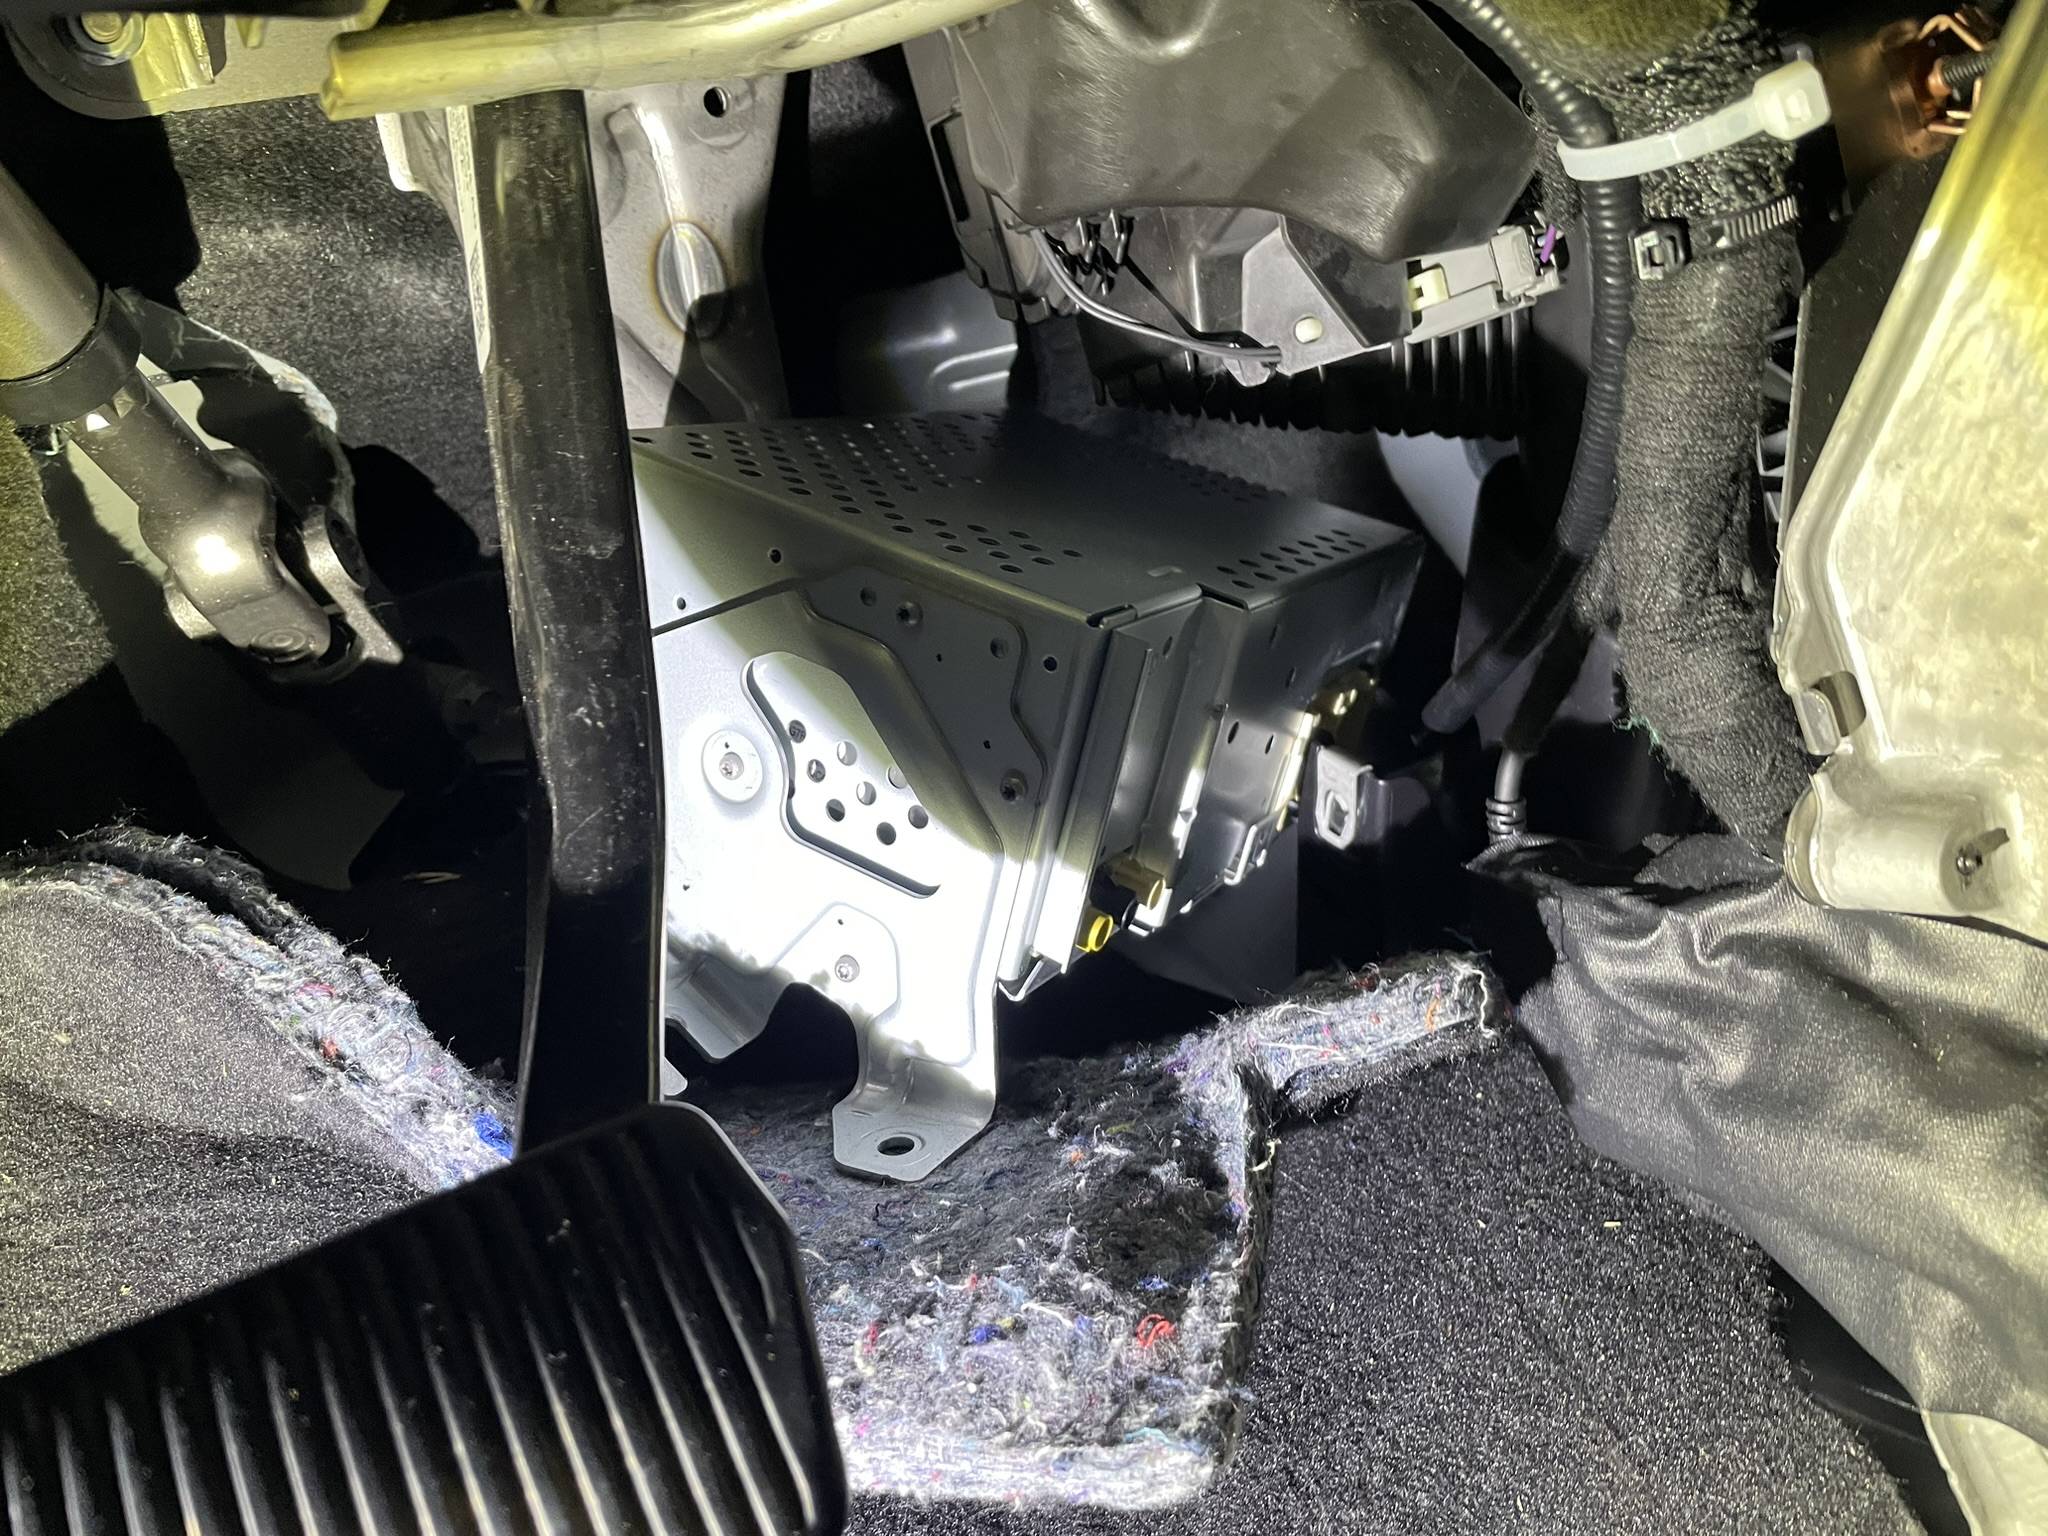
Upon receiving the replacement ACM, I discovered there was sufficient slack in the connectors to temporarily install it for testing. Remarkably, as soon as it was connected, both audio and GPS functionalities were restored, even before performing the PMI (Programmable Module Installation). Encouraged by this immediate success, I proceeded with the PMI, which fully integrated the new module into the system. The final challenge was to securely mount the ACM in its designated spot without removing the dashboard.
Swapping the Part
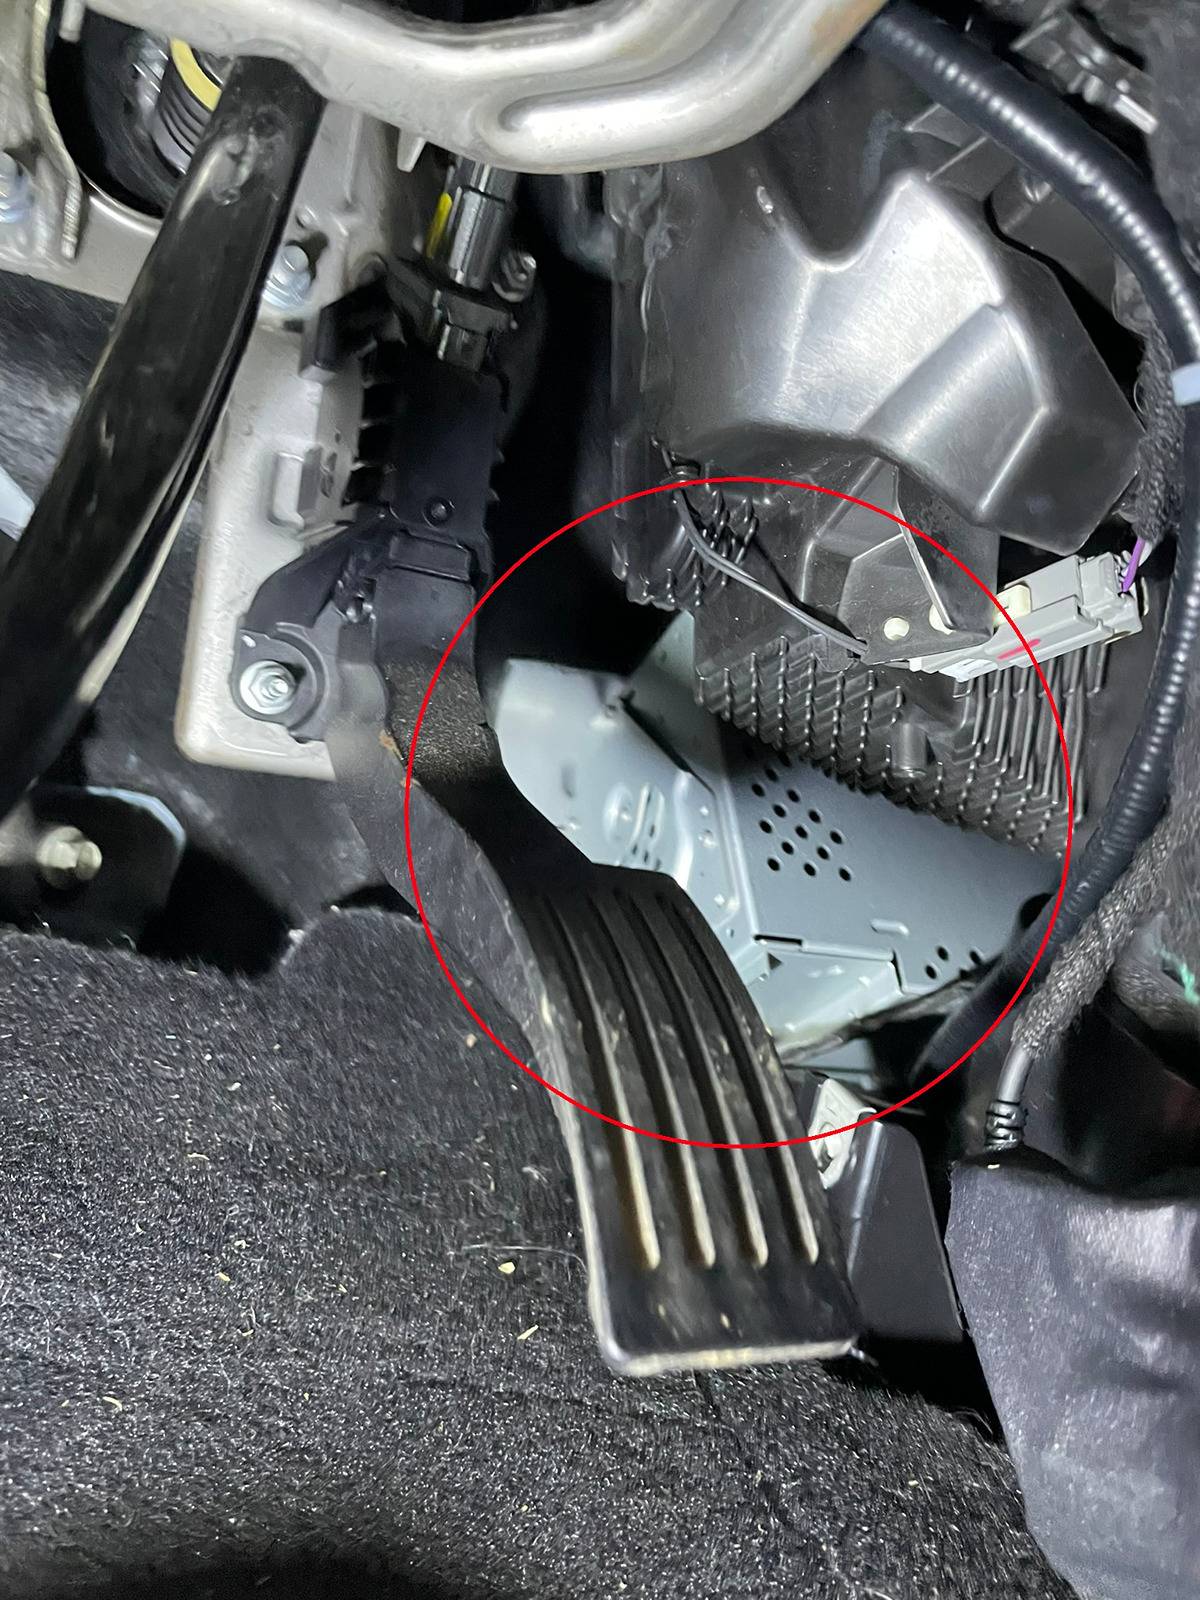
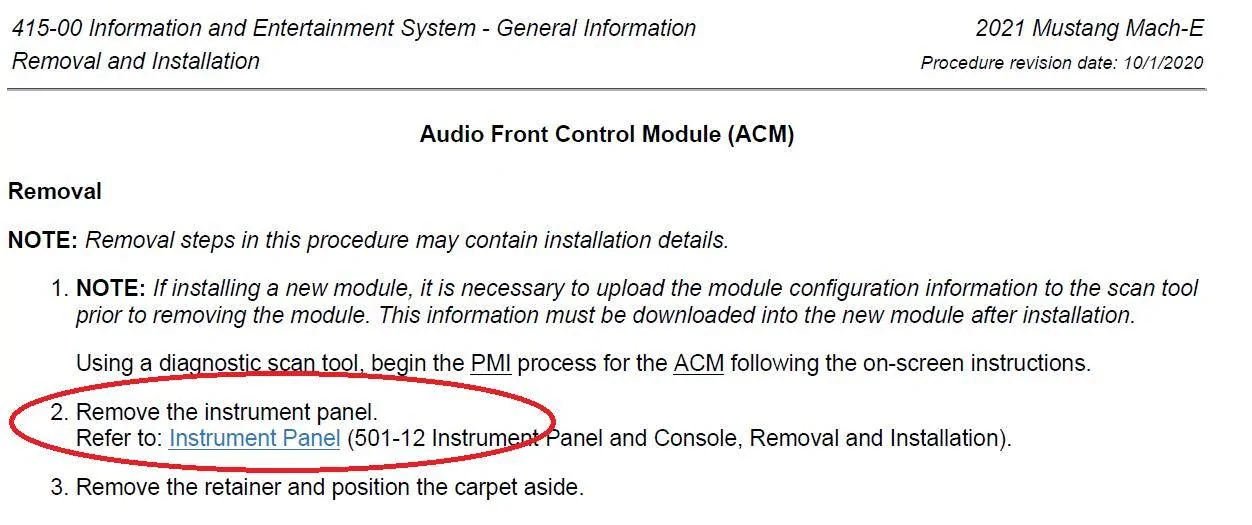
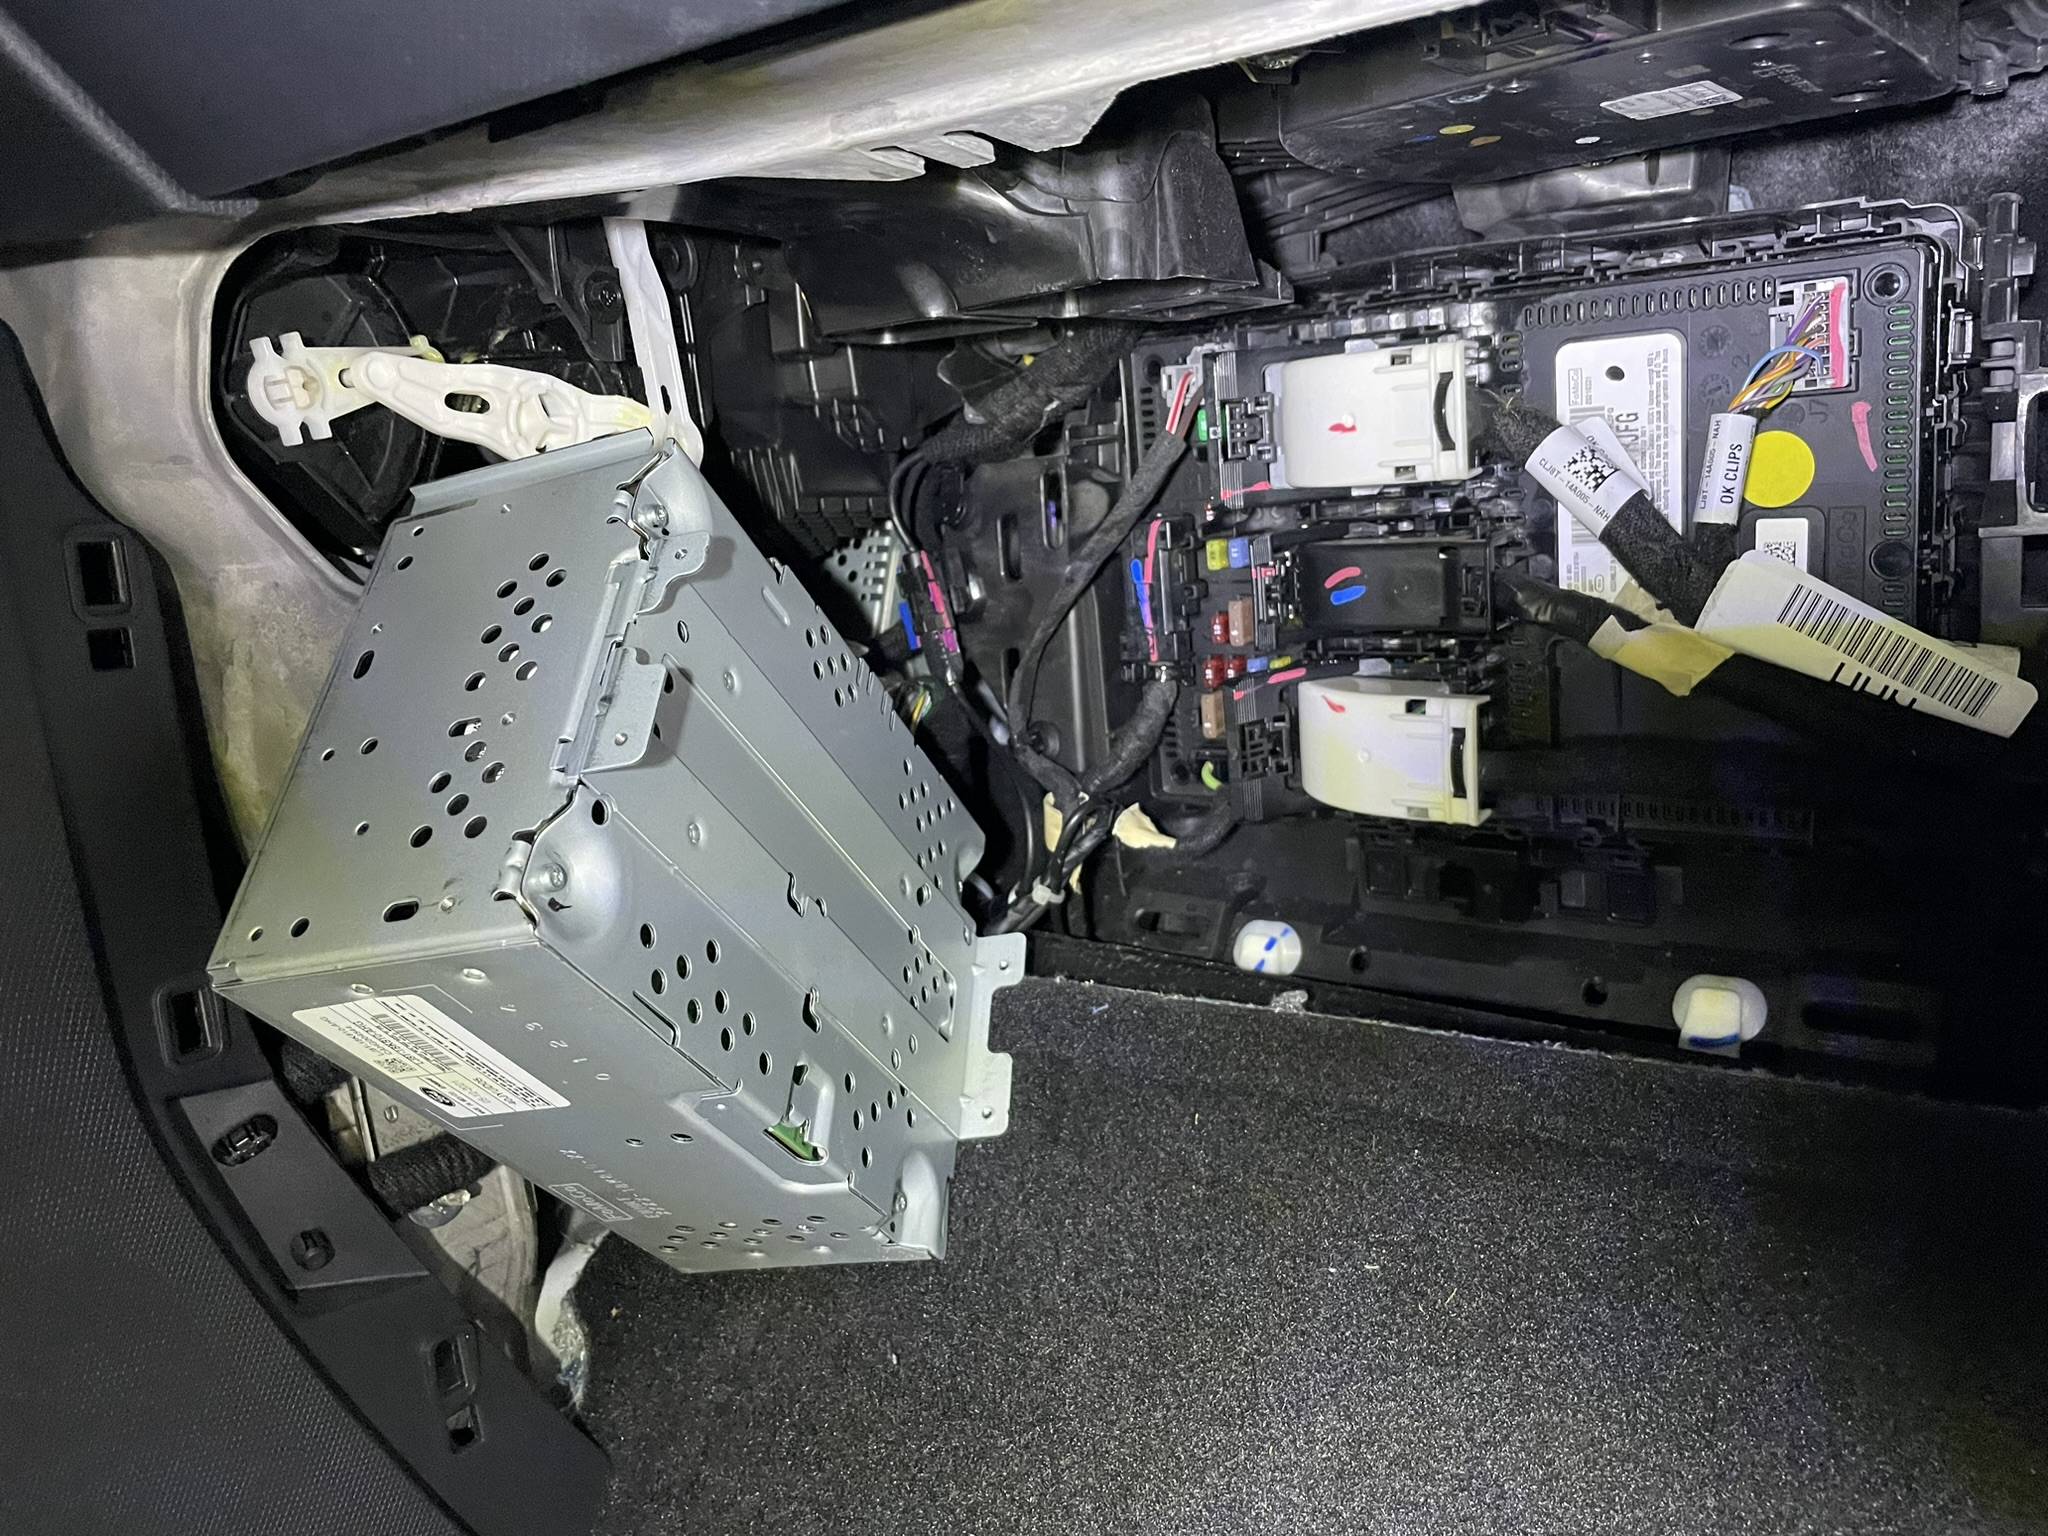
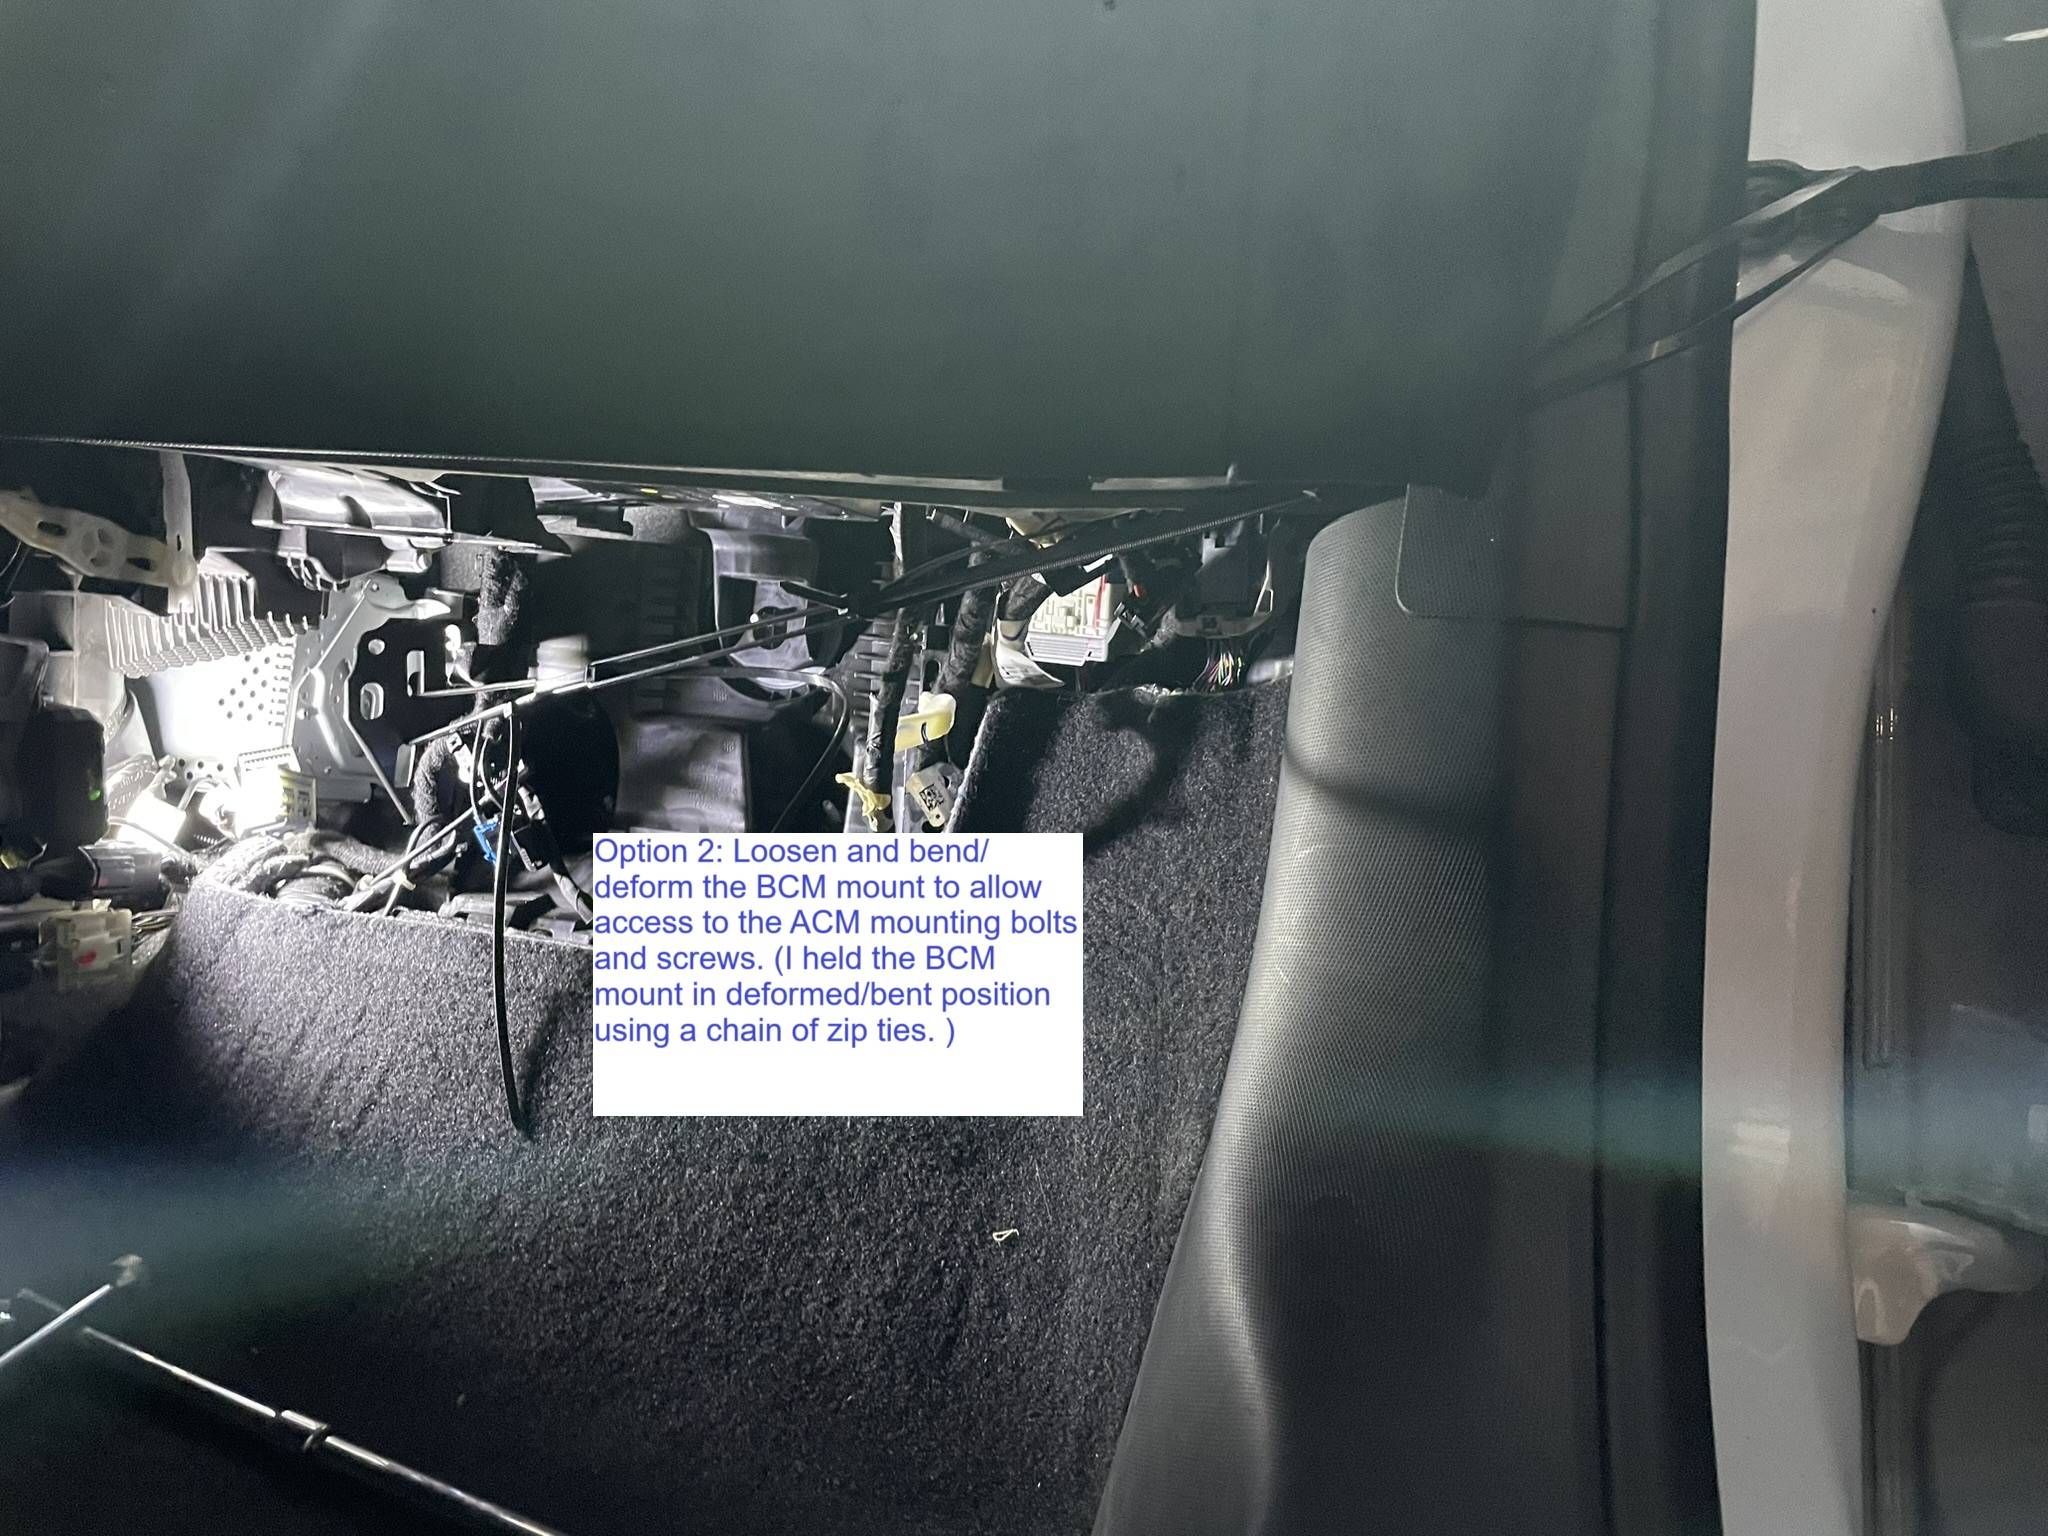
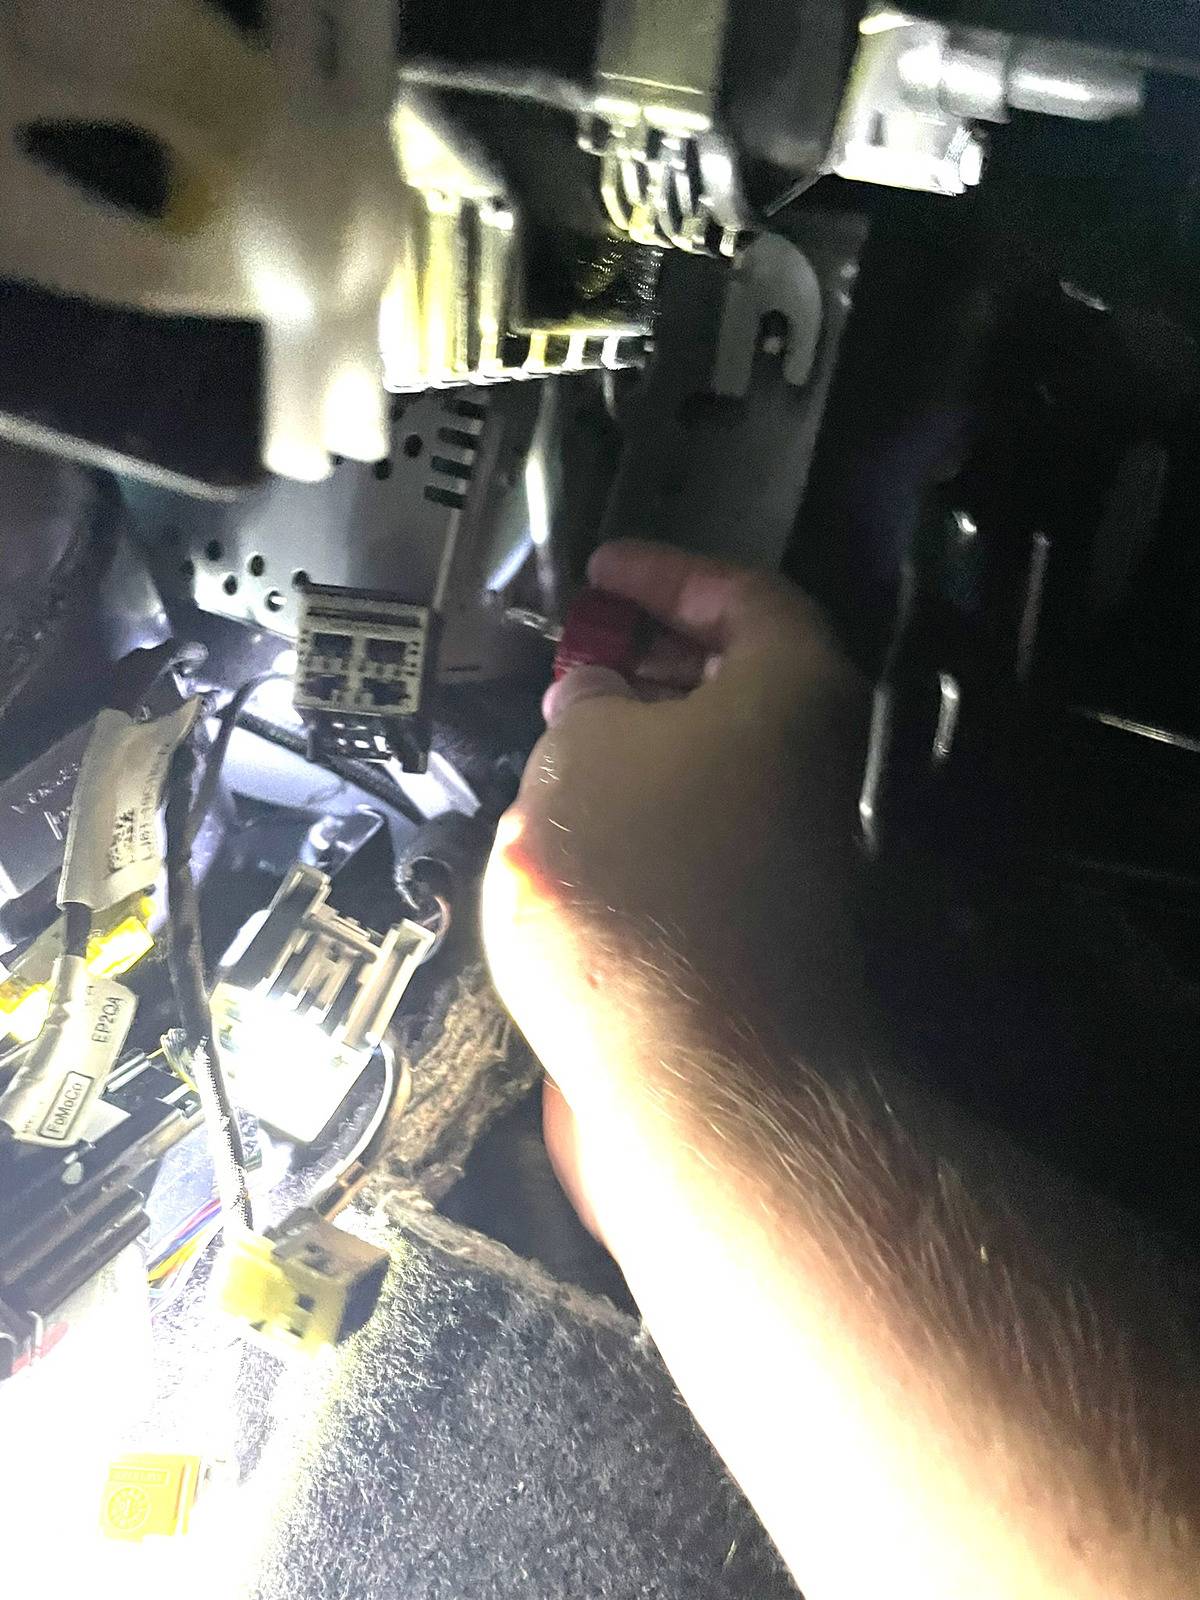
Contrary to Ford's official stance that the dashboard must be removed to replace the ACM, I discovered a workaround that allowed for a less invasive approach. My initial step involved removing the side panels to better explore and assess the installation space. It appeared feasible to slide out the ACM if the brackets could be detached while the module remained in the car. I initially hoped that the BCM (Body Control Module) bracket could be easily removed. However, a structural "dog ear" mount from the EVAP casing presented an obstacle. Considering the option to cut and later repair this mount was preferable to the more daunting task of draining the coolant and refrigerant.
After further exploration, I devised a strategy that avoided altering the "dog ear" mount. By removing the accelerator pedal and cleverly manipulating the passenger-side bracket, I created enough clearance. I then loosened and temporarily bent part of the BCM mount using a chain of zip ties, which provided the necessary space. With this setup, I was able to contort my wrist enough to loosen the T10 screws with a thumb screwdriver. Ultimately, I only needed to remove the passenger bracket, and I managed to extract the entire unit through the driver’s side footwell, leaving the driver-side bracket installed.
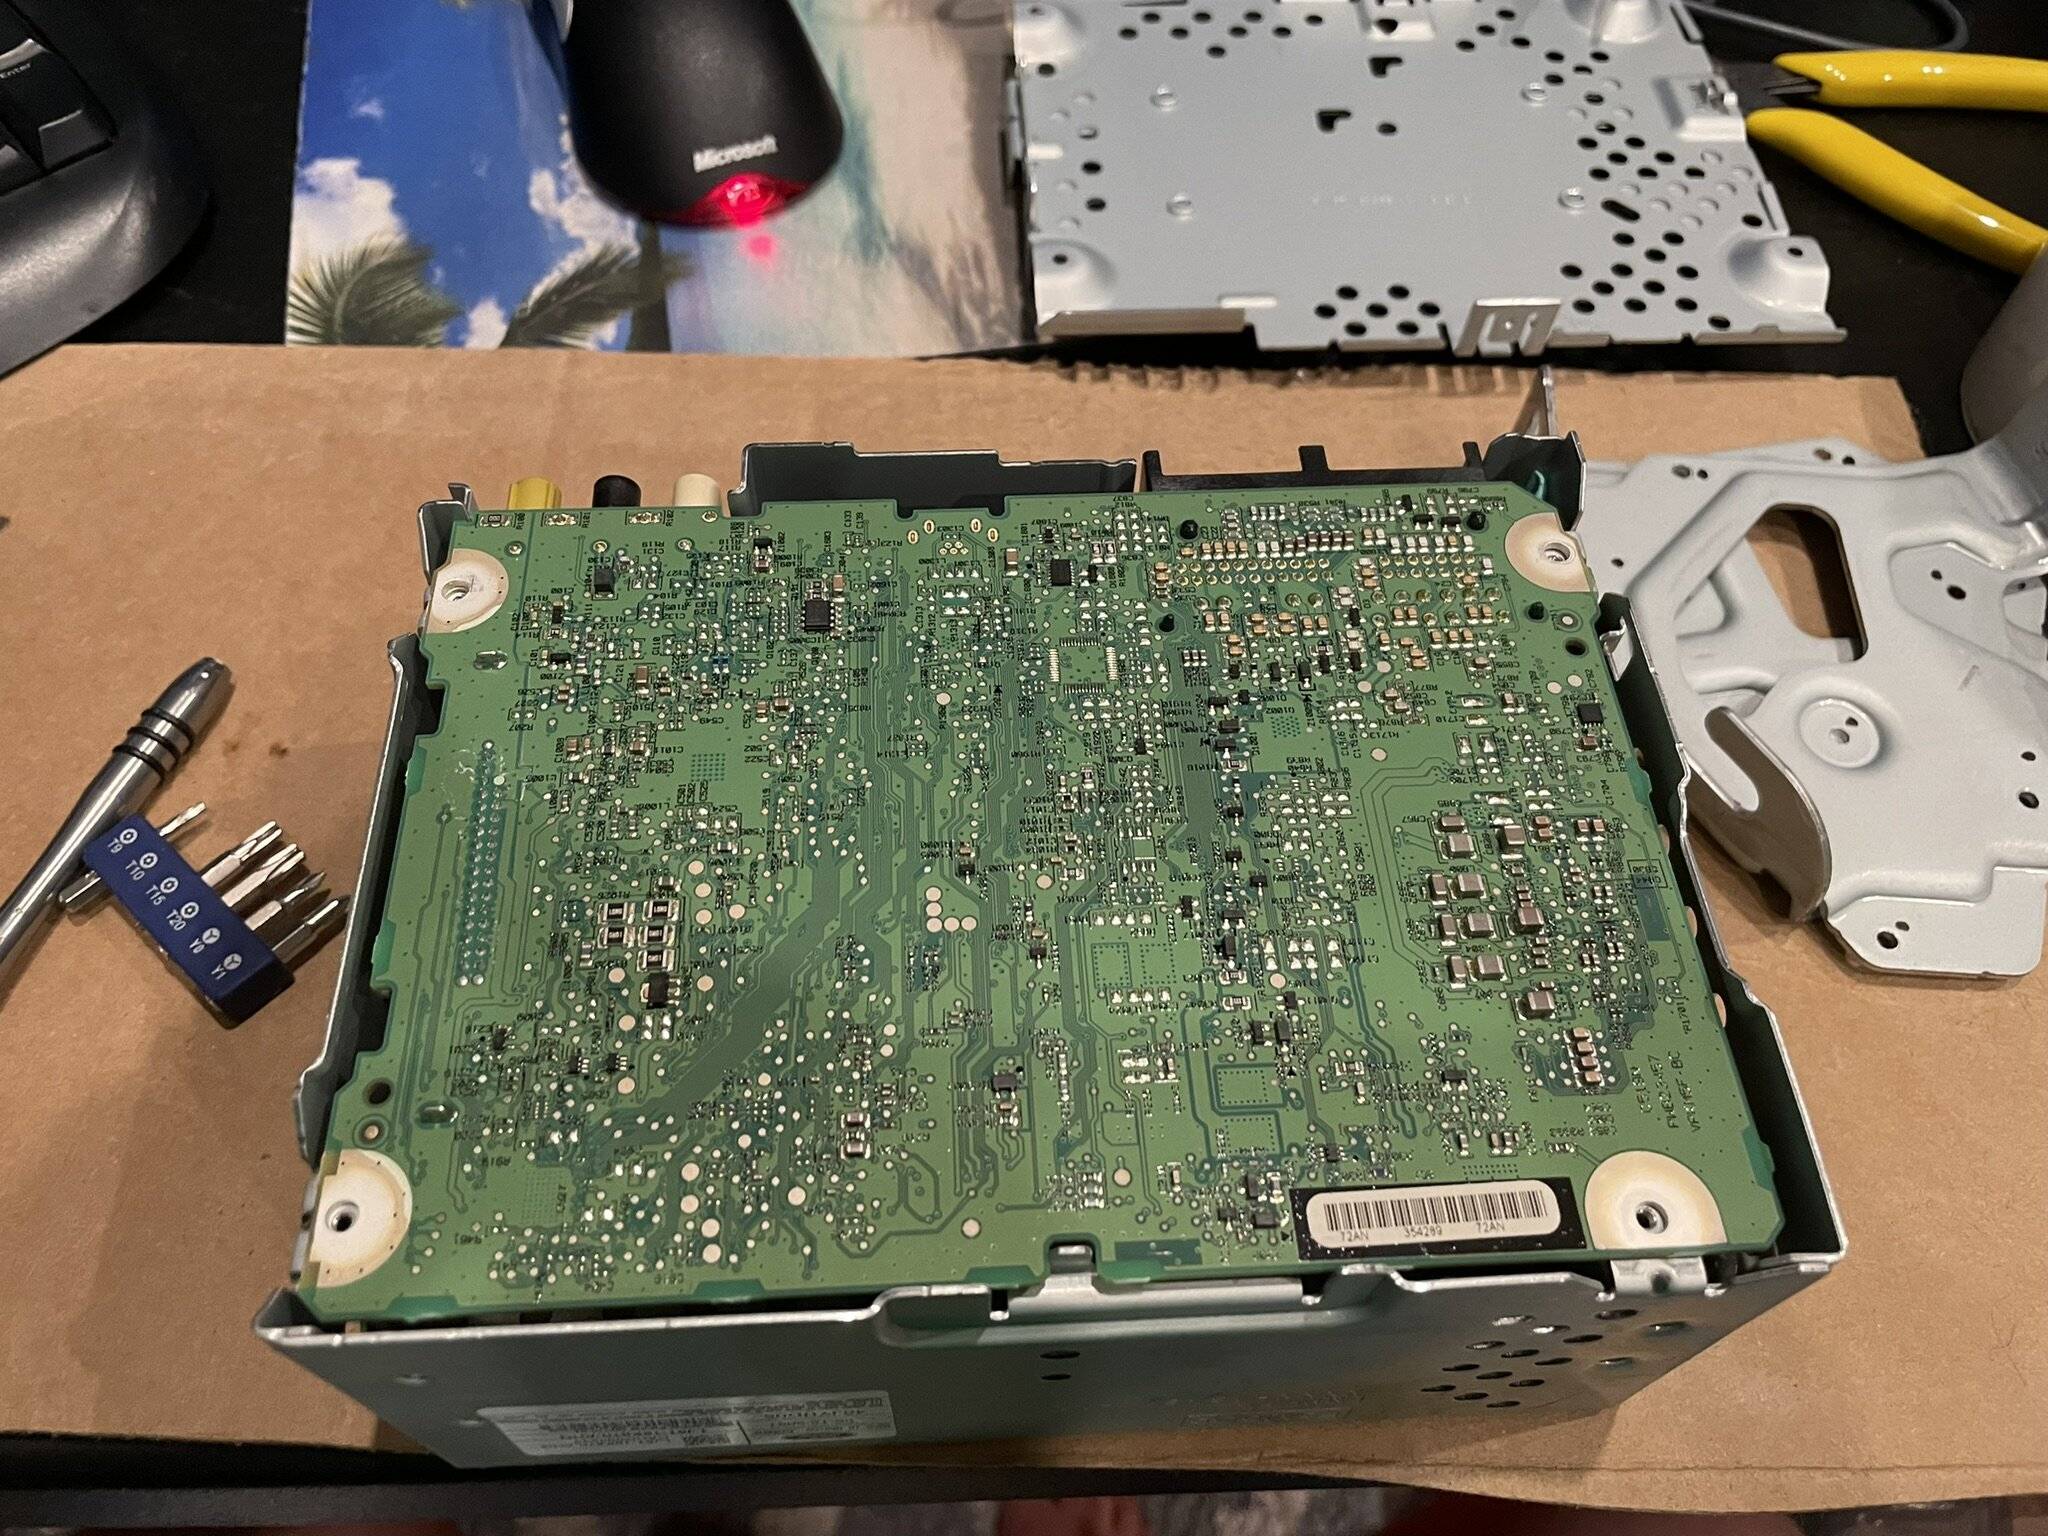
The Old Unit
What could have caused the original ACM to fail? Often, electronic failures leave no visible clues, with issues typically arising from internal chip defects. However, upon inspection of the old unit, I discovered signs of corrosion and a burn mark, indicating more tangible damage. Reflecting on this experience, if I were to replace another ACM, I would apply a conformal coating to the replacement board to safeguard it against moisture. Ideally, such protective measures should be a standard practice straight from the factory.

TLDR
In summary, replacing the ACM can be done without removing the dashboard. Simply remove the footwell panels and the accelerator pedal, temporarily bend the BCM mount using zip ties, and unscrew the passenger-side ACM bracket. This approach allows for the removal and replacement of the ACM with minimal disruption. I hope this article helps you in your future endeavors.
On a family trip to Florida, our 2021 Mach-E suddenly lost its audio and GPS functions. After consulting a forum, I tried disconnecting the battery—a quick fix that temporarily restored the radio and GPS. Using a ¼” socket set from Harbor Freight, I performed this reset. Initially, this solution worked well, but the problem recurred several times. Frustrated, I purchased an FDRS subscription and planned to reload the ACM software. Unfortunately, the ACM stayed offline. Ford suggested that replacing the ACM would require removing the entire dashboard, including draining the coolant and recovering the refrigerant. Having previously removed a dashboard on a late-model Fusion but lacking the tools to bleed the HV battery, I was hesitant. With 45,000 miles on the car and no longer under bumper-to-bumper warranty, the repair cost was estimated at $2,000-$3,000. Despite being able to afford it, I lacked trust in my local dealership due to prior botched repairs.
Diagnosis
The diagnosis was straightforward. I used FDRS to check communication errors and found that each module sharing the HS3 bus with the ACM could not connect with the radio. After verifying power supply and wiring integrity with a voltmeter, I concluded that the ACM was indeed non-functional. This left me with two choices: drive to a reputable dealership in Dallas or Houston, or source the part myself and hope for a simpler fix. (Crazy 3rd choice: create an extension harness set and relocate the new unit to where the DSP would be since my car is 6 channel model.)
Sourcing a Part
Locating the part proved challenging. The specific ACM model (LJ8T-18K810-AHG / LJ8T-18K810-AHL) was not listed as available from Ford, so I turned to eBay, securing one from a slightly newer Job 2 2021 model. I considered a 2023 part (LJ8T-18D890-AHC), but uncertain if FDRS would program it, I opted for caution. The part arrived covered in oil, which led me to carefully clean it with plastic-safe electronics cleaner. Upon inspection, the board was noticeably smaller than its housing, suggesting the design was carried over from models previously equipped with a CD player.
Confirming the Diagnosis
Upon receiving the replacement ACM, I discovered there was sufficient slack in the connectors to temporarily install it for testing. Remarkably, as soon as it was connected, both audio and GPS functionalities were restored, even before performing the PMI (Programmable Module Installation). Encouraged by this immediate success, I proceeded with the PMI, which fully integrated the new module into the system. The final challenge was to securely mount the ACM in its designated spot without removing the dashboard.
Swapping the Part
Contrary to Ford's official stance that the dashboard must be removed to replace the ACM, I discovered a workaround that allowed for a less invasive approach. My initial step involved removing the side panels to better explore and assess the installation space. It appeared feasible to slide out the ACM if the brackets could be detached while the module remained in the car. I initially hoped that the BCM (Body Control Module) bracket could be easily removed. However, a structural "dog ear" mount from the EVAP casing presented an obstacle. Considering the option to cut and later repair this mount was preferable to the more daunting task of draining the coolant and refrigerant.

After further exploration, I devised a strategy that avoided altering the "dog ear" mount. By removing the accelerator pedal and cleverly manipulating the passenger-side bracket, I created enough clearance. I then loosened and temporarily bent part of the BCM mount using a chain of zip ties, which provided the necessary space. With this setup, I was able to contort my wrist enough to loosen the T10 screws with a thumb screwdriver. Ultimately, I only needed to remove the passenger bracket, and I managed to extract the entire unit through the driver’s side footwell, leaving the driver-side bracket installed.
The Old Unit
What could have caused the original ACM to fail? Often, electronic failures leave no visible clues, with issues typically arising from internal chip defects. However, upon inspection of the old unit, I discovered signs of corrosion and a burn mark, indicating more tangible damage. Reflecting on this experience, if I were to replace another ACM, I would apply a conformal coating to the replacement board to safeguard it against moisture. Ideally, such protective measures should be a standard practice straight from the factory.
TLDR
In summary, replacing the ACM can be done without removing the dashboard. Simply remove the footwell panels and the accelerator pedal, temporarily bend the BCM mount using zip ties, and unscrew the passenger-side ACM bracket. This approach allows for the removal and replacement of the ACM with minimal disruption. I hope this article helps you in your future endeavors.
Sponsored
Last edited:
")